Car V6 gasoline engine Ford Scorpio 1

View of the engine bay of a V6 engine
Engine bay with 2.8L V6 engine 1 – Battery, 2 – Strut, 3 – Air filter, 4 – Air flow meter, 5 – Headlights, 6 – Adjustment plate, 7 – Additional headlight cover, 8 –...
Engine bay with 2.8L V6 engine 1 – Battery, 2 – Strut, 3 – Air filter, 4 – Air flow meter, 5 – Headlights, 6 – Adjustment plate, 7 – Additional headlight cover, 8 –...

Technical characteristics of V6 engines
V6 engine with overhead valves and an overhead camshaft in the engine block, which is driven via a helical gear from the crankshaft (V6 2.8 dm³ engine) or a chain (V6...
V6 engine with overhead valves and an overhead camshaft in the engine block, which is driven via a helical gear from the crankshaft (V6 2.8 dm³ engine) or a chain (V6...
Repairs that do not require engine removal
The following operations can be performed on the engine installed in the vehicle: removal and installation of cylinder heads; removal and installation of oil pan and...
The following operations can be performed on the engine installed in the vehicle: removal and installation of cylinder heads; removal and installation of oil pan and...
Removal the engine
The engine is removed without the gearbox upwards from the engine compartment using a lifting mechanism. It is also possible to remove the engine together with the...
The engine is removed without the gearbox upwards from the engine compartment using a lifting mechanism. It is also possible to remove the engine together with the...

Disassembling the engine
V6 Engine 1 – thermostat housing, 2 – thermostat, 3 – water pump, 4 – timing cover, 5 – bypass hose nipple, 6 – intake manifold, 7 – camshaft thrust plate, 8 – camshaft...
V6 Engine 1 – thermostat housing, 2 – thermostat, 3 – water pump, 4 – timing cover, 5 – bypass hose nipple, 6 – intake manifold, 7 – camshaft thrust plate, 8 – camshaft...
Checking the degree of wear of engine parts
After the engine has been disassembled and all parts have been cleaned of dirt and oil, they should be checked for signs of wear. In cases where there are no established...
After the engine has been disassembled and all parts have been cleaned of dirt and oil, they should be checked for signs of wear. In cases where there are no established...

Rocker arm axle assembly
Rocker arm axle assembly 1. Knock out the cylindrical locking pin (indicated by the arrow) from one side of the valve rocker arm shaft and remove the spring washer. 2....
Rocker arm axle assembly 1. Knock out the cylindrical locking pin (indicated by the arrow) from one side of the valve rocker arm shaft and remove the spring washer. 2....
Valve tappets and tappet rods
1. Check the valve lifters for wear or damage and replace them with new ones if necessary. 2. Check the push rods for warping or wear. Straighten or replace if necessary.
1. Check the valve lifters for wear or damage and replace them with new ones if necessary. 2. Check the push rods for warping or wear. Straighten or replace if necessary.
Camshaft — Checking for Wear
If the camshaft bearings are excessively worn, they must be replaced. Since special tools are required to install new bearings, this work must be performed at a...
If the camshaft bearings are excessively worn, they must be replaced. Since special tools are required to install new bearings, this work must be performed at a...

Cylinder heads
Inlet (top) and outlet valve kit Inlet (left) and outlet valve seals 1. Remove oil and dirt from cylinder heads. Remove carbon deposits from combustion chambers and...
Inlet (top) and outlet valve kit Inlet (left) and outlet valve seals 1. Remove oil and dirt from cylinder heads. Remove carbon deposits from combustion chambers and...
Cylinders — Checking for wear
Theoretically, a new cylinder is perfectly round. The piston's work causes wear on the walls at right angles to the piston pins due to lateral load. This wear occurs...
Theoretically, a new cylinder is perfectly round. The piston's work causes wear on the walls at right angles to the piston pins due to lateral load. This wear occurs...

Checking and restoring pistons and piston rings
Piston and ring wear can usually be detected by signs of increased oil consumption and low compression, sometimes associated with cylinder wear. Another sign of piston...
Piston and ring wear can usually be detected by signs of increased oil consumption and low compression, sometimes associated with cylinder wear. Another sign of piston...
Piston pins and connecting rods — inspection
The piston pins are installed into the heated connecting rods. Typically, piston pins are replaced when pistons are replaced. The connecting rods are not subject to wear...
The piston pins are installed into the heated connecting rods. Typically, piston pins are replaced when pistons are replaced. The connecting rods are not subject to wear...
Crankshaft — Check
1. Inspect the main and connecting rod journals for signs of wear, nicks or scratches. Check them for out-of-roundness using a micrometer. Out-of-roundness exceeding...
1. Inspect the main and connecting rod journals for signs of wear, nicks or scratches. Check them for out-of-roundness using a micrometer. Out-of-roundness exceeding...

Main and connecting rod bearings
Plastigage brand rod used to measure clearances in main and connecting rod bearings Measuring the width of a Plastigage rod with a scale to determine the gap size With...
Plastigage brand rod used to measure clearances in main and connecting rod bearings Measuring the width of a Plastigage rod with a scale to determine the gap size With...

Timing gears — check
Checking clearances in the timing gears 1. Check the gear teeth for damage or signs of excessive wear, as indicated by noise during operation. 2. The free play between...
Checking clearances in the timing gears 1. Check the gear teeth for damage or signs of excessive wear, as indicated by noise during operation. 2. The free play between...
Flywheel — Checking and Installing
1. Check the flywheel for damage, the flywheel ring for wear and damage. 2. If the crown is very worn or has a missing tooth, the crown should be replaced. The old crown...
1. Check the flywheel for damage, the flywheel ring for wear and damage. 2. If the crown is very worn or has a missing tooth, the crown should be replaced. The old crown...

Lubrication system — general information
Engine lubrication system The stamped steel oil pan, mounted underneath the crankcase, serves as a reservoir for engine oil. An oil pump directs oil from the pan through...
Engine lubrication system The stamped steel oil pan, mounted underneath the crankcase, serves as a reservoir for engine oil. An oil pump directs oil from the pan through...
Oil pump — removal and installation
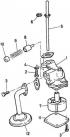
Oil pump 1 – housing, 2, 3 – bolts, 4 – lock washer, 5 – drive shaft, 6 – washer, 7 – rotors, 8 – plunger, 9 – spring, 10 – plug, 11 – cover, 12 – intake tube with mesh...
Oil pump 1 – housing, 2, 3 – bolts, 4 – lock washer, 5 – drive shaft, 6 – washer, 7 – rotors, 8 – plunger, 9 – spring, 10 – plug, 11 – cover, 12 – intake tube with mesh...
Crankcase ventilation system
The closed crankcase ventilation system is designed to relieve the pressure of gases breaking through into the crankcase. The system operates by sucking in a certain...
The closed crankcase ventilation system is designed to relieve the pressure of gases breaking through into the crankcase. The system operates by sucking in a certain...
Engine assembly — general information
To achieve maximum engine life after a major overhaul with a minimum of problems, not only must all parts be assembled correctly, but all parts and components must be...
To achieve maximum engine life after a major overhaul with a minimum of problems, not only must all parts be assembled correctly, but all parts and components must be...

Installing the crankshaft
Checking the axial play of the crankshaft with a dial indicator 1. Wipe the locations of the bearing shells on the crankshaft and install the upper main bearing shells....
Checking the axial play of the crankshaft with a dial indicator 1. Wipe the locations of the bearing shells on the crankshaft and install the upper main bearing shells....

Installing the camshaft
Temporary bolt for installing the intermediate plate 1. Install the thrust ring (1) with the rounded side forward and the key (2) on the camshaft. 2. Lubricate the...
Temporary bolt for installing the intermediate plate 1. Install the thrust ring (1) with the rounded side forward and the key (2) on the camshaft. 2. Lubricate the...

Installing pistons and connecting rods
1. Wipe the half of the connecting rod at the cap and the lower part of the bearing shell and install the bearing shell in place so that the installation tongue fits...
1. Wipe the half of the connecting rod at the cap and the lower part of the bearing shell and install the bearing shell in place so that the installation tongue fits...

Installing an oil pump
1. Check the mating surfaces of the oil pump and crankcase, they must be clean. 2. Insert the hexagonal pump drive shaft with the pointed end facing the distributor. The...
1. Check the mating surfaces of the oil pump and crankcase, they must be clean. 2. Insert the hexagonal pump drive shaft with the pointed end facing the distributor. The...
Installing the flywheel
1. Install the engine back plate onto the two mounting pins. 2. Check that the mating surfaces of the flywheel and crankshaft are clean and install the flywheel on the...
1. Install the engine back plate onto the two mounting pins. 2. Check that the mating surfaces of the flywheel and crankshaft are clean and install the flywheel on the...

Installing the timing gear and cover
1. Install a new sealing ring into the drive cover. 2. Check the keyways on the end of the crankshaft, they should be clean, there should be no burrs on the keys....
1. Install a new sealing ring into the drive cover. 2. Check the keyways on the end of the crankshaft, they should be clean, there should be no burrs on the keys....

Installing the oil pan, water pump and crankshaft pulley
Sequence of tightening the oil pan mounting bolts 1. Clean the contact surfaces of the crankcase and the sump. The grooves in the seal holders must be clean. 2. Install...
Sequence of tightening the oil pan mounting bolts 1. Clean the contact surfaces of the crankcase and the sump. The grooves in the seal holders must be clean. 2. Install...

Removal and installation the oil heat exchanger
Oil heat exchanger 1 – threaded bushing, 2 – gasket, 3 – heat exchanger, 4 – adapter, 5 – oil filter The oil heat exchanger is installed between the oil filter and the...
Oil heat exchanger 1 – threaded bushing, 2 – gasket, 3 – heat exchanger, 4 – adapter, 5 – oil filter The oil heat exchanger is installed between the oil filter and the...
Cylinder heads, rocker shafts and intake manifold
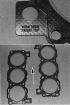
Cylinder head gaskets and markings Cylinder head bolt tightening sequence Intake Manifold Bolt Tightening Sequence 1. Lubricate the valve lifters with clean engine oil...
Cylinder head gaskets and markings Cylinder head bolt tightening sequence Intake Manifold Bolt Tightening Sequence 1. Lubricate the valve lifters with clean engine oil...

Adjusting valve clearances
Numbering of cylinders and high-voltage wire connections Valve arrangement Adjustment of the intake and exhaust valves should be done with the engine cold at a...
Numbering of cylinders and high-voltage wire connections Valve arrangement Adjustment of the intake and exhaust valves should be done with the engine cold at a...
Engine Auxiliary Parts
1. Screw in the water temperature sensor and tighten it to the specified torque. 2. Install the distributor and adjust the ignition timing. 3. Clean the surface of the...
1. Screw in the water temperature sensor and tighten it to the specified torque. 2. Install the distributor and adjust the ignition timing. 3. Clean the surface of the...
Engine installation
The engine is installed in the reverse order of removal, but in addition, pay attention to the following points: lightly lubricate the manual transmission input shaft;...
The engine is installed in the reverse order of removal, but in addition, pay attention to the following points: lightly lubricate the manual transmission input shaft;...
Removal the 2.4 and 2.9 liter engine
The steps to remove these engines are essentially the same as for 2.8 dm³ engines (see subsection 3.3.3 ). The following differences should be noted. 1. Remove the hoses...
The steps to remove these engines are essentially the same as for 2.8 dm³ engines (see subsection 3.3.3 ). The following differences should be noted. 1. Remove the hoses...

Cylinder heads for 2.4 and 2.9 liter engines
The process of removing the cylinder heads is presented for the engine installed in the car. Oil pressure sensor The oil pressure sensor is located on the left front...
The process of removing the cylinder heads is presented for the engine installed in the car. Oil pressure sensor The oil pressure sensor is located on the left front...

Replacing the timing chain 2.4 and 2.9 liters
Upper radiator shroud, plastic bracket and pin Cooling system pipe hanger mounting bolt Installing the chain tensioner Releasing the chain tensioner plunger Fixing the...
Upper radiator shroud, plastic bracket and pin Cooling system pipe hanger mounting bolt Installing the chain tensioner Releasing the chain tensioner plunger Fixing the...

Adjusting the valve clearance of the 2.4 and 2.9 liter engine
Valve arrangement on 2.4 and 2.9 dm³ engines Adjustment of valve clearance is carried out in the same way as described in subsection 3.3.4.17 , except for the valve...
Valve arrangement on 2.4 and 2.9 dm³ engines Adjustment of valve clearance is carried out in the same way as described in subsection 3.3.4.17 , except for the valve...

Oil pump for 2.4 and 2.9 liter engines
Repair of the oil pump is essentially the same as for the 2.8 dm³ engine (see subsection 3.3.4.14.1 ). Removal the oil receiver from the oil pump Removal the oil pump...
Repair of the oil pump is essentially the same as for the 2.8 dm³ engine (see subsection 3.3.4.14.1 ). Removal the oil receiver from the oil pump Removal the oil pump...
This section is available on russian, bulgarian, belarusian, ukrainian, serbian, croatian, romanian, polish, slovak, hungarian
Fusion
Scorpio 1
Scorpio 2
Sierra
- General information
- Vehicle device
- User manual
- Faults on the way
- Maintenance
- Tips for the car owner
- Power unit
- Engine repair
- Lubrication and cooling system
- Supply system
- Exhaust and vapor recovery
- Transmission
- Clutch
- Car gearbox
- Front wheel drives
- Chassis
- Front suspension
- Rear suspension
- Steering
- Brake system
- Wheels and tires
- Body
- Exterior
- Interior
- Doors, locks and windows
- Body сare
- Electrical equipment
- Equipment and devices
- Engine electrics
- Lighting and signaling
- Switches and sensors
- Electrical circuits
Scorpio 1
- General information
- User manual
- Maintenance
- Power unit
- Petrol engines OHC
- Petrol engines DOHC
- Petrol engines V6
- Ignition and control
- Diesel engines
- Cooling system
- Supply system
- Carburetors
- Fuel injection
- Transmission
- Clutch
- Manual gearbox «N»
- Manual gearbox «MT 75»
- Automatic gearbox «A4LD»
- Rear axle and drive shafts
- Chassis
- Steering
- Power steering
- Front suspension
- Rear suspension
- Brake system
- Body
- Exterior
- Interior
- Doors, locks and windows
- Heating and ventilation
- Electrical equipment
- Equipment and devices
- Power devices
- Electrical circuits
Scorpio 2
- General information
- Car care
- Maintenance
- Power unit
- Engine repair
- Lubrication system
- Cooling system
- Ignition system
- Supply system
- Carburetors
- Injection system (gasoline)
- Injection system (diesel)
- Exhaust system
- Transmission
- Clutch
- Car gearbox
- Chassis
- Front suspension
- Rear suspension
- Steering
- Brake system
- Wheels and tires
- Body
- Exterior
- Interior
- Doors, locks and windows
- Heating system
- Electrical equipment
- Equipment and devices
- Headlights and lighting
- Windshield wipers and washers
- Power devices
- Electrical circuits
Sierra
- General information
- User manual
- Maintenance
- Gasoline engines
- Engine repair
- Ignition system
- Fuel system
- Cooling and lubrication system
- Changes 1984-1986
- Changes 1987-1989
- Changes 1990-1993
- Diesel engines
- Engine repair
- Fuel system
- Cooling and lubrication system
- Changes 1988-1993
- Transmission
- Clutch
- Mechanical gearbox
- Automatic gearbox
- Cardan and rear axle
- Chassis
- Steering
- Steering with power steering
- Front suspension
- Rear suspension
- Brake system
- Body and electrical
- Body elements and doors
- Electrical equipment
- Electrical circuits