Car engine fuel system Ford Sierra

Fuel System Specifications
Fuel tank The fuel tank, made of sheet steel, is installed under the boot floor and is held in place by a plate secured with two bolts. Capacity: 60 dm 3 . Tank filler...
Fuel tank The fuel tank, made of sheet steel, is installed under the boot floor and is held in place by a plate secured with two bolts. Capacity: 60 dm 3 . Tank filler...

Ford Variable Diffuser Carburetor
Ford close-throttle carburetor cutaway 1 - throttle lever, 2 - movable diffuser flap, 4 - main fuel jet, 5 - additional fuel jet, 6 - float chamber, 7 - mixture...
Ford close-throttle carburetor cutaway 1 - throttle lever, 2 - movable diffuser flap, 4 - main fuel jet, 5 - additional fuel jet, 6 - float chamber, 7 - mixture...
Removal and installation of the Ford carburetor
Withdrawal 1. Remove air filter. 2. Disconnect flexible pipes from the carburetor: fuel supply and heating (engine coolant liquid) automatic starter and close their...
Withdrawal 1. Remove air filter. 2. Disconnect flexible pipes from the carburetor: fuel supply and heating (engine coolant liquid) automatic starter and close their...

Disassembly, inspection and assembly of the Ford carburetor
Ford carburetor elements 1 - carburetor cover, 2 - movable diffuser damper, 3 - metering conical needle, 4 - holder of the main fuel jet, 5 - float, 6 - valve needle, 7...
Ford carburetor elements 1 - carburetor cover, 2 - movable diffuser damper, 3 - metering conical needle, 4 - holder of the main fuel jet, 5 - float, 6 - valve needle, 7...

Idle speed and CO content adjustment (Ford carburetor)
Ford Carburetor Idle Adjustment 1 - throttle stop screw for adjusting the engine speed, 2 - screw for adjusting the composition of the mixture 1. Warm up the engine to...
Ford Carburetor Idle Adjustment 1 - throttle stop screw for adjusting the engine speed, 2 - screw for adjusting the composition of the mixture 1. Warm up the engine to...

Trigger Adjustment (Ford Carburetor)
Bimetal spring housing for Ford carburetor automatic starter The arrow shows the setting signs for adjusting the duration of the trigger (the coincidence of the sign on...
Bimetal spring housing for Ford carburetor automatic starter The arrow shows the setting signs for adjusting the duration of the trigger (the coincidence of the sign on...

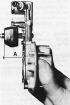
Throttle Cable Adjustment (Ford Carburetor)
Throttle cable attachment A - adjusting nut 1. Disconnect the battery and remove the air filter. 2. Press the accelerator pedal to the stop and lock it in this position....
Throttle cable attachment A - adjusting nut 1. Disconnect the battery and remove the air filter. 2. Press the accelerator pedal to the stop and lock it in this position....

Removal and installation of a needle shaft (Ford carburetor)
Float needle valve Needle valve malfunction usually occurs when it is contaminated due to the use of fuel with foreign particles or due to mechanical wear. Withdrawal 1....
Float needle valve Needle valve malfunction usually occurs when it is contaminated due to the use of fuel with foreign particles or due to mechanical wear. Withdrawal 1....

Vacuum Regulator Diaphragm (Ford Carburetor)
Vacuum carburetor regulator If the diaphragm is damaged, there is no control of the air damper. Work is carried out on a carburetor removed from the engine. Withdrawal...
Vacuum carburetor regulator If the diaphragm is damaged, there is no control of the air damper. Work is carried out on a carburetor removed from the engine. Withdrawal...

Weber 32/36 DGAV carburetor — design description
Carburetor elements Weber 32/36 DGAV 1 - carburetor cover, 2 - strainer, 3 - valve body, 4 - float, 5 - needle valve, 6 - gasket, 7 - accelerator pump jet, 8 -...
Carburetor elements Weber 32/36 DGAV 1 - carburetor cover, 2 - strainer, 3 - valve body, 4 - float, 5 - needle valve, 6 - gasket, 7 - accelerator pump jet, 8 -...
Removal and installation of the Weber carburetor
Withdrawal 1. Disconnect the battery and remove the air filter. 2. Being careful, unscrew the plug of the expansion tank. 3. Remove the coolant hoses from the starter...
Withdrawal 1. Disconnect the battery and remove the air filter. 2. Being careful, unscrew the plug of the expansion tank. 3. Remove the coolant hoses from the starter...
Float Position Adjustment (Weber Carburetor)
Weber Carburetor Float Adjustment A = 41±0.5 mm. 1. Disconnect the battery and remove the air filter. 2. Disconnect the fuel supply line from the carburetor. 3. Loosen...
Weber Carburetor Float Adjustment A = 41±0.5 mm. 1. Disconnect the battery and remove the air filter. 2. Disconnect the fuel supply line from the carburetor. 3. Loosen...

Throttle Adjustment (Weber Carburetor)
Weber choke opening adjustment A - screwdriver, B - adjusting screw in the housing 1. Unscrew the three screws securing the housing of the starting device and the...
Weber choke opening adjustment A - screwdriver, B - adjusting screw in the housing 1. Unscrew the three screws securing the housing of the starting device and the...

Checking and adjusting the automatic starting device (Weber carburetor)
The position of the starting flap controls when adjusting the automatic starter of the Weber carburetor A - drill, B - plate 1. Partially open the mixture throttle and...
The position of the starting flap controls when adjusting the automatic starter of the Weber carburetor A - drill, B - plate 1. Partially open the mixture throttle and...

Idle speed and CO content adjustment (Weber carburetor)
Weber carburetor idle adjustment 1 - screw for adjusting the engine speed, 2 - casing for the screw for adjusting the composition of the mixture 1. Warm up the engine to...
Weber carburetor idle adjustment 1 - screw for adjusting the engine speed, 2 - casing for the screw for adjusting the composition of the mixture 1. Warm up the engine to...
This section is available on russian, bulgarian, belarusian, ukrainian, serbian, croatian, romanian, polish, slovak, hungarian
See other similar sections for Ford cars:
• Power unit: Supply system Ford Focus 2 (2004-2010)
• Power unit: Fuel system Ford Mondeo 3 (2000-2007)
• Diesel engines: Fuel system Ford Escort 4 (1986-1990)
• Power unit: Supply system Ford Fiesta 4 (1996-1999)
• Engine: Fuel/exhaust systems Ford Taurus 1 and 2 (1986-1994)
• Power unit: Supply system Ford Focus 2 (2004-2010)
• Power unit: Fuel system Ford Mondeo 3 (2000-2007)
• Diesel engines: Fuel system Ford Escort 4 (1986-1990)
• Power unit: Supply system Ford Fiesta 4 (1996-1999)
• Engine: Fuel/exhaust systems Ford Taurus 1 and 2 (1986-1994)
Fusion
Scorpio 1
Scorpio 2
Sierra
- General information
- Vehicle device
- User manual
- Faults on the way
- Maintenance
- Tips for the car owner
- Power unit
- Engine repair
- Lubrication and cooling system
- Supply system
- Exhaust and vapor recovery
- Transmission
- Clutch
- Car gearbox
- Front wheel drives
- Chassis
- Front suspension
- Rear suspension
- Steering
- Brake system
- Wheels and tires
- Body
- Exterior
- Interior
- Doors, locks and windows
- Body сare
- Electrical equipment
- Equipment and devices
- Engine electrics
- Lighting and signaling
- Switches and sensors
- Electrical circuits
Scorpio 1
- General information
- User manual
- Maintenance
- Power unit
- Petrol engines OHC
- Petrol engines DOHC
- Petrol engines V6
- Ignition and control
- Diesel engines
- Cooling system
- Supply system
- Carburetors
- Fuel injection
- Transmission
- Clutch
- Manual gearbox «N»
- Manual gearbox «MT 75»
- Automatic gearbox «A4LD»
- Rear axle and drive shafts
- Chassis
- Steering
- Power steering
- Front suspension
- Rear suspension
- Brake system
- Body
- Exterior
- Interior
- Doors, locks and windows
- Heating and ventilation
- Electrical equipment
- Equipment and devices
- Power devices
- Electrical circuits
Scorpio 2
- General information
- Car care
- Maintenance
- Power unit
- Engine repair
- Lubrication system
- Cooling system
- Ignition system
- Supply system
- Carburetors
- Injection system (gasoline)
- Injection system (diesel)
- Exhaust system
- Transmission
- Clutch
- Car gearbox
- Chassis
- Front suspension
- Rear suspension
- Steering
- Brake system
- Wheels and tires
- Body
- Exterior
- Interior
- Doors, locks and windows
- Heating system
- Electrical equipment
- Equipment and devices
- Headlights and lighting
- Windshield wipers and washers
- Power devices
- Electrical circuits
Sierra
- General information
- User manual
- Maintenance
- Gasoline engines
- Engine repair
- Ignition system
- Fuel system
- Cooling and lubrication system
- Changes 1984-1986
- Changes 1987-1989
- Changes 1990-1993
- Diesel engines
- Engine repair
- Fuel system
- Cooling and lubrication system
- Changes 1988-1993
- Transmission
- Clutch
- Mechanical gearbox
- Automatic gearbox
- Cardan and rear axle
- Chassis
- Steering
- Steering with power steering
- Front suspension
- Rear suspension
- Brake system
- Body and electrical
- Body elements and doors
- Electrical equipment
- Electrical circuits
FordBook.ru © 2014-2024 • Mobile version • Interesting to read • Sitemap: EN BG BY UA RS HR RO PL SK HU • Site search • Contact with administration
Focus 1 • Focus Turnier 1 • Focus 2 • Mondeo 1 • Mondeo 1 and 2 • Mondeo 2 • Mondeo 3 • Mondeo 4 • Escort 3 • Escort 4 • Escort 5 • Fiesta 2 • Fiesta 4 • Taurus 1 and 2 • Fusion • Scorpio 1 • Scorpio 2 • Sierra •
Focus 1 • Focus Turnier 1 • Focus 2 • Mondeo 1 • Mondeo 1 and 2 • Mondeo 2 • Mondeo 3 • Mondeo 4 • Escort 3 • Escort 4 • Escort 5 • Fiesta 2 • Fiesta 4 • Taurus 1 and 2 • Fusion • Scorpio 1 • Scorpio 2 • Sierra •