Ford carburetor elements
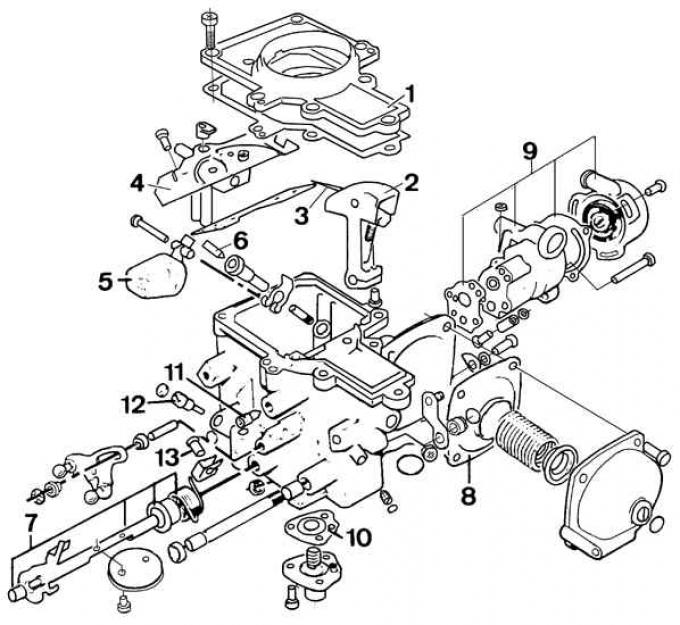
1 - carburetor cover, 2 - movable diffuser damper, 3 - metering conical needle, 4 - holder of the main fuel jet, 5 - float, 6 - valve needle, 7 - throttle valve axis, 8 - diaphragm of the movable damper regulator, 9 - starting elements device, 10 - accelerator pump, 11 - shunt flow adjustment screw, 12 - mixture adjustment screw, 13 - idle speed adjustment screw
Disassembly
1. Remove the carburetor cover by unscrewing the seven bolts of its fastening (Torx T20 bolts) and remove the cover gasket.
2. Drain fuel from float chamber.
3. Unscrew the four screws securing the main fuel jet holder, pull the movable diffuser flap back and remove the main fuel jet holder.
Attention! Do not remove the conical needle that interacts with the main fuel jet. If it is damaged, the entire carburetor must be replaced.
4. Remove the accelerator pump one-way valve.
5. Remove float and needle valve.
6. Remove the protective cover and unscrew the mixture adjustment screw.
7. Unscrew the screws securing the cover of the vacuum regulator, remove the cover, the spring, its stop and remove the diaphragm.
8. Remove the accelerator pump cover, remove the spring and diaphragm.
Examination
1. Wash the components of the carburetor (wash diaphragms in alcohol solution).
2. Blow out all holes and jets with compressed air.
3. Check the condition of the needle valve, float, diaphragms, main jet holder, throttle valve shaft.
4. Check the condition of the conical needle and the possible ovality of the jets.
5. Check the correct functioning of the spring that sets the needle position.
Carburetor assembly
1. Insert the accelerator pump diaphragm, its spring and cover (the side with the diaphragm gasket towards the carburetor body).
2. Insert the diaphragm reinforcement elements, as well as its spring setting ring.
3. Insert diaphragm. The vacuum hole in the carburetor body must be opposite the hole in the vacuum regulator body.
4. Insert spring and regulator cover.
5. Screw in the mixture adjustment screw until it stops and unscrew it three turns. This is the starting position for correct adjustment.
6. Insert the float and its needle valve.
7. Insert the accelerator pump valve ball and place its load in the body channel.
8. Hold the movable diffuser flap at the maximum opening position and install a new gasket as well as the main fuel jet assembly.
9.Install it in such a way relative to the carburetor body that its flange is at the height of the gasket installation surface.
10. Install new cover gasket and carburetor cover
Visitor comments