DOHC gasoline engine of car Ford Scorpio 1

DOHC Engine Specifications
The engine is a petrol, four-stroke, four-cylinder, in-line, water-cooled engine with two camshafts in the cylinder head and is mounted longitudinally in front of the...
The engine is a petrol, four-stroke, four-cylinder, in-line, water-cooled engine with two camshafts in the cylinder head and is mounted longitudinally in front of the...

Repairs that do not require engine removal
Engine number location The following operations can be performed on the engine installed in the vehicle: removal and installation of timing chain and sprockets; removal...
Engine number location The following operations can be performed on the engine installed in the vehicle: removal and installation of timing chain and sprockets; removal...
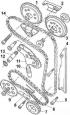
Timing chain and sprockets
Timing drive 1 - Intake camshaft sprocket, 2 - Upper chain guide, 3 - Exhaust camshaft sprocket, 4 - Side chain guide, 5 - Side chain guide mounting bolt, 6 - Oil pump...
Timing drive 1 - Intake camshaft sprocket, 2 - Upper chain guide, 3 - Exhaust camshaft sprocket, 4 - Side chain guide, 5 - Side chain guide mounting bolt, 6 - Oil pump...
Cylinder head — design description
Cylinder head parts 1 - cylinder head, 2 - intake valves, 3 - exhaust valves, 4 - cylinder head gasket, 5 - hydraulic valve lifters, 6 - crackers, 7 - upper spring...
Cylinder head parts 1 - cylinder head, 2 - intake valves, 3 - exhaust valves, 4 - cylinder head gasket, 5 - hydraulic valve lifters, 6 - crackers, 7 - upper spring...

Removal the cylinder head
Bolt for fastening the sprocket and the ignition distributor drive on the camshaft controlling the intake valves Attention! The cylinder head can only be removed on a...
Bolt for fastening the sprocket and the ignition distributor drive on the camshaft controlling the intake valves Attention! The cylinder head can only be removed on a...
Disassembly and assembly of the cylinder head
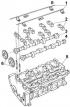
Cylinder head 1 – oil supply pipes to the camshaft cams, 2 – camshaft bearing caps, 3 – camshaft controlling the intake valves, 4 – camshaft controlling the exhaust...
Cylinder head 1 – oil supply pipes to the camshaft cams, 2 – camshaft bearing caps, 3 – camshaft controlling the intake valves, 4 – camshaft controlling the exhaust...
Checking the cylinder head
1. Check the flatness of the cylinder head surface mating with the cylinder block using a steel ruler and a set of measuring probes. If the flatness is greater than 0.05...
1. Check the flatness of the cylinder head surface mating with the cylinder block using a steel ruler and a set of measuring probes. If the flatness is greater than 0.05...
Checking the valve guides
1. Worn valve guides do not ensure coaxial installation of the valves in the seats, which leads to a significant increase in fuel and oil consumption. 2. Check the...
1. Worn valve guides do not ensure coaxial installation of the valves in the seats, which leads to a significant increase in fuel and oil consumption. 2. Check the...
Processing of valve seats in the cylinder head
Valve seats with signs of wear or burning must be processed with mandatory preservation of the angles and size of the chamfer. Otherwise, it is necessary to replace the...
Valve seats with signs of wear or burning must be processed with mandatory preservation of the angles and size of the chamfer. Otherwise, it is necessary to replace the...
Cylinder head assembly
1. Lubricate the valve guides with fresh engine oil. 2. Insert the valve into its place. 3. Install the lower spring support plate onto the valve. 4. Wrap a piece of...
1. Lubricate the valve guides with fresh engine oil. 2. Insert the valve into its place. 3. Install the lower spring support plate onto the valve. 4. Wrap a piece of...

Installing the cylinder head
DOHC Engine Cylinder Head Bolt Tightening Sequence M11 bolts – tightening sequence: 1–10. M8 bolts – tightening sequence: 11–13. Location of camshaft bearing caps 1....
DOHC Engine Cylinder Head Bolt Tightening Sequence M11 bolts – tightening sequence: 1–10. M8 bolts – tightening sequence: 11–13. Location of camshaft bearing caps 1....

Removal and installation the rear crankshaft seal ring
Special mandrel for installing the rear crankshaft seal ring A – back cover, B - special tool 1. Remove the gearbox. 2. Remove the clutch. 3. Remove the flywheel and...
Special mandrel for installing the rear crankshaft seal ring A – back cover, B - special tool 1. Remove the gearbox. 2. Remove the clutch. 3. Remove the flywheel and...

Removal the engine
The engine is removed without the gearbox upwards from the engine compartment using a lifting mechanism. It is also possible to remove the engine together with the...
The engine is removed without the gearbox upwards from the engine compartment using a lifting mechanism. It is also possible to remove the engine together with the...
Additional operations for engine removal on vehicles with automatic transmission
1. In the engine compartment, unscrew the upper transmission-to-engine mounting bolts. Mark the locations of the ground bus, vacuum tube clamps, and transmission oil...
1. In the engine compartment, unscrew the upper transmission-to-engine mounting bolts. Mark the locations of the ground bus, vacuum tube clamps, and transmission oil...
Additional operations for removing the engine with gearbox
1. Disconnect the exhaust pipe from the exhaust system and remove it from the vehicle. 2. On vehicles with a catalytic converter, remove the heat shield. 3. Remove the...
1. Disconnect the exhaust pipe from the exhaust system and remove it from the vehicle. 2. On vehicles with a catalytic converter, remove the heat shield. 3. Remove the...
Engine installation
The engine is installed in the reverse order of removal, but it is necessary to pay attention to some features: lubrication of the splines of the gearbox clutch shaft...
The engine is installed in the reverse order of removal, but it is necessary to pay attention to some features: lubrication of the splines of the gearbox clutch shaft...
Disassembling the engine
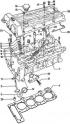
DOHC Engine Seals and Gaskets 1 - carburetor, 2 - cylinder head cover, 3 - intake manifold, 4 - intake manifold gasket, 5 - cylinder head, 6 - exhaust manifold gasket, 7...
DOHC Engine Seals and Gaskets 1 - carburetor, 2 - cylinder head cover, 3 - intake manifold, 4 - intake manifold gasket, 5 - cylinder head, 6 - exhaust manifold gasket, 7...
Cylinders — Checking for wear
Theoretically, a new cylinder is perfectly round. The piston's work causes wear on the walls at right angles to the piston pins due to lateral load. This wear occurs...
Theoretically, a new cylinder is perfectly round. The piston's work causes wear on the walls at right angles to the piston pins due to lateral load. This wear occurs...

Checking and restoring pistons and piston rings
Piston and ring wear can usually be detected by signs of increased oil consumption and low compression, sometimes associated with cylinder wear. Another sign of piston...
Piston and ring wear can usually be detected by signs of increased oil consumption and low compression, sometimes associated with cylinder wear. Another sign of piston...
Piston pins and connecting rods
1. Press out the piston pins using a press. 2. Place the connecting rods on a plate and check that they are not deformed. 3. Place fixture 21.014 in a vice and pull out...
1. Press out the piston pins using a press. 2. Place the connecting rods on a plate and check that they are not deformed. 3. Place fixture 21.014 in a vice and pull out...
Crankshaft — Checking and Installing
Inspect the main and connecting rod journals for signs of wear, nicks or scratches. Check them for out-of-roundness using a micrometer. Out-of-roundness exceeding 0.025...
Inspect the main and connecting rod journals for signs of wear, nicks or scratches. Check them for out-of-roundness using a micrometer. Out-of-roundness exceeding 0.025...

Main and connecting rod bearings
With proper maintenance and regular oil and filter changes, bearings will last a very long time. A sign of damage to connecting rod bearings is a regular, rhythmic, loud...
With proper maintenance and regular oil and filter changes, bearings will last a very long time. A sign of damage to connecting rod bearings is a regular, rhythmic, loud...
Flywheel — Checking and Installing
Check the flywheel for damage, the flywheel ring for wear and damage. If the crown is very worn or has a missing tooth, the crown should be replaced. The old crown can...
Check the flywheel for damage, the flywheel ring for wear and damage. If the crown is very worn or has a missing tooth, the crown should be replaced. The old crown can...

Engine assembly
DOHC Engine Crankshaft Main Bearing Designations 1–5 – bearing numbers, A – main bearing shell, B – crankshaft thrust half rings DOHC Engine Connecting Rod Cap...
DOHC Engine Crankshaft Main Bearing Designations 1–5 – bearing numbers, A – main bearing shell, B – crankshaft thrust half rings DOHC Engine Connecting Rod Cap...
Starting the engine after major repairs
1. After installing the engine in the vehicle, check the oil and coolant levels. 2. Remove the spark plugs and turn off the ignition system. 3. Crank the engine with the...
1. After installing the engine in the vehicle, check the oil and coolant levels. 2. Remove the spark plugs and turn off the ignition system. 3. Crank the engine with the...

Crankcase ventilation system
Crankcase ventilation system with fuel injection system 1 – connection to the intake manifold, 2 – intake manifold, 3 – breather tube, 4 – oil separator, 5 – valve, 6 –...
Crankcase ventilation system with fuel injection system 1 – connection to the intake manifold, 2 – intake manifold, 3 – breather tube, 4 – oil separator, 5 – valve, 6 –...

Removal and installation the oil pan
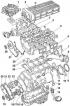
Elements of the lubrication system 1 – Oil pressure sensor, 2 – Oil filter, 3 – Oil level gauge pipe, 4 – Oil level gauge, 5 – Oil pan gasket, 6 – Oil pan, 7 – Oil drain...
Elements of the lubrication system 1 – Oil pressure sensor, 2 – Oil filter, 3 – Oil level gauge pipe, 4 – Oil level gauge, 5 – Oil pan gasket, 6 – Oil pan, 7 – Oil drain...

Removal and installation the oil pump
Oil pump 1 – oil pump sprocket, 2 – oil pump, 3 – gasket, 4 – oil pump cover, 5 – pressure reducing valve, 6 – rotor, 7 – pump body, 8 – gasket, 9 – oil receiver Removal...
Oil pump 1 – oil pump sprocket, 2 – oil pump, 3 – gasket, 4 – oil pump cover, 5 – pressure reducing valve, 6 – rotor, 7 – pump body, 8 – gasket, 9 – oil receiver Removal...

Disassembling the oil pump
Checking the DOHC Engine Oil Pump Checking the radial clearance between gears. Checking the radial clearance between the rotor and the pump body. Checking the axial...
Checking the DOHC Engine Oil Pump Checking the radial clearance between gears. Checking the radial clearance between the rotor and the pump body. Checking the axial...
This section is available on russian, bulgarian, belarusian, ukrainian, serbian, croatian, romanian, polish, slovak, hungarian
Fusion
Scorpio 1
Scorpio 2
Sierra
- General information
- Vehicle device
- User manual
- Faults on the way
- Maintenance
- Tips for the car owner
- Power unit
- Engine repair
- Lubrication and cooling system
- Supply system
- Exhaust and vapor recovery
- Transmission
- Clutch
- Car gearbox
- Front wheel drives
- Chassis
- Front suspension
- Rear suspension
- Steering
- Brake system
- Wheels and tires
- Body
- Exterior
- Interior
- Doors, locks and windows
- Body сare
- Electrical equipment
- Equipment and devices
- Engine electrics
- Lighting and signaling
- Switches and sensors
- Electrical circuits
Scorpio 1
- General information
- User manual
- Maintenance
- Power unit
- Petrol engines OHC
- Petrol engines DOHC
- Petrol engines V6
- Ignition and control
- Diesel engines
- Cooling system
- Supply system
- Carburetors
- Fuel injection
- Transmission
- Clutch
- Manual gearbox «N»
- Manual gearbox «MT 75»
- Automatic gearbox «A4LD»
- Rear axle and drive shafts
- Chassis
- Steering
- Power steering
- Front suspension
- Rear suspension
- Brake system
- Body
- Exterior
- Interior
- Doors, locks and windows
- Heating and ventilation
- Electrical equipment
- Equipment and devices
- Power devices
- Electrical circuits
Scorpio 2
- General information
- Car care
- Maintenance
- Power unit
- Engine repair
- Lubrication system
- Cooling system
- Ignition system
- Supply system
- Carburetors
- Injection system (gasoline)
- Injection system (diesel)
- Exhaust system
- Transmission
- Clutch
- Car gearbox
- Chassis
- Front suspension
- Rear suspension
- Steering
- Brake system
- Wheels and tires
- Body
- Exterior
- Interior
- Doors, locks and windows
- Heating system
- Electrical equipment
- Equipment and devices
- Headlights and lighting
- Windshield wipers and washers
- Power devices
- Electrical circuits
Sierra
- General information
- User manual
- Maintenance
- Gasoline engines
- Engine repair
- Ignition system
- Fuel system
- Cooling and lubrication system
- Changes 1984-1986
- Changes 1987-1989
- Changes 1990-1993
- Diesel engines
- Engine repair
- Fuel system
- Cooling and lubrication system
- Changes 1988-1993
- Transmission
- Clutch
- Mechanical gearbox
- Automatic gearbox
- Cardan and rear axle
- Chassis
- Steering
- Steering with power steering
- Front suspension
- Rear suspension
- Brake system
- Body and electrical
- Body elements and doors
- Electrical equipment
- Electrical circuits