DOHC Engine Cylinder Head Bolt Tightening Sequence
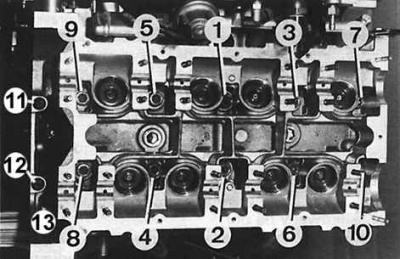
M11 bolts – tightening sequence: 1–10.
M8 bolts – tightening sequence: 11–13.
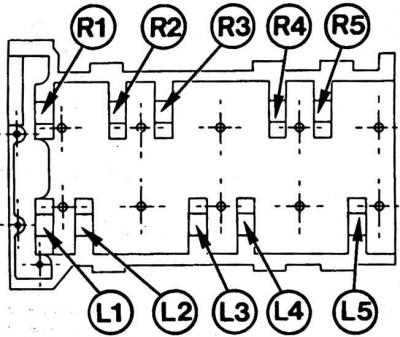
Location of camshaft bearing caps
1. Thoroughly clean the mating surfaces of the cylinder head and cylinder block.
2. Install a new gasket on the cylinder block.
3. Turn the crankshaft so that the pistons are in the middle of their stroke.
4. Install the cylinder head onto the cylinder block.
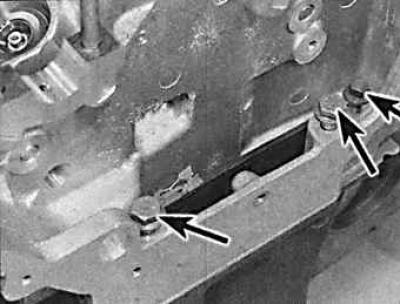
5. Lubricate the threads of the cylinder head mounting bolts with a thin layer of engine oil (the arrows show the M8 bolts for mounting the front part of the cylinder head), install them in place and tighten them to the required torque in a specific sequence (see subsection 3.2.1).
6. Lubricate the camshaft bearings in the head with a thin layer of engine oil and install the camshafts in place.
7. Lubricate the camshaft bearing caps with a thin layer of engine oil and install them in place in accordance with the marking. The bearing caps of the camshaft controlling the intake valves are marked R1–R5, and the bearing caps of the camshaft controlling the exhaust valves are marked L1–L5. The numbering of the caps is from the drive side of the valve timing mechanism.
8. Install the oil supply line to the camshaft cams.
9. Gradually and consistently tighten the camshaft cover fastening nuts in a specific sequence. Tighten the fastening nuts by hand, turning them sequentially by 180° until the cover touches the cylinder head. Tightening sequence: L1 and R1, L5 and R5, L3 and R3. Then tighten the remaining cover fastening nuts by hand.
10. Tighten the cover mounting nuts to the required torque, turning them by the same angle in the following sequence: L1 and R1, L5 and R5, L3 and R3, L2 and L4, R2 and R4.
11. Install the timing chain and sprockets (see subsection 3.2.2.1).
12. Install the cylinder head cover with a new gasket and tighten the cover mounting bolts sequentially from the edge to the center.
13. Screw in the spark plugs.
14. Install the ignition distributor, distributor rotor and cover.
15. Install the high voltage wires in place.
16. Screw the exhaust pipe with a new gasket to the exhaust manifold.
17. Connect the wires to the radiator fan.
18. On vehicles with fuel injection, connect the wiring harness to the engine and the fuel lines to the pressure regulator.
19. Connect the vacuum hoses and accelerator cable.
20. Connect the crankcase ventilation hose to the cylinder head.
21. Connect the coolant supply hose to the pipe on the cylinder head.
22. Connect the radiator hose and expansion tank.
23. Install the air filter.
24. Pour motor oil into the engine.
25. Fill the cooling system with coolant.
26. Connect the ground wire to the battery.
27. Start the engine and adjust if necessary.
[The text was obtained in its entirety from the specified website FordBook.ru]