Contents: External seal ↳ Transmission fluid leak in torque… ↳ Checking for leaks ↳ Checking for leaks under black light ↳ Transmission fluid cooler ↳
Special tool
 | UV Diagnostic Inspection Kit (12V) 12-Volt Master UV Diagnostic Inspection Kit 164-R0756 or equivalent |
CAUTION: Do not attempt to stop fluid leaks by tightening the bolts beyond the specified torque. This may damage the crankcase threads.
Check the filler line for the working fluid on the gearbox housing in the block with the driving axle. If a leak is detected, install a new plug.
Check the lines and fittings between the transaxle housing and the cooler for looseness, wear, or damage. If the leak cannot be stopped by tightening the fluid line nut, install new parts.
If the leak persists, install a new coolant line fitting and tighten to specification. The same procedure should be followed for fluid leaks between the cooler and the coolant line fittings as described in this section. Refer to Section 307-02 for additional information.
The cooler can be further tested for leaks. Refer to Section 307-02 for additional information.
If a leak is detected in the gear selector lever, install a new seal.
If a leak is detected on the section of the transmission wiring connector in the drive axle unit, install a new O-ring.
To prevent external leaks of transmission fluid in the gearbox, the following elements are included in the block with the drive axle:
- sealant
- lip type seals
- o-ring seals
- sealing rings
- sealing bushings (stockings)
- thread sealant
- working fluid casing
External seal
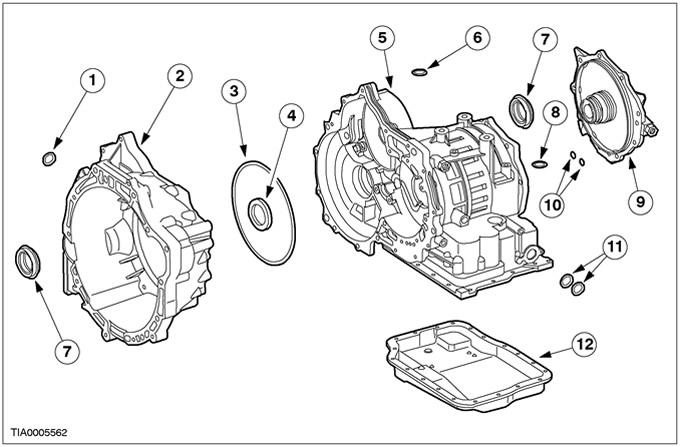
| Pos. | Spare Part No | Name |
| 1 | — | Secondary Shaft Speed Sensor O-Ring |
| 2 | — | Torque converter housing (sealant at the junction with the crankcase) |
| 3 | — | Working fluid pump seal |
| 4 | — | Working fluid pump seal |
| 5 | — | Carter (sealant at the junction with the torque converter housing) |
| 6 | — | O-ring for turbine speed sensor |
| 7 | — | Differential seal assembly |
| 8 | — | O-ring seal - Body bulkhead wiring connector |
| 9 | — | End cap assembly (sealant at the junction with the crankcase) |
| 10 | — | Crankcase cover seal (2 pcs., end cover to crankcase) |
| 11 | — | Hand shaft seal (2 pcs.) |
| 12 | — | Oil pan (sealant at the junction with the pan) |
Transmission fluid leak in torque converter area
When diagnosing and repairing transmission fluid leaks in the pump mount, gearbox, and torque converter area, use the following procedures to determine the true source of the leak. A transaxle-to-engine leak, which appears as transmission fluid around the torque converter housing, can have several causes. In many cases, it is possible to pinpoint the exact source of the leak by performing a thorough inspection without removing the transaxle from the vehicle. The paths that the transmission fluid takes to reach the bottom of the torque converter housing are shown in the illustration. The next five steps correspond to the numbers in the illustration.
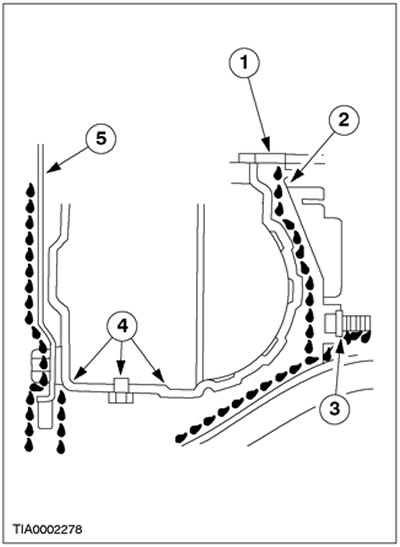
1. Fluid passing through the pump lip seal will tend to flow along the impeller hub and then to the back of the impeller housing. Additionally, in the event of a general seal failure, fluid that has passed through this seal will only collect on the inside of the converter housing, near the outside diameter of the housing. Fluid from the vent port may flow along the impeller hub and then to the back of the impeller housing. Fluid that has passed through the weld of the converter hub will flow along the inside of the converter housing.
2. Fluid that has passed through the mating surface of the oil pump seal (along the outside diameter) and the pump housing will follow the same path as a leak along the inside diameter of the oil pump seal. Fluid that has passed through the weld of the torque converter hub will flow along the inside of the torque converter housing.
3. Fluid that passes through the pump-to-case mounting screw or the pump gasket will only collect on the inside of the torque converter housing. Fluid will not collect on the back of the torque converter.
4. Fluid leaks from the transformer drain plug, (depending on the model) the transformer seal weld or the transformer to flexible plate stud weld will appear on the outside diameter of the torque converter on the back surface of the flexible plate and in the transformer housing next to the flexible plate. Fluid leaks from the torque converter will leave a ring of fluid around the inside surface of the torque converter housing.
NOTE: A white sanitary napkin can help you determine the color (red corresponds to the transmission fluid in the drive axle unit) and the source of the leaking fluid.
5. Engine oil leaks are sometimes mistaken for leaks from the transaxle pump gasket. To determine if engine oil is the cause of the problem, you should also check the following areas for possible leaks.
- a Leaks through the cylinder head cover gasket can allow oil to spill out of the converter housing or leak between the converter housing and the cylinder block, causing oil to pool in the housing or on the bottom of the converter housing.
- b Leaks through the oil gallery plug allow oil to flow along the rear surface of the cylinder block to the bottom of the torque converter housing.
- c The leak at the rear crankshaft oil seal area leaks back to the flexplate and then into the torque converter housing.
Checking for leaks
1. Factory-filled transmission fluid is colored red to help determine whether the leak is coming from the engine or the transaxle. The red color should help pinpoint the exact location of the leak.
2. Wipe off all traces of fluid from the top and bottom of the torque converter housing, crankcase, rear surface of the engine and oil pan. Clean the torque converter area by washing it with a suitable non-flammable solvent. Then dry it with compressed air.
3. Wipe the torque converter housing and the front of the flexible plate. The torque converter housing can be washed with a cleaning solvent. Blow dry all washed areas with compressed air.
4. Start the engine and run it until the transaxle reaches its normal operating temperature. Observe the back of the cylinder block and the top of the torque converter case for fluid leaks. Raise the vehicle on a lift (refer to Section 100-02) and run the engine at fast idle and then at normal idle, occasionally shifting the transmission into D and R to build up transaxle pressure. Observe the front of the flexplate, the rear of the cylinder block (as far as possible), and the inside of the torque converter case and the front of the crankcase. Run the engine until fluid leaks are observed and the likely source of the leak can be determined.
Checking for leaks under black light
Soluble aniline or fluorescent dyes, pre-mixed at a rate of 2.5 ml (1/2 teaspoon) of powdered dye per 0.24 L (1/2 pint) of automatic transmission fluid, are useful in locating fluid leaks. These dyes can be used to determine whether the leak is engine oil or transmission fluid. Ultraviolet light can be used to detect the presence of fluorescent dye solution.
Transmission fluid cooler
CAUTION: Whenever the transaxle is disassembled to install new components, the transmission fluid cooler line must be cleaned and backflushed and a new transmission fluid cooler must be installed.
NOTE: Cleaning and back flushing the transmission fluid cooling system, together with the normal cleaning and inspection procedures performed as prescribed in this section during disassembly and assembly, will prevent contaminants from re-entering the transaxle and eliminate the need for re-repair.
If there is internal wear or damage in the transaxle, metal particles, clutch disc material or brake band material may have entered the torque converter and transmission fluid cooler. This contamination is the main cause of repeated transaxle failures. All foreign particles/contamination must be removed from the system before the transaxle is put into service.
(This article was borrowed from the website: fordbook)