Engine ONS
To check the timing belt tension, you need the FORD 21-113 testing device. Incorrect timing belt tension is the cause of noise during operation and leads to intensive wear of the belt.
Removal
Shift the gearbox into neutral and apply the handbrake.
Remove the V-belt, see p. 29.
Remove the distributor cap, see p. 47.
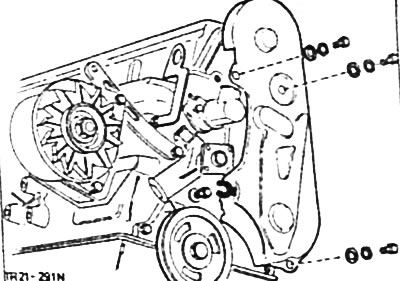
Loosen the fastening of the toothed belt cover and pull the cover from the side together with the guide clamps from the retaining pins. Tilt the cover from below, then remove it from the toothed wheel of the camshaft (for greater clarity, the fan is not shown in the figure).
Place the engine crankshaft in a position where the piston of cylinder 1 is in the BMT of the combustion process. To do this, turn the crankshaft so that the mark on the crankcase coincides with the mark on the crankshaft gear, see Figure GL21-9 below.
At the same time, the mark on the camshaft gear should coincide with the installation mark on the cylinder head. If this does not happen, then the crankshaft must be turned another 360° (a full turn) in the direction of its rotation.
The crankshaft is turned by means of a toothed wheel mounted on the shaft using a socket head and a ratchet.
Caution: Do not turn the engine shaft by the camshaft gear, as this will place a very high load on the timing belt.
Once the marks have aligned, do not change the engine adjustment under any circumstances.
If a used belt is to be reused, its direction of rotation must be marked before removal. To do this, an arrow in the direction of rotation of the engine shaft is applied to the belt using a felt-tip pen or marker. The direction of rotation of the crankshaft is shown below in Figure GL 21-9.
Loosen the toothed belt tension. To do this, first loosen the bolt with internal splines in the head of the belt tensioner, and then the bolt with a hexagonal head. Then press the belt tensioner against the action of the tension spring and tighten its mounting bolts again.
Note: To loosen the Allen bolt, you will need a 13mm box spanner with a strong bent end. Otherwise, you will need to drain some of the coolant and remove the thermostat housing.
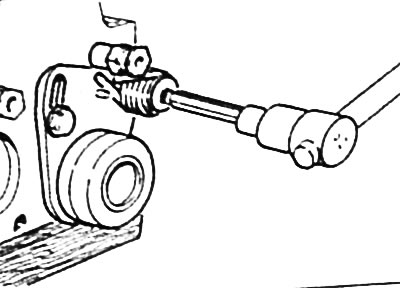
Loosen the crankshaft belt pulley fastening and remove the thrust washer. To do this, engage 5th gear and tighten the handbrake. If the toothed belt only needs to be removed from the camshaft toothed wheel, then it is not necessary to dismantle the belt pulley.
Caution: When releasing the belt pulley fastening, the crankshaft should not turn.
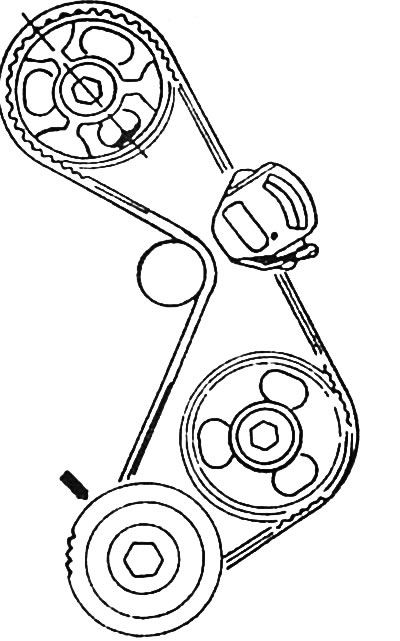
Remove the toothed belt and do not change the position of the toothed wheels after this.
Installation
Attention: Do not bend or twist the toothed belt. Replace a dirty, damaged or worn toothed belt in any case. Check the tension roller for uniformity and ease of movement.
Caution: If the camshaft needs to be turned with the timing belt removed, none of the pistons should be in the TDC position. Otherwise, the pistons and valves may be seriously damaged.
If the camshaft needs to be turned, all pistons should first be set to a position corresponding to half of their stroke. To do this, draw a chalk line on the top of the crankshaft wheel (prerequisite: the crankshaft is in a position in which the piston of cylinder 1 is at TDC), then turn the crankshaft to the right or left by 1/4 of a turn. Now the chalk line should be located horizontally on the wheel to the right or left.
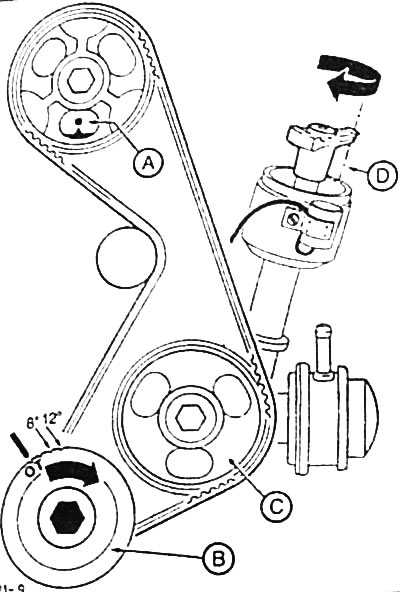
Make sure that the position of the camshaft gear "A" corresponds to the TDC position of the piston of cylinder 1. In this case, the mark on the camshaft gear must coincide with the installation mark on the cylinder head.
At the same time, the marks on the crankshaft gear "B" and the crankcase must coincide. In this case, the piston of cylinder 1 will be at the TDC of the combustion process.
Rotate the intermediate shaft gear "C" so that the mark on the distributor rotor tongue is located above the mark on the edge of the distributor housing.
Place the toothed belt on the toothed wheels in accordance with the figure GL 21-9. Make sure that the pull side of the belt (on the right in the figure) is tightly tensioned. If a used belt is installed, it should be placed in accordance with the arrow applied before removal, which shows the direction of belt rotation.
Caution: When applying the timing belt, neither the crankshaft nor the camshaft should change their position. Otherwise, the engine may be seriously damaged or may not be able to develop full power.
Attach the belt pulley with the thrust washer to the crankshaft and tighten the mounting bolts to a torque of 120 Nm.
Loosen the tension roller mounting bolts so that it can fit against the timing belt.
Tighten the tension roller mounting bolts to a torque of 25 Nm: first tighten the hexagon head bolt, then the slotted head bolt.
Turn the crankshaft in the direction of its rotation by 2 turns and check the adjustment. The marks on the camshaft gear, crankshaft gear and on the distributor rotor must match their installation marks.
Turn the crankshaft counter-clockwise by approximately 60°. This corresponds to approximately three pitches of the camshaft gear teeth.
Using the FORD 21-113 test device, check the timing belt tension. Place the device on the belt in the middle between the toothed wheels of the camshaft and intermediate shafts. The device should show a value of 4-5 units for a used belt, or 10-11 units for a new belt. If the specified value is not achieved, turn the engine crankshaft again to the position in which the piston of cylinder 1 is at TDC of the combustion process. Loosen the tension roller mounting bolts and rotate the roller accordingly. Then tighten the tension roller mounting bolts to a torque of 25 Nm.
Turn the crankshaft in the direction of its rotation by 2 turns and check the timing belt tension again.
Install the timing belt cover and secure with three bolts.
Install the distributor cap, see p. 47.
Install the V-belt, see p. 29.
Check and, if necessary, adjust the ignition timing angle, see p. 50.