Contents: V-belt for driving the generator and… ↳ V-ribbed belt ↳ Models with tension roller ↳ V-belts for generator and power… ↳ V-belts for generator and power… ↳ Poly V-belt for driving all… ↳ Poly V-belt for driving all… ↳
If a used V-belt or poly V-belt is reinstalled, it must be checked for wear and damage. If there is fraying on the side surfaces, cracks or damage, such a belt must be replaced in any case.
V-belt for driving the generator and power steering pump
Engine ONS
Attention. The OHC engine is equipped with two V-belts. Both belts must always be replaced together.
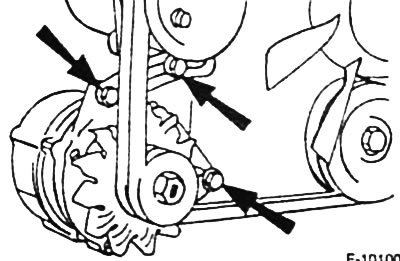
Loosen the locking bolts of the arrows.
Tilt the generator towards the engine and remove the V-belts.
Place new V-belts on the pulleys and use a crowbar to push the generator away from the engine, thereby tightening both V-belts.
Tighten the locking bolts to a torque of 25 Nm.
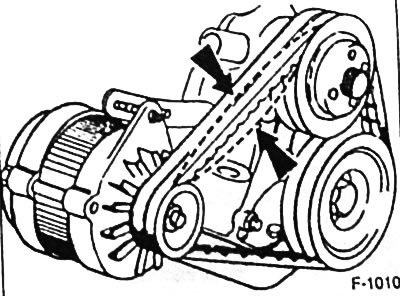
Vehicle without power steering: check the tension of the belts between the coolant pump pulleys and the "arrow" alternator. When pressed with your thumb, the belts should deflect by about 4 mm.
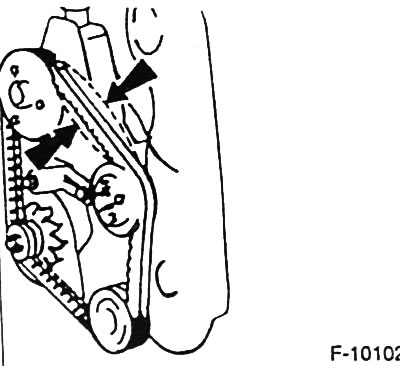
Vehicle with power steering: check the tension of the belts between the pulleys of the coolant pump and the power steering pump "arrow". When pressed with your thumb, the belts should deflect by about 4 mm.
V-ribbed belt
DOHC engines with a displacement of 2.0 and 2.9 liters
DOHC engines are equipped with a poly V-belt, which simultaneously drives all auxiliary units. Depending on the equipment, the belt tension is automatically adjusted by a tension roller.
When applying the poly V-belt, ensure that it is correctly positioned on all pulleys.
Models without tension roller (some models up to 8/94)
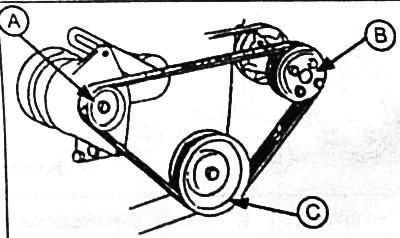
Loosen the generator locking bolts "A".
Tilt the generator towards the engine and remove the poly V-belt.
Place a new poly V-belt on the pulleys and use a crowbar to push the generator away from the engine, thereby tightening the poly V-belt.
Tighten the locking bolts to a torque of 25 Nm.
Models with tension roller
For models with a self-adjusting tension roller, the tension of the poly V-belt does not need to be adjusted. The condition of the poly V-belt should only be checked as part of regular maintenance; if necessary, the poly V-belt should be replaced.
Poly V-belt application diagram
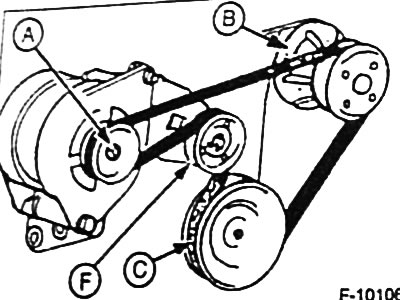
2.0L DOHC engine without power steering
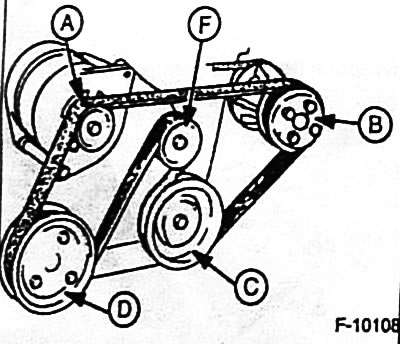
2.0 Liter DOHC engine for a car with power steering (and/or air conditioning)
A - generator; B - coolant pump; C - crankshaft belt pulley; D - power steering pump; F - self-adjusting tension roller.
Note: If there is an air conditioning compressor, it is located between the crankshaft and the coolant pump.
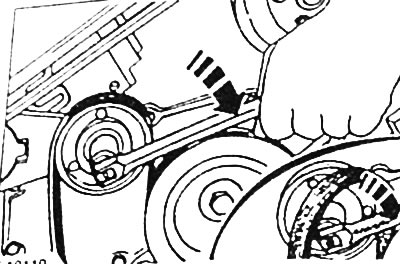
Using the sprocket and ratchet, loosen the belt tension by pressing the tension roller in the direction of the arrow and remove the poly V-belt.
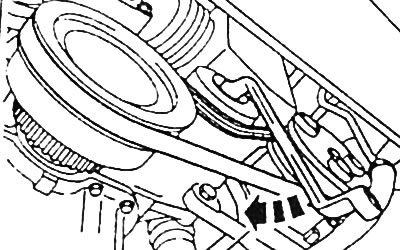
V6-DOHC engine with 9/94: Turn tensioner pulley for separate poly V-belt to the right.
To apply the poly V-belt, press the tension roller in the direction of the arrow.
V-belts for generator and power steering pump drive
V6-OHC engine up to 8/94
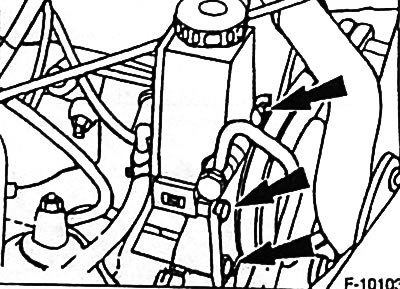
Release the locking and adjusting bolts.
Remove the V-belts.
Place new V-belts on the pulleys and use a crowbar to push the generator away from the engine, thereby tightening both V-belts.
Caution: Do not press on the expansion tank.
Tighten the locking and adjusting bolts to a torque of 55 Nm.
Check the tension of the belts between the pulleys of the coolant pump and the power steering pump. When pressed with your thumb, the belts should deflect by about 4 mm.
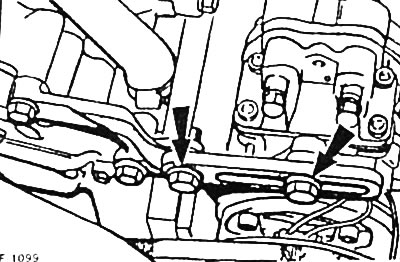
V-belt for driving the air conditioning compressor: loosen the locking and fastening bolts.
Tilt the compressor towards the engine and remove the V-belts.
Place new V-belts on the pulleys and adjust their tension by turning the compressor.
Tighten the locking bolts to a torque of 25 Nm.
Check the belt tension at the section with the largest distance between the pulleys. When pressed with your thumb, each belt should deflect by approximately 4 mm.
Tighten the locking and fastening bolts to a torque of 75 Nm.
V-belts for generator and power steering pump drive
Naturally aspirated and turbocharged diesel engines up to 8/93
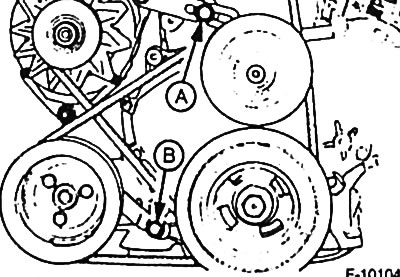
Loosen the mounting bolts and tension bolt "B" of the power steering pump.
Remove the V-belt for driving the power steering pump.
Loosen the mounting bolts and tension bolt "A" of the generator.
Remove the V-belt for the generator drive.
Install a new V-belt.
Using a crowbar, push the generator away from the engine and thereby tighten the V-belt.
Tighten the mounting bolts and tension bolt to a torque of 25 Nm.
Using a crowbar, press the power steering pump away from the engine and thereby tighten the V-belt.
Tighten the mounting bolts and tension bolt to a torque of 95 Nm.
Check the belt tension at the section with the largest distance between the pulleys. When pressed with your thumb, each belt should deflect by approximately 4 mm, otherwise repeat the tension adjustment.
Poly V-belt for driving all auxiliary units
Turbocharged diesel engine from 8/93 to 8/94
Disconnect the negative (-) battery cable.
Caution: When the battery is disconnected, the contents of the electronic memory devices are erased. For example, for engine fault codes or radio codes. Before disconnecting, also read the instructions in the chapter "Removal and installation the battery".
Remove the suction pipe. To do this, loosen the clamp and the fastening clip, remove the ventilation system pipe and pull the pipe out of the air filter.
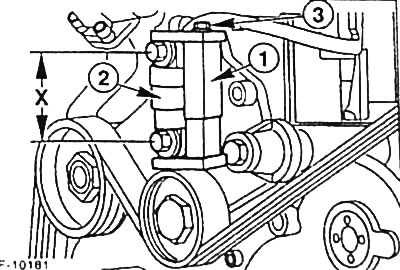
Place special tool "1" FORD 91-180 on the automatic belt tensioner and turn bolt "3" until dimension X = 80 mm is achieved.
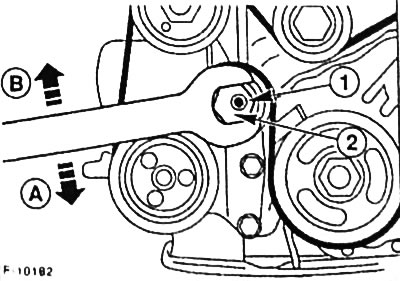
Loosen bolt "1" securing the lower belt tensioner.
Note: Left hand thread, turn right to release.
Turn the adjusting eccentric "2" in the direction of arrow "A" until the tension of the poly V-belt is completely released. In this position, tighten the fastening bolt to a torque of 45 Nm.
Remove the poly V-belt.
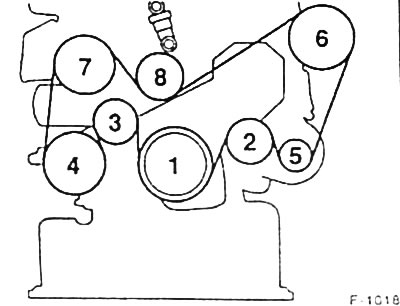
Place the new poly V-belt on the pulleys in ascending order of their numbers from 1 to 8.
Release and remove the special tool.
Install the intake manifold.
Connect the battery ground (-) cable.
Start the engine and let it idle for about 10 minutes.
Disconnect the battery ground (-) cable and remove the intake manifold.
Loosen the lower belt tensioner mounting bolt.
Note: Left hand thread.
Turn the adjusting eccentric clockwise "B" until the automatic belt tensioner has a dimension X = 81-83 mm. In this position, tighten the fastening bolt to a torque of 45 Nm.
Install the intake manifold.
Connect the negative (-) battery cable. Set the clock, enter the radio theft protection code.
Poly V-belt for driving all auxiliary units
Turbocharged diesel engine since 9/94
Place the front of the car on jack stands.
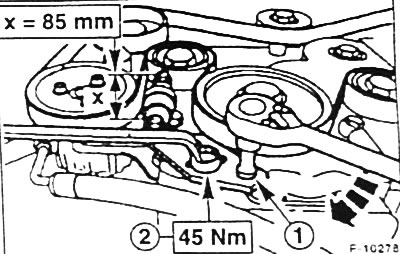
Install socket wrench "1" on the automatic belt tensioner and loosen bolt "9". Turn the socket wrench to the left and remove the belt.
Install the new belt in the sequence shown in Figure F-10183.
Turn the automatic belt tensioner clockwise until dimension X = 85 mm (from the center of one bolt to the center of the other bolt) is achieved. In this position, tighten the fastening bolt "9" to a torque of 45 Nm.
Note: Start the engine, let it idle for about 5 minutes, then check the size again. Adjust the belt tensioner position if necessary.
Lower the car.