Every 16,000 km or 12 months.
General information
1. The auxiliary drive belt is a flat, multi-groove belt with a V-shaped groove cross-section located on the right side of the engine. It drives the generator, the cooling system pump (on 4-cylinder engines), the hydraulic steering system pump and (depending on the version) the air conditioning system compressor. The belt itself is driven by the crankshaft pulley (see Fig. 5.1. a, b).
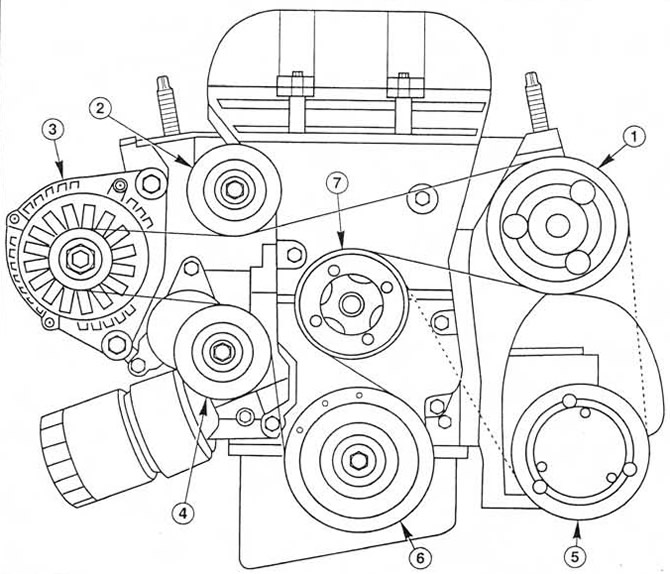 Fig. 5.1,a. Auxiliary drive belt route - models produced before June 1998 with 4-cylinder engines.
1. Power steering pump
2. Idler pulley
3. Generator
4. Automatic tensioner
5. Air conditioning compressor (if equipped)
6. Crankshaft pulley
7. Cooling system pump
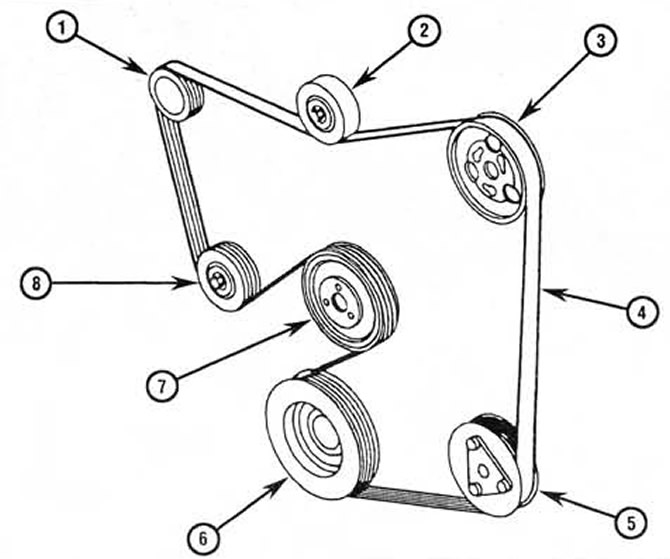 Fig. 5.1.6. Auxiliary drive belt route - models produced since June 1998 with 4-cylinder engines and air conditioning system (on models without this system, pulley 5 is missing)
1. Generator
2. Idler pulley
3. Power steering pump
4. Belt
5. Air conditioning compressor (if equipped)
6. Crankshaft pulley
7. Cooling system pump
8. Automatic tensioner
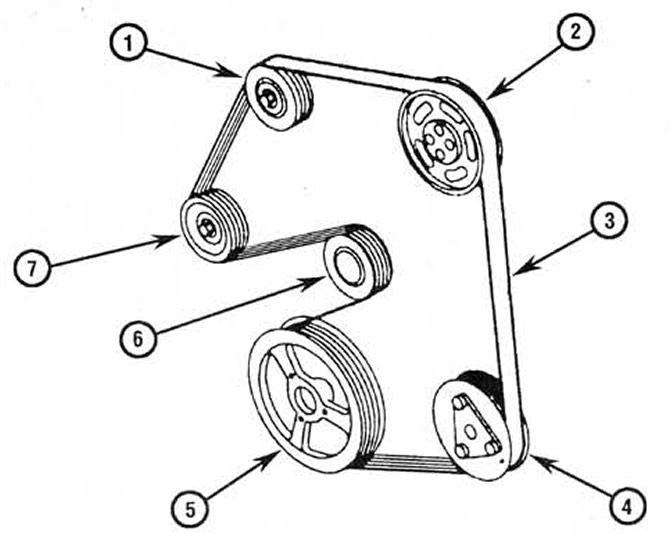 Fig. 5.1,c. Auxiliary drive belt route - models with V-shaped 6-cylinder engines and air conditioning system (on models without this system, pulley 4 is missing)
1. Idler pulley
2. Hydraulic steering pump
3. Belt
4. Air conditioning compressor (if equipped)
5. Crankshaft pulley
6. Automatic tensioner
7. Generator
2. On 6-cylinder engines, the coolant pump is driven by a separate belt of the same type from the front intake camshaft.
3. The condition and tension of the auxiliary drive belt is very important for engine operation. The belt experiences heavy loads during operation and stretches and wears out over time. Therefore, it must be checked regularly.
Examination
4. With the ignition off, open and secure the hood. The accessory drive belt is located on the right end of the engine, under the right engine mount bracket. Be careful and wear gloves to protect your hands from hot parts if the engine has just been turned off. For better access, jack up the front of the car on the right side, place it on supports, remove the wheel, and then remove the accessory drive belt cover (fastened with two fasteners) from under the wheel arch. If necessary, also remove the rear section of the mudguard, which is secured with two bolts.
5. Using a flashlight or portable lamp for illumination and turning the engine by the crankshaft pulley bolt, inspect the belt along its entire length for cracks, rubber peeling, and groove wear (see Fig. 5.5). Also make sure there are no shiny areas on the belt.
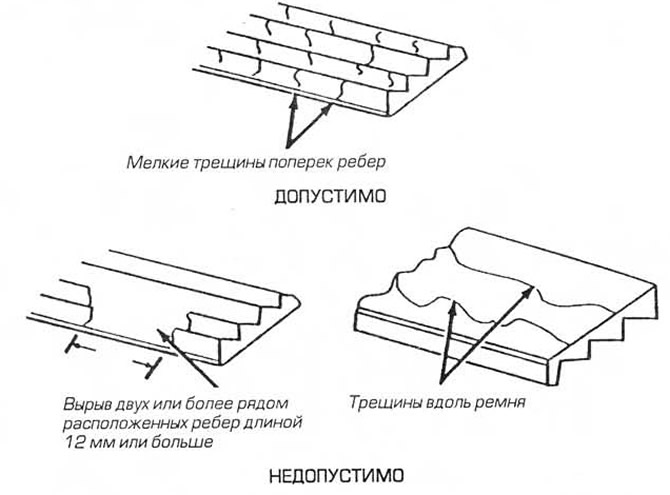 Fig. 5.5. Inspect the accessory drive belt for similar signs of wear. Small cracks across the groove walls are acceptable. If they are deep or if the belt is worn or damaged, replace it.
6. Inspect the belt on both sides. To do this, turn it with your fingers. If you doubt the belt's serviceability, replace it (see item 7).
7. On 6-cylinder models, remove the water pump drive belt cover secured to the top and front of the engine. Inspect the belt as described in pp. 5, 6.
Belt tension
8. The accessory drive belt is tensioned by an automatic tensioner. Therefore, regular checks and manual adjustments are not possible.
9. If you feel that the belt is slipping and/or loose, or that the tensioner is faulty, the tensioner needs to be replaced.
10. To do this, remove the belt (see below), unscrew the tensioner mounting bolts (two bolts with a slotted head are accessible from below from under the wheel arch) from the generator support bracket (see Fig. 5.10). The new tensioner must be properly installed on its supports and tightened to the required torque.
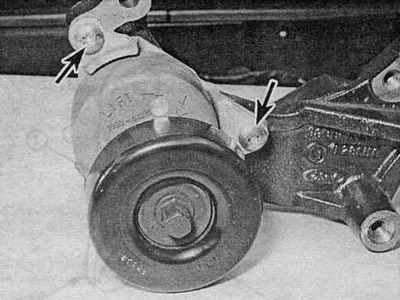 Fig. 5.10 The accessory drive belt is tensioned by an automatic tensioner. It is secured with two slotted head screws (shown by arrows) to the generator support bracket.
Replacement
11. Open the hood. Raise the front of the car on the right side, place it on a support, remove the wheel, and then remove the belt cover (fixed with two fasteners) from under the wheel arch.
12. If you are reinstalling a removed belt, mark it or note which side of the belt has the manufacturer's mark on a flat surface so that you can reinstall the belt with the correct side facing up.
13. Turn the tensioner pulley clockwise so that it does not put pressure on the belt (see Fig. 5.13). Depending on the model, the tensioner has either a hexagon for a spanner or a square hole into which you can insert the handle of a socket wrench.
 Fig. 5.13 Turn the tensioner pulley clockwise so that the pulley does not exert pressure on the belt. Then remove the belt from the crankshaft pulley.
14. Remove the belt from the crankshaft pulley and release the tensioner. Then remove the belt from the remaining pulleys, remembering its original position.
15. Inspect all pulleys and remove all traces of oil from the grooves. Make sure that the tensioner is working properly. When you turn its pulley clockwise, you should feel the force of the spring, and when you release it, the pulley should smoothly return to its original position.
16. If you are reinstalling a removed belt, install it so that it rotates in the same direction. Check its position using the marks made during removal. When installing the belt, ensure that it fits into the pulley grooves as shown in Fig. 5.16. Make sure that the belt is correctly positioned on the pulleys. Start putting the belt on from the top, then put it on the lower pulleys, finishing this procedure on the crankshaft pulley. Turn the tensioner pulley clockwise, tighten the belt on the crankshaft pulley, and then release the tensioner again.
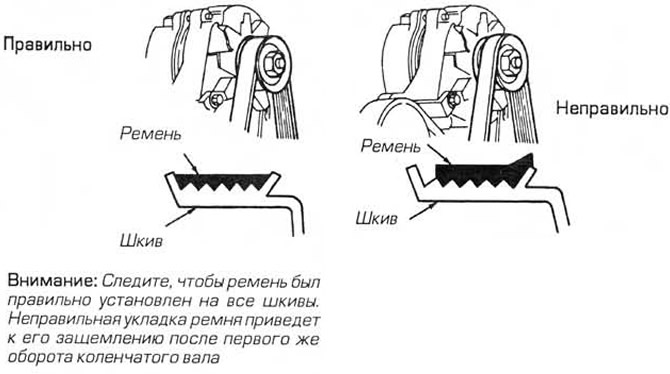 Fig. 5.16 When installing the belt, make sure that all its ribs are in the grooves of the pulleys.
17. Turn the crankshaft clockwise at least two full turns (using a wrench on the pulley bolt) to allow the belt to settle on the pulleys. Then check that the belt is correctly installed on the pulleys.
18. Install the removed components, then lower the vehicle to the ground.