Every 16,000 km or 12 months.
Note: More detailed illustrations of the brake system are presented in Ch. 9.
1. The procedures described in this paragraph should be carried out in accordance with the maintenance schedule or if you suspect that there is a malfunction in the system. The following symptoms may indicate a brake system failure:
- A) When you press the brake pedal, the car pulls to one side.
- b) Screeching when brakes are applied.
- V) Excessive brake pedal travel.
- G) The need for frequent topping up of brake fluid. Please note that hydraulic clutch transmissions (see chapter 6) this problem may be caused by a leak in the clutch actuator.
Front disc brakes
2. Apply the parking brake. 2 Apply the parking brake and loosen the front wheel nuts. Raise the front end and place it on stands.
3. To improve access to the brake calipers, remove the wheels.
4. Looking through the caliper sight hole, verify that the thickness of the lining friction material of each pad does not reach the regulated minimum specified in the specification (see fig. 19.4).
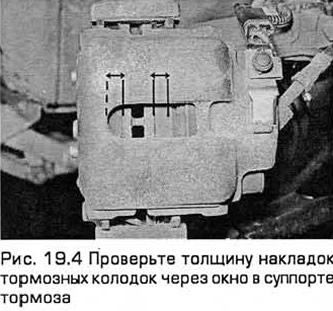
Note: Please note that usually the lining material is bonded to the metal base.
5. If it is difficult for you to determine the exact thickness of the pads, or if you are not sure that the pads are in good condition, remove the caliper for a subsequent check (see chapter 9).
6. Check the other brake caliper in the same way.
7. If any of the brake pads are worn to the limit (see technical data) or above it, then all four pads on this vehicle axle must be replaced as a set (that is, all front or all rear pads).
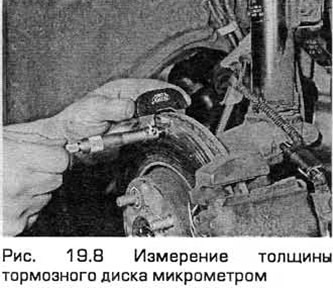
8. Measure the thickness of the discs with a micrometer (if available), to make sure the disks don't run out of resource (see fig. 19.8) . If any disc is thinner than indicated (minimum thickness value in Technical Data), replace it (see ch. 9). In this case, you should always check the general condition of the disk. Inspect each disc for scratches and discoloration caused by overheating. If such signs are found, replace the corresponding disc or have it regrinded (ch. 9).
9. Check all brake lines and hoses before installing wheels (ch. 9). In particular, inspect flexible hoses in areas near the calipers where the hoses have the most movement. Squeezing the hoses with your fingers (but without folding them in half, so as not to damage), check for cracks, cuts that are not otherwise visible (see fig. 19.9).

10. Finally, reinstall the wheels, lower the vehicle and finally tighten the wheel nuts.
Rear disc brakes
11. Loosen the rear wheel nuts, then chock the front wheels. Raise the rear and place it on supports. Remove rear wheels.
12. The procedure for checking the rear disc brakes is performed as indicated in paragraphs. 2...10.
Rear drum brakes
13. Loosen rear wheel nuts. Support the front wheels with wedges, lift the rear and place it on supports. Remove rear wheels.
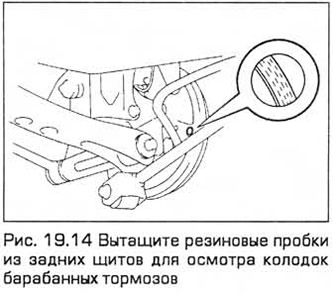
14. To control the thickness of the brake pads without removing the brake drums, pull out the rubber plugs from the rear shields and use a flashlight to inspect the lining of the movable brake pads (see fig. 19.14). Make sure that the thickness of the lining material does not reach the minimum specified in the Technical Data.
15. If it is difficult for you to accurately determine the thickness of the linings, or if you are not sure that the pads are in good condition, remove the brake drums for later inspection (ch. 9).
16. After removing the drums, check that the shoe return springs and pressure springs are installed correctly, and also check that there are no brake fluid leaks from the wheel brake cylinders. Check the friction surface of each brake drum for scratches and discoloration. If such signs are found, the drum must be replaced or its friction surface treated.
17. Check all brake lines and hoses before installing wheels (ch. 9). Finally apply the parking brake and make sure the rear wheels are locked. The parking brake is self-adjusting and does not require manual adjustment.
18. Install the wheels and lower the vehicle to the ground. Tighten the wheel nuts to the required torque.
Visitor comments