Contents: Replacing brake fluid ↳ Replacing the coolant ↳ Draining the coolant ↳ Flushing the system ↳ Filling the cooling system ↳ Antifreeze mixture ↳ General cooling system checks ↳
Every 3 years.
Replacing brake fluid
The procedure is similar to the procedure for bleeding the brake hydraulic system (see Chapter 9), except that you must first pump all the brake fluid out of the reservoir and then allow all the old fluid to drain out of the system by bleeding the brakes.
Replacing the coolant
Note: If you use Ford-specified or equivalent antifreeze, you do not need to change the coolant for the life of the vehicle. However, if you do not know what type of coolant is in your vehicle, or if you use non-specified antifreeze, or if you still prefer to change the coolant, change the coolant (usually every 2 years) as described below. See also paragraph 3 of this chapter.
Warning: Do not allow antifreeze to come into contact with your skin or the vehicle's paintwork. Wash off any spills immediately with water. Do not leave the antifreeze container in places accessible to children and pets - they may be attracted by its smell. Even a small amount of liquid getting inside the body is very dangerous and can lead to death. Wipe up any spills immediately. The antifreeze container must not be left open, and any leaks from the cooling system must be eliminated immediately.
Warning: Never remove the expansion tank cap while the engine is running or immediately after it has been stopped, as the fluid will remain hot and there is a risk of scalding and serious burns.
Draining the coolant
Warning: Allow the engine to cool before performing this procedure.
1. After the engine has completely cooled down, open the reserve tank cap (see par. 3).
2. To improve access, you can lift the front of the car and place it on supports.
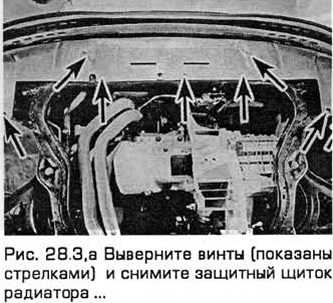
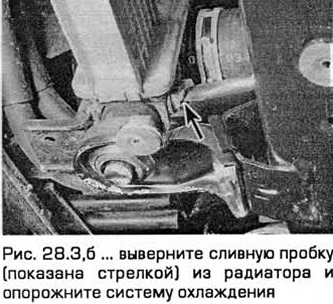
3. Remove the radiator shield mounting screws (8 or 9 screws). Place a suitable container under the radiator and remove the drain plug. Try to ensure that most of the liquid gets into the container (see Fig. 28.3, a, b).
Flushing the system
4. If the coolant is not changed regularly, or if the antifreeze loses its qualities, the efficiency of the cooling system may be significantly reduced due to the channels becoming clogged with dirt, rust, etc. This can be avoided (along with using only high-quality antifreeze and clean soft water) by flushing the system in cases where you remove/install any component or replace the coolant.
5. After draining the fluid, install the drain plug and fill the system with clean water. Close the expansion tank with the cap. Start the engine and wait until it warms up to normal operating temperature. Then turn it off and after it has completely cooled down, drain the fluid from the system again. Repeat the procedure until only clean water flows out of the system. Then fill it with coolant of the specified composition.
6. If you use only high-quality antifreeze and clean soft water, and have already replaced the coolant (in accordance with the recommended replacement schedule), the above flushing procedure will keep the system clean for a long time. If the system has not been maintained carefully, then the following operations should be performed.
7. Drain the coolant and disconnect the upper and lower radiator hoses. Insert a garden hose into the upper radiator hose. Flush the radiator with clean water until clean water flows out of the lower outlet.
8. To flush the engine, insert a garden hose into the thermostat outlet. Run clean water through the engine until clean water flows out of the lower hose.
9. If after a sufficiently long flush the water does not become clear, flush with a special flushing agent.
10. If the radiator is heavily soiled, it may be necessary to flush it in the opposite direction. To do this, insert a hose into the lower outlet, wrapping the hose with a piece of rag to seal it. Run water through the radiator until clean water flows out of the upper outlet.
11. If you suspect that the radiator is clogged with deposits inside, remove it, turn it over and wash it in the same way as described in point 10.
12. The heater heat exchanger can be flushed in the same way. The heater heat exchanger tubes have the same diameter and pass through the engine bulkhead. Removal and installation of the heater heat exchanger are described in more detail in Chapter 3.
13. Use flushing agents only as a last resort. If the coolant in the system is changed regularly, this is usually not necessary.
Filling the cooling system
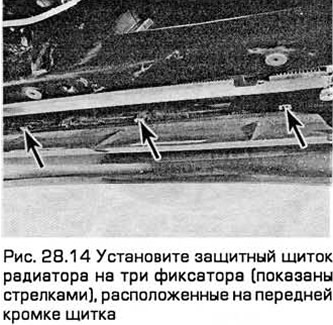
14. After draining and flushing the system, secure all removed hoses and tighten the radiator cap. Install the radiator shield onto the three clips located on the front edge of the shield. Tighten the shield mounting screws (see Fig. 28.14). If the vehicle was raised, lower it to the ground.
15. Prepare coolant of the specified composition in the required quantity (see Technical data), but with some reserve for possible topping up.
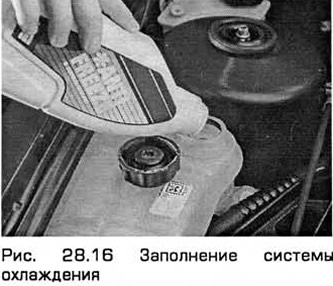
16. Fill the system slowly through the filler neck of the expansion tank (see Fig. 28.16). Since the tank is located at the highest point of the cooling system, all air in the system will exit through the tank. Slow filling will prevent the formation of air locks.
17. Add fluid until the level in the tank reaches the "MAX" mark. Then close the lid.
18. Start the engine and let it idle until it reaches normal operating temperature and the electric radiator fan comes on. Monitor the temperature gauge to see if the engine is overheating. If the fluid level in the expansion tank drops significantly, add fluid to the "MAX" mark to minimize the amount of air circulating in the system.
19. Turn off the engine and leave it until it cools down completely (overnight if possible). Then open the tank cap and add fluid to the "MAX" mark. Install and tighten the tank cap. Eliminate all leaks from the engine compartment and the body.
20. Check for leaks, especially at the joints that were disassembled. New antifreeze tends to quickly penetrate through weak points in the system.
21. Note: If after draining the fluid and flushing the system you notice signs of overheating that were not present before, then the problem is almost certainly caused by air locks. Air usually gets into the system components when the system is filled too quickly. Sometimes the locks can be removed by tapping or squeezing the various hoses. If the problem still persists, turn off the engine and allow it to cool completely, then open the reservoir cap or disconnect the hoses to release the air from the system.
Antifreeze mixture
22. Ford claims that the antifreeze added to the vehicle's cooling system at the factory (TU ESD-M97B-49-A or WSS-M97B44-D) will last as long as the vehicle itself. This will happen provided that the initially added antifreeze is not mixed with other types of fluids when topping up. The cooling system should always be filled with the specified brand of antifreeze mixed with clean water in a 50/50 ratio. If you add another brand of antifreeze, the Ford warranty is automatically canceled. To restore the warranty, you must completely drain the coolant and flush the cooling system before refilling the system.
23. If you have a used car whose history is unknown, before filling the cooling system with branded antifreeze, you should thoroughly flush the cooling system in both directions. If you then fill the system with Ford antifreeze, you can no longer worry about the cooling system.
24. If the antifreeze does not meet Ford specifications, it should always be replaced in accordance with the maintenance schedule. The general rule is to replace the antifreeze every three years.
This is necessary not only to ensure reliable protection against freezing, but also to prevent corrosion, which will occur due to the decrease in the effectiveness of its inhibitors. Always use ethylene glycol-based antifreeze, which is designed for cooling systems made of different metals. The amount of antifreeze and the level of protection are regulated in the specifications.
25. If the antifreeze meets Ford specifications, prepare the mixture according to Technical Requirements. The standard mixture is 40% antifreeze (by volume) and 60% clean soft water. If using another type of antifreeze, follow the manufacturer's instructions.
26. Prepare the mixture with some excess, taking into account possible topping up. However, you cannot know in advance when and how much mixture you will need, so the recommendations on the amount of reserve liquid are rather academic.
27. Before replacing the antifreeze, the cooling system must be emptied, flushed, and the condition and reliability of all hoses must be checked. As noted above, fresh antifreeze quickly finds a weak spot in the system.
28. After filling the system with antifreeze, stick a label on the expansion tank indicating the brand and concentration of antifreeze. Subsequent refills should be made using antifreeze of the same brand and concentration.
29. Antifreeze must not be used in windshield washers as it will damage the paintwork. Special cleaning additives should be used to clean the glass.
General cooling system checks
30. The engine must be cool before starting them. Therefore, perform system checks before the trip or at least 3 hours after it.
31. Remove the expansion tank cap (see paragraph 3) and wipe it inside and out with a rag. Also wipe the neck of the tank. The presence of rust or corrosion on the neck indicates that the fluid needs to be replaced. The fluid inside the tank should be relatively clean and transparent. If it is rust-colored, drain the fluid and flush the system, then fill it with new fluid.
32. Carefully check all connections of the cooling system for leaks. Usually the location of the leak can be determined by the presence of white or rusty loose deposits. If a leak is found, then, as a rule, the hose, gasket, etc., due to which the leak occurred, must be replaced.
33. Clean the front side of the radiator core from leaves, insects and other debris with a soft brush. Be careful not to damage the thin fins or cut yourself on them. To do this job more thoroughly, remove the radiator grille (see Chapter 11).
(Content was created using data from this website FordBook)