Contents: General part ↳ Inspection ↳ Checking the tension of drive belts ↳ Main drive belt for water pump and… ↳ Power steering pump drive belt (cars… ↳ Power steering pump drive belt (cars… ↳ Replacement ↳
General part
1. The main drive belt, which is of the flat-toothed (or "multi-V") type, is mounted at the front of the engine and transmits torque from the crankshaft pulley to the alternator, water pump and cooling fan. On models with power steering and/or air conditioning, an additional drive belt for these systems is installed in front of the main belt, which also engages with the crankshaft pulley.
2. The condition and tension of drive belts has a critical impact on engine operation. Due to their composition and high operating stresses, drive belts lose tension and wear out over time. Therefore, they must be inspected regularly.
Inspection
3 Turn off the engine, then open and prop up the hood. If the engine is still hot, be very careful and wear protective gloves to avoid burning your hands.
4. Using a flashlight and turning the crankshaft pulley with a wrench if necessary, check the condition of the drive belt along its entire length. Look out for cracks, separation of rubber layers, broken or worn teeth (see Figure 10.4). Also inspect the belt for wear and oiliness, which will appear as shiny areas. Both sides of the drive belt must be inspected, which means it may be necessary to turn the drive belt over to inspect the back side. If you do not have the opportunity. Inspect any part of the belt visually, run your fingers over it to ensure its satisfactory condition. If there is any doubt about the condition of the drive belt, replace it with a new one as described below.
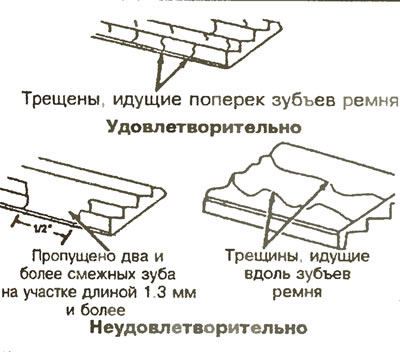
Figure 10.4. Inspect the drive belt for any signs of wear shown. If the drive belt has deep cracks or other signs of wear or damage, replace it with a new one.
Checking the tension of drive belts
5. Ford technicians use a special device to check the tension of drive belts, but to check the belt tension at home, it is enough to press on the belt with your fingers in the middle of the longest "span" between the pulleys.
6. Adjust, if necessary, according to the belt type as follows.
Main drive belt for water pump and alternator
7. When checking the tension by pressing with your fingers in the middle of the longest "span" between the pulleys, a deviation of 2.5 mm in one direction is considered normal (the "oscillation" in both directions should be approximately 5.0 mm) (see Figure 10.7a). If adjustment is necessary, loosen the alternator locking and adjusting bolts. Then, by turning the adjusting bolt on the adjustment lever, set the correct belt tension (see Figure 10.7b) and re-tighten the bolts.
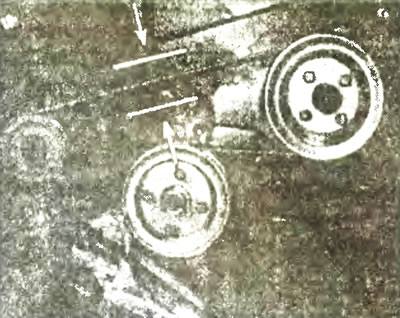
Figure 10.7a. Check the drive belt tension by measuring its deflection at the indicated point.
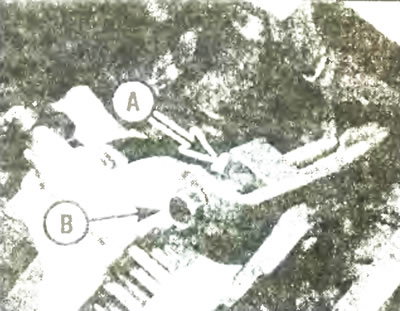
Figure 10.7b. Fixing (A) and adjusting (B) bolts of the alternator adjusting lever.
8. Run the engine for about five minutes, then recheck the belt tension.
Power steering pump drive belt (cars without air conditioning)
9. When checking the tension by pressing with your fingers in the middle of the longest "span" between the pulleys, a deviation of 2.0 mm in one direction is considered normal (the "oscillation" in both directions should be approximately 4.0 mm). If adjustment is necessary, loosen the pivot and adjusting bolts of the power steering pump support bracket, rotate the bracket with the pump to ensure the correct drive belt tension, then retighten the bolts (see Fig. 10.9).
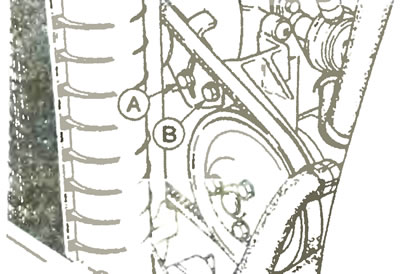
Figure 10.9. Power steering drive belt and its hinge and adjusting bolts
10. Run the engine for about five minutes, then recheck the belt tension.
Power steering pump drive belt (cars with air conditioning)
11. The tension of the drive belt installed on later vehicles with power steering and air conditioning is adjusted by an automatic tensioning mechanism; regular checks and manual "adjustment" are not required or possible.
12. If you suspect that the drive belt is slipping or sagging, or if the tensioning mechanism is broken, it must be replaced with a new one. To do this, remove the drive belt as described below, then unscrew the bolt and remove the tensioner mechanism. When installing a new tensioner, ensure it is properly aligned on the mountings and securely fastened.
Replacement
13. The correct positioning of the drive belts relative to the pulleys is shown in Figures 10.13a, b.
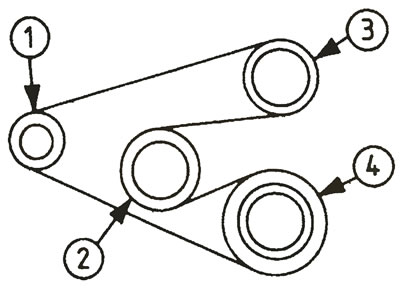
Figure 10.13a. Correct location of the water pump and generator drive belt relative to the pulleys: 1. Generator pulley.; 2. Fan pulley.; 3. Water pump pulley.; 4. Crankshaft groove pulley.
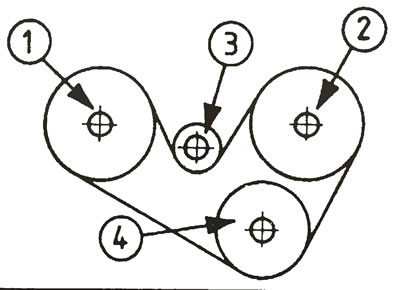
Figure 10.13a. Correct location of auxiliary power steering and air conditioning drive belt: 1. Crankshaft pulley.; 2. Power steering pump pulley.; 3. Automatic regulator pulley.; 4. Air conditioning compressor pulley.
14. If you are going to reinstall the removed drive belt, pay attention to the manufacturer's marks or make your own marks on a flat surface so that the belt is installed correctly.
15. To remove the drive belt of the water pump and generator, you must first remove the auxiliary belt.
16. To remove the belt, loosen the belt tension completely as described above. If an automatic tensioner is installed, loosen the tensioner pulley bolt and move the tensioner to the side to release the belt. Remove the belt from the pulleys.
17. Check all pulleys and ensure that their recesses are clean and free of grease. Wipe them if necessary.
18. If you are installing a previously removed belt, use the marks or notes made during removal to ensure that the belt rotates in the same direction after installation as before removal. Center the drive belt in the pulley grooves so that it does not extend beyond the raised sides of the pulleys and is correctly directed.
19. Turn the crankshaft groove pulley clockwise with a wrench at least two full turns to seat the drive belt on the pulleys, checking that the drive belt is installed correctly. Once the belt is installed, adjust its tension as described above.