Warning: Air conditioning system hose replacement must be performed by the manufacturer's dealer or a qualified air conditioning repair shop equipped to safely discharge the system. Never remove any air conditioning system components or hoses unless the system is depressurized.
Always check the hoses for any abrasions or burnouts, which can cause premature and costly failure.
Softening of the hose material indicates its internal damage; this type of damage can cause contamination of the cooling system and blockage of the radiator with particles of the hose material.
Hardening of the hose material can occur at any time. In this case, tightening the hose clamp will not restore the seal and will not eliminate the leaks that have occurred.
Bulging hoses or oil-leaking ends are a sign of danger and are caused by contamination with oil or grease. Squeeze the hose to detect any cracks or breaks that may be causing the leak.
General part
1. High temperatures in the engine compartment can cause deterioration of rubber or plastic hoses used to operate the engine, related systems, and emission control systems. Hoses should be inspected periodically for cracks, loose clamps and clips, hardening of the hose material, and leaks.
2. Carefully inspect the upper and lower radiator hoses, smaller diameter cooling system hoses and metal pipes, and the heater hoses and pipes running from the engine to the firewall. Inspect the hoses along their entire length and replace any that are split, swollen or in poor condition with new ones. Remember, cracks often become visible when the hose is compressed (see Figure 11.2).
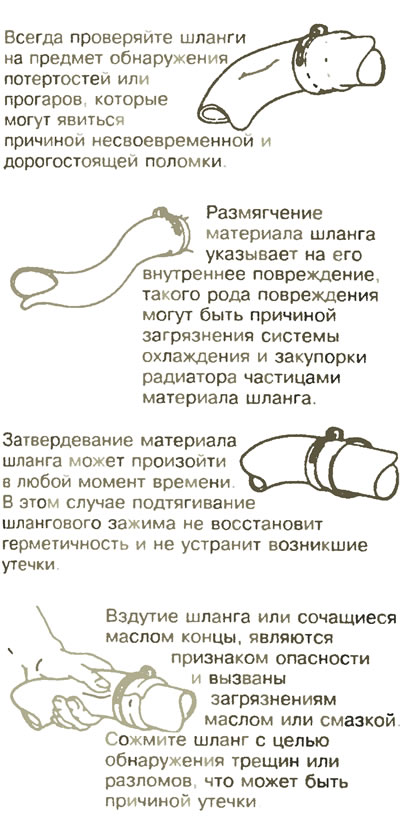
Figure 11.2. Hoses, like drive belts, have a terrible habit of breaking at the most inopportune times - regularly checking their condition as shown in the figure will help prevent trouble.
3. Make sure that there is no possibility of leakage at the hose connection points. Remember that a cooling system leak will usually leave white or rusty deposits in the areas surrounding the leak: If the hose is attached to the cooling system with a spring clamp and the clamp appears to be loose, replace it with a new one to avoid possible leaks.
4. Some (but not all) hoses are secured to the fittings using clamps. Where hoses are secured with clamps, ensure that the clamps are tightly tightened to prevent fluid leakage. Where hoses are fitted to fittings without being secured with clamps, check to see if the hose material has expanded or hardened, causing fluid leakage.
5. Check all fluid reservoirs, filler caps, drain plugs, etc. for leaks. If the vehicle is permanently parked, carefully inspect the ground underneath the vehicle, paying attention to all oil stains and puddles, except for the puddle of water left by fogging from the air conditioner. Once you detect a leak, identify and correct its cause. Where oil has been leaking for a long time, steam cleaning, high-pressure water rinsing, or something similar will be required to remove the accumulated dirt in order to pinpoint the exact source of the leak.
Vacuum hoses
6. In general, to identify vacuum hoses, especially in emission control systems, the hoses are marked with colored stripes molded into them. Different systems use hoses that have different wall thicknesses, collapse resistance, and heat resistance. When replacing hoses, ensure that the new hoses you install are made of the same material as the originals.
7. Often the only effective way to check the condition of the hoses is to remove the hose from the vehicle. If you remove more than one hose, make sure the hoses and their fittings are marked to ensure they are reinstalled correctly.
8. When checking the vacuum hoses, remember to also check the plastic T-connections. Inspect connections for cracks and ensure that the hoses attached to the fittings are not kinked, as this will cause leaks.
9. To detect leaks in vacuum hoses, you can use a small piece of old vacuum hose as a stethoscope (with an internal diameter of about 6 millimeters). Place one end of the hose to your ear and run the other end along the surface of the vacuum hose and along the fittings, listening for a hissing sound, which indicates a loss of seal.
Warning: When checking hoses with a stethoscope, be extremely careful not to touch moving engine parts such as drive belts, fan, etc.
Fuel supply hoses
10. Check the fuel supply hoses for signs of material deterioration or abrasions. Pay particular attention to areas where the hoses are kinked and immediately before the fittings (for example, where the hose connects to the fuel filter).
11. Only high-quality fuel hoses, which are usually identified by the word, should be used to replace fuel lines "Fluoroelastomer" (fluorelastometers), printed on the hose. Under any circumstances, never use non-reinforced vacuum hoses, clear plastic tubing, or water hoses as fuel lines.
12. Fuel lines are typically secured with spring-type hose clamps. These clamps often lose their tension over time and may spring back unexpectedly when removed. When replacing hoses, replace spring-type clamps with screw-type clamps.
Metal fuel lines
13. Metal tubes are often used as fuel lines between the fuel filter and the engine. Be careful to ensure that the tubes are not kinked or corrugated, and try to anticipate the moment when a crack will form in the tube.
14. When replacing metal fuel lines, only seamless steel tubing should be used, as copper or aluminum tubing does not provide the strength necessary to withstand engine vibrations
15. Inspect the metal brake system pipes where they connect to the master cylinder and the ABS hydraulic unit (if used) for cracks in the tubes or loose fittings. At the slightest sign of a brake fluid leak, it is necessary to immediately carry out a thorough inspection of the entire brake system.