Contents: Removal ↳ Installation ↳
Note: If the valve drive parts are to be reused, they must be installed in their original locations. To avoid confusing the parts, it is recommended to prepare a suitable laying board.
Removal
Remove the cylinder heads and place them on 2 wooden blocks to avoid accidentally damaging the open valves, see p. 19.
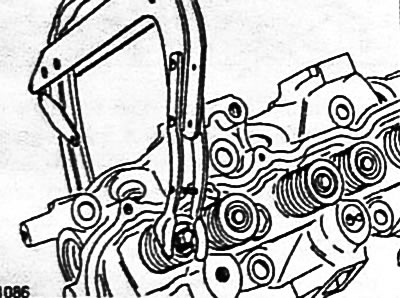
Remove the valve springs. To remove the crackers - and then the valves with springs - a standard spring compressor tool is used.
Compress the valve spring and remove the crackers. Then release the springs and remove the tool. Remove the valve from the cylinder head. Remove the upper valve spring plate, the spring and the lower valve spring plate.
Remove the remaining valves in a similar manner.
Remove the valve stem seals, see next chapter.
Installation
If the old valves and the old cylinder head are installed, the valve guides must be checked before assembly. If new valves are installed in the old cylinder head, the valve seats in the cylinder head must first be reworked and the valves must be ground in.
Clean the valves from any carbon deposits using a scraper and wire brush.
Clean the valve stems from burrs at the contact surfaces of the crackers.
The valve stems and valve guides are easily lubricated with SAE 80/90 hypoid oil (gear oil) and each valve is inserted into its original position.
Insert the lower valve spring plate.
Use new valve stem seals, see next chapter.
Insert the spring and upper spring plate.
Compress the valve springs, insert the crackers correctly, and then release the springs
Install the cylinder heads, see p. 19.
Check and, if necessary, adjust the valve drive clearances, see p. 26.
[The original post is on the web portal: www.fordbook.ru]