Contents: Removal ↳ Installation ↳
Note: If the valve drive parts are to be used again, they must be installed in their original locations. To avoid mixing up the parts, a laying board should be prepared for their removal.
Removal
Remove the air filter, see p. 57.
Remove the cylinder head cover.
Remove the timing belt, see from 13.
Turn the engine crankshaft so that none of the pistons are at TDC, see from 13.
Remove the 3 mounting bolts and remove the oil spray tube.
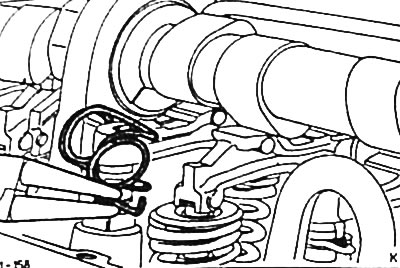
Unfasten the retaining springs of the pressure levers from the clamps on the spherical pins and remove them.
Pull the pressure levers away from the camshaft. To do this, turn the camshaft so that the spring of the corresponding valve is unloaded. Insert the FORD 21-005B device between the camshaft and the upper valve spring plate and recess the plate so that the pressure lever can be pulled out.
Caution: Make sure that the valve cotters do not become loose and the valve does not fall into the combustion chamber. If this happens, the cylinder head will need to be removed.
If a spring compressor is not available, the valve spring can be carefully compressed using a screwdriver.
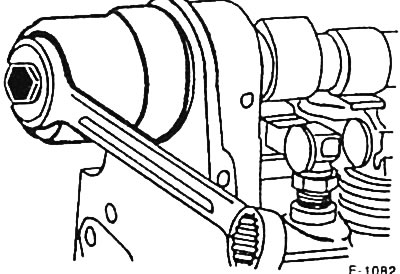
Unscrew the central bolt securing the camshaft gear and remove the gear together with the thrust plate. At the same time, hold the camshaft with a wrench by the lug located behind the sixth cam.
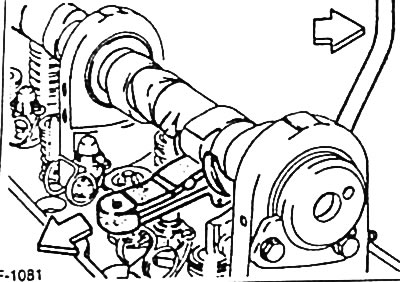
Loosen the camshaft mounting plate fastening and carefully remove the camshaft in a rearward direction.
From the toothed belt side, carefully pull the camshaft oil seal out of the cylinder head.
Installation
At the service station, the camshaft can be checked for runout if necessary.
The camshaft, its bearings and mounting plate are easily lubricated with SAE 80/90 hypoid oil (gear oil).
Carefully insert the camshaft from the rear bearing side.
Caution: Do not damage the working surfaces of the bearings.
Insert and screw the mounting plate.
If a used camshaft of a car with high mileage is installed, it is necessary to measure the axial clearance. At the service station, a linear movement indicator is used for this, which is attached to the cylinder head. Press the camshaft towards the toothed belt and set the value "0" on the indicator scale. Then press the camshaft towards the mounting plate and read the reading on the indicator scale. The prescribed value is 0.05-0.204 mm.
It is easy to lubricate the sealing lips of the new camshaft oil seal with transmission oil and insert the seal using a special FORD 21-009B tool. The seal should be located in the hole 1.5 mm deeper than its edge. If a special tool is not available, drive in the seal using a pipe that has the same outer and inner diameters as the seal.
Install the camshaft gear and tighten the mounting bolt to 50 Nm. Hold the camshaft with a wrench.
Attach and screw the oil spray tube.
Set the camshaft gear to the TDC mark for the piston of cylinder 1, see p. 17.
Set the crankshaft to the TDC mark for the piston of cylinder 1, see p. 17.
Slightly pressing the valve spring plates, insert the pressure levers.
Note: The pressure levers must be installed in their original places.
Place the retaining springs of the pressure levers and secure them in the clamps. The clamps should be positioned on the camshaft side.
Install the timing belt, see p. 13.
Check and, if necessary, adjust the valve drive clearances, see p. 26.
Install the cylinder head cover, see p. 15.
Install the air filter.
[Information for this article was taken from the website: www.fordbook.ru]