Contents: When the starter is turned on, the… ↳ The starter turns slowly and does… ↳ When the ignition key is released… ↳ Windscreen wiper ↳
When the starter is turned on, the starter motor does not work
The reasons for this may be a failure of the starter or traction relay, as well as a defect in the wires.
1. To detect a malfunction, you must first check for voltage at terminal 50 of the traction relay.
2. The absence of voltage when the starter is turned on indicates damage to the electrical circuit, and if voltage is present, it indicates a malfunction of the traction relay or starter.
3. If, when the starter is turned on, voltage is supplied to the traction relay, but it does not operate (there is no characteristic click), then the traction relay is faulty (the winding is broken or shorted to ground).
4. The presence of a characteristic click of the traction relay indicates that the relay contacts are burnt out or that the starter itself is out of order.
5. The operation of the starter electric motor can be checked by briefly applying voltage via an additional large-section wire to the contact of the traction relay on the electric motor side.
6. If the electric motor starts working, then the cause of the malfunction should be sought in the traction relay.
The starter turns slowly and does not start the engine
The reasons for this may be a discharged battery, too thick oil is poured into the engine lubrication system, the graphite brushes are not sufficiently pressed against the starter motor collector, the poor condition of the collector working surface and worn starter bearings.
When the ignition key is released from the "engine start" position, the starter continues to operate
The reasons for this may be sticking of the traction relay contacts or the ignition switch does not open the starter circuit. In this case, immediately turn off the ignition and disconnect the battery, then fix the problem.
Windscreen wiper
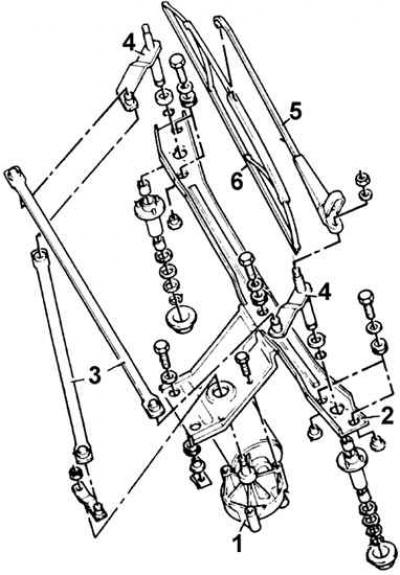
1 – engine, 2 – holder, 3 – rods, 4 – wiper arm axles, 5 – wiper arm, 6 – brush
Replacing the rubber wiper blade
1. Set the windshield wiper arm together with the blade to a vertical position.
2. Turn the brush to a position perpendicular to the lever.
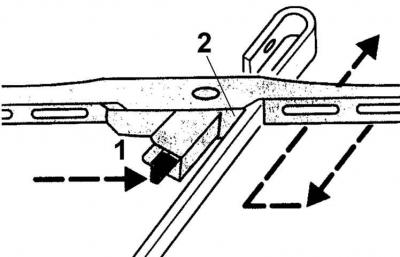
3. Press the lock (1) and slide the brush from the hook down the lever. Move the brush to the side along the lever and remove it from the lever upwards (2 – hole through which the brush is removed from the lever).
4. From the closed side of the rubber brush, squeeze both steel bars together with pliers, remove them from the side from the outer clamps, then remove the rubber brush together with the bars from the remaining clamps.
5. Install a new rubber blade without the mounting tabs into one of the wiper blade clamps.
6. Insert both tires into the rubber brush so that the notches on the tires face the rubber and coincide with the rubber protrusions.
7. Press both steel bars and rubber together with pliers and install them in the other clamps so that the protrusions on the clamps on both sides enter the locking grooves of the rubber brush.
8. Place the wiper blade on the arm and lower it onto the glass.
9. Check the tightness of the brush against the glass.
Removal and installation the windshield wiper arm
1. Open the hood.
2. Remove the plastic cap from the lever mounting nut and unscrew the nut.
3. Mark the position of the levers and remove the wiper arm from the axle.
Removal and installation the windshield wiper
1. Remove the wiper arms.
2. Remove the ventilation grille.
3. Disconnect the electrical wire connector from the engine.
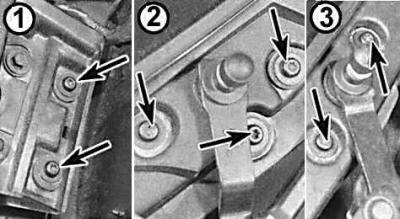
4. Unscrew the 8 Torx bolts securing the motor and windshield wiper mechanism to the engine compartment bulkhead (1 – two screws located in front of the windshield wiper motor, 2 – three screws near the right arm, 3 – two screws near the left arm, one bolt located between the windshield wiper arms).
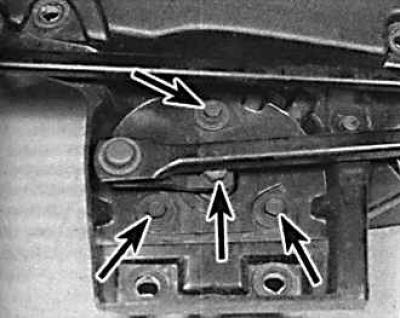
5. Remove the windshield wiper mechanism and motor (arrows indicate the attachment points of the windshield wiper motor).
6. Disconnect the rods from the lever axles and the crank mechanism.
Attention! The mechanism rods are connected to its cranks by means of nylon ball pins. The pins should be carefully removed using a lever and inserted after coating with graphite grease.
7. Unscrew the mounting bolt and remove the crank.
8. Unscrew the three screws and remove the engine from the bracket.
9. To install the windshield wiper, follow the steps in reverse order to the removal process.