Contents: Main headlight ↳ Headlight adjustment ↳ Headlight beam adjustment ↳ Replacing the additional headlight… ↳ Replacing the front fog light bulb ↳ Replacing the side turn signal… ↳ Rear light ↳ Removal the rear light ↳ Replacing the license plate light… ↳ Replacing interior lighting bulbs ↳ Replacing mirror lighting bulbs ↳ Replacement of open door signal,… ↳ Removal and installation headlights… ↳ Replacing the switch lighting lamp ↳ Replacing the glove compartment… ↳ Replacing the ashtray light bulb ↳ Replacing the heater panel backlight… ↳ Replacing the automatic transmission… ↳ Replacing the hazard warning light… ↳ Replacing the clock backlight lamp ↳
Main headlight
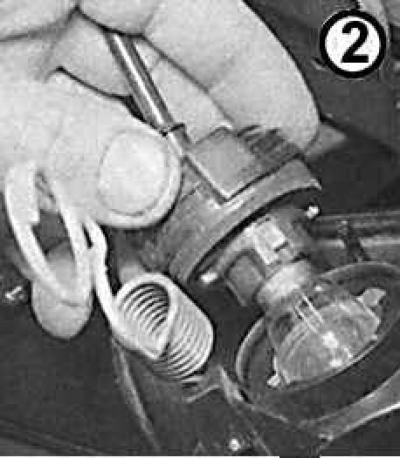
Replacing the high and low beam bulbs
1. Open the hood.
2. Turn the rear headlight cover counterclockwise and remove it.
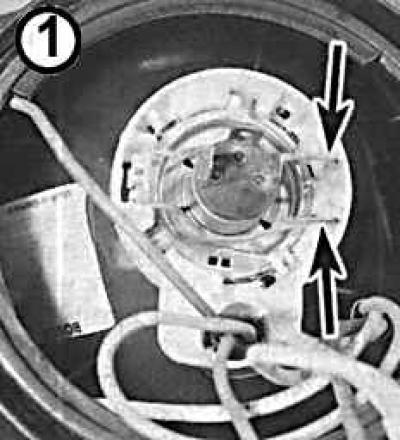
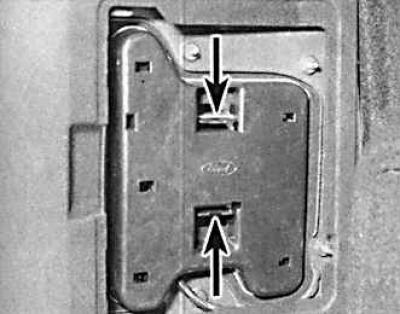
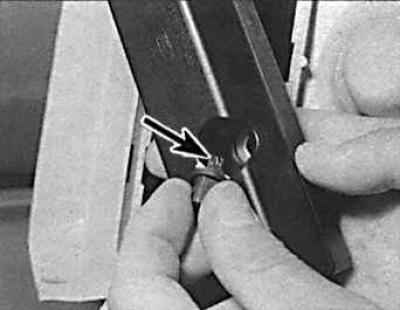
3. Disconnect the electrical connector from the light bulb and squeeze the tabs (indicated by arrows) of the spring clip.
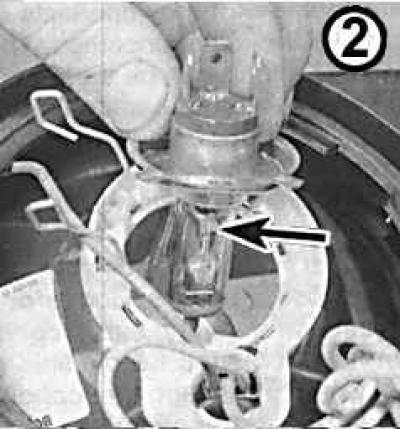
4. Remove the bulb (indicated by the arrow) from the headlight.
5. Install the new bulb so that the bulb holder protrusions fit into the headlight reflector grooves and secure with a spring clip.
Attention! It is strictly forbidden to touch the glass bulb with bare hands. Otherwise, it is necessary to wipe the bulb with alcohol.
6. Install the connector on the bulb and close the rear cover of the headlight.
7. Check the headlight adjustment.
Replacing the parking light bulb
1. Open the hood.
2. Turn the rear headlight cover counterclockwise and remove it.
3. Remove the bulb holder and bulb from the bottom of the reflector.
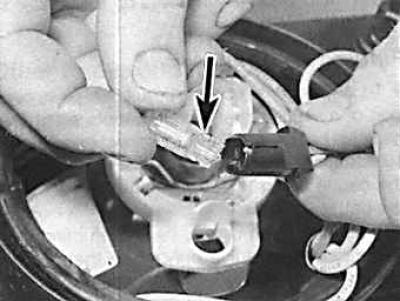
4. Pull the bulb (indicated by the arrow) and remove it from the holder.
5. Slide the new bulb into the holder and install the holder into the reflector.
6. Close the rear cover of the headlight.
Replacing the front turn signal bulb
1. Open the hood.
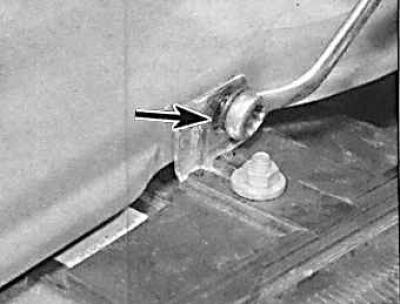
2. In the engine compartment, unhook the spring holding the turn signal lamp glass and remove it.
3. Turn the bulb holder counterclockwise and remove it from the flashlight.
4. Press the light bulb into the holder and in this position turn it counterclockwise and remove it.
5. Insert the new bulb into the holder (indicated by the arrow).
6. Press the bulb in until it stops and turn it clockwise in this position.
7. Insert the holder with the bulb into the lantern and turn clockwise until it locks into place.
8. Insert the glass of the lantern into place and secure it with a spring.
Headlight adjustment
Headlight adjustment screws
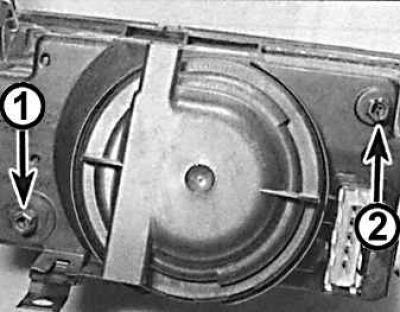
1 – screw for adjusting light in the vertical plane,
2 – screw for adjusting light in the horizontal plane
Changing the headlight beam setting is done by turning the screws located at the rear of the headlights (accessible from the engine compartment).
In headlights, the lower screw is used for vertical adjustment, and the upper screw is used for horizontal adjustment.
Initial conditions:
- the tires of the wheels must be inflated to the required air pressure;
- a vehicle with a full tank of fuel must only be loaded with a weight of 75 kg on the driver's seat;
- the front of the car should be pressed hard several times to properly position the elastic suspension elements
Headlight beam adjustment
Headlight adjustment diagram
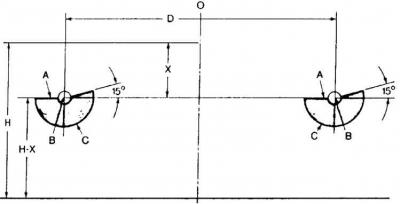
A – light boundary, B – light flux center, C – low beam illumination zone, D – headlight center distance, H – headlight installation height, O – vehicle axis, X = 120 mm for main headlights and X = 220 mm for fog lights.
1. Place the vehicle on a flat horizontal surface at a distance of 10 meters from a vertical wall.
2. Apply marking lines on the wall in accordance with the figure. Headlight adjustment diagram.
3. Turn on the low beam headlights and cover one headlight with a handy material and adjust the beam of light of the second headlight.
4. Repeat the adjustment operation for the second headlight.
5. At the first opportunity, adjust the headlights using special equipment.
Replacing the additional headlight bulb
1. Open the hood.
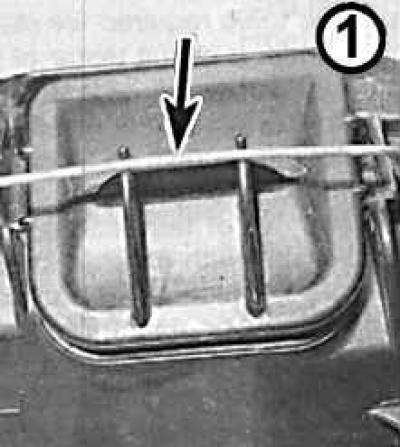
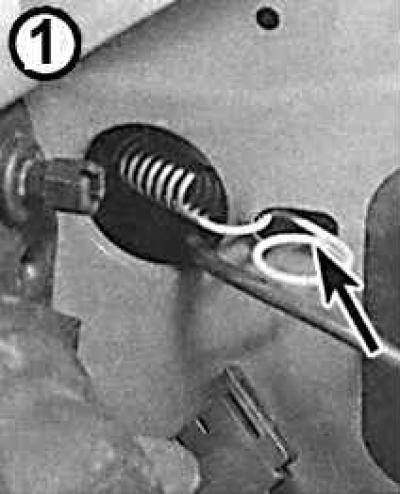
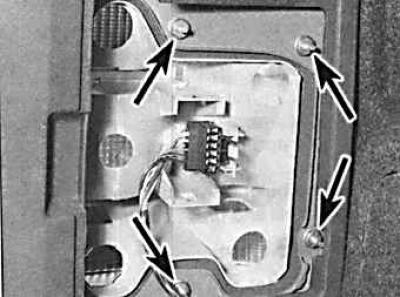
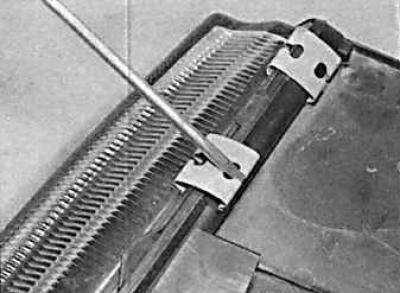
2. Remove the plastic cover from the top of the headlight, first releasing the wire clips (arrow).
3. Squeeze and move aside the two wire fasteners.
4. Remove the bulb and disconnect the electrical connector.

5. Connect the connector of the new bulb and install the bulb (indicated by the arrow) so that the projections of the bulb holder fit into the grooves of the headlight reflector.
Attention! It is strictly forbidden to touch the glass bulb with bare hands. Otherwise, it is necessary to wipe the bulb with alcohol.
6. Secure the light bulb with two wire clips.
7. Install and secure the plastic cover.
8. Check the headlight adjustment.
Replacing the front fog light bulb
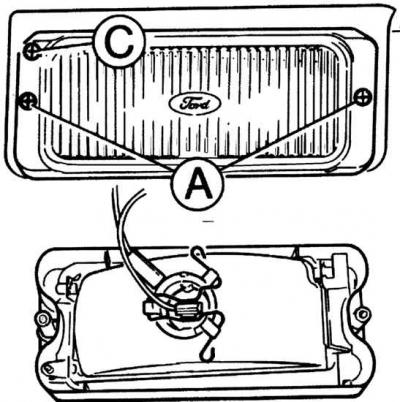
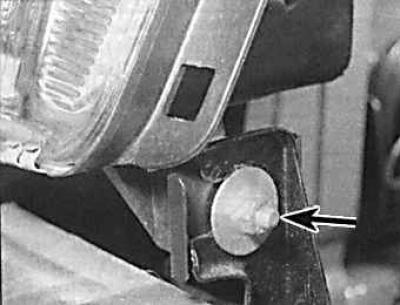
A – headlight mounting screws,
C – headlight adjustment screw
1. Unscrew the two screws on both sides of the headlight and remove the headlight from its socket.
2. From the back of the headlight, squeeze the spring clip of the bulb and move it to the side.
3. Remove the bulb and disconnect the electrical connector.
4. Install the new bulb so that the bulb holder protrusions fit into the headlight reflector grooves and secure with a spring clip.
Attention! It is strictly forbidden to touch the glass bulb with bare hands. Otherwise, it is necessary to wipe the bulb with alcohol.
5. Connect the electrical connector.
6. Install the headlight into the socket and secure with screws.
7. Check the headlight adjustment.
Attention! The fog light is adjusted vertically by turning the screw located at the top of the headlight.
Replacing the side turn signal repeater bulb
 |
 |
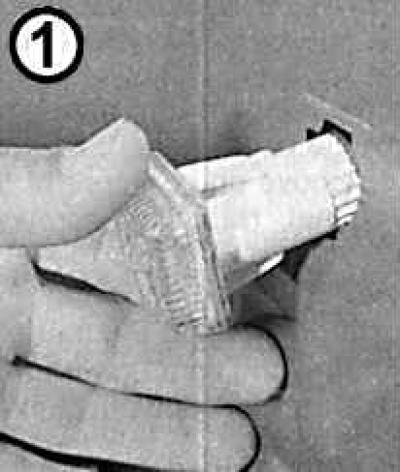
1. Turn the turn signal repeater glass clockwise and remove the turn signal repeater from the body.
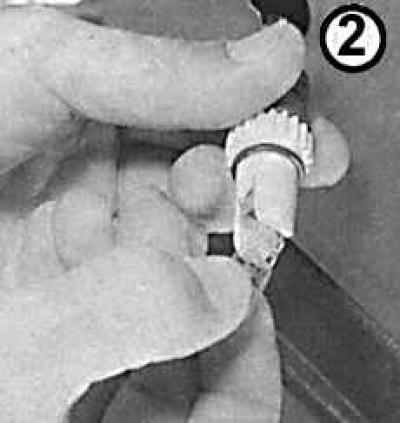
2. Turn the turn signal repeater glass counterclockwise relative to the bulb holder and remove it.
3. Pull the bulb out of the holder.
4. Install a new light bulb into the holder.
5. Install the turn signal repeater glass onto the holder and secure it by turning it clockwise.
6. Install the turn signal repeater into the body and secure it by turning it counterclockwise.
Rear light
Replacing light bulbs
The arrangement of the bulbs on the holder
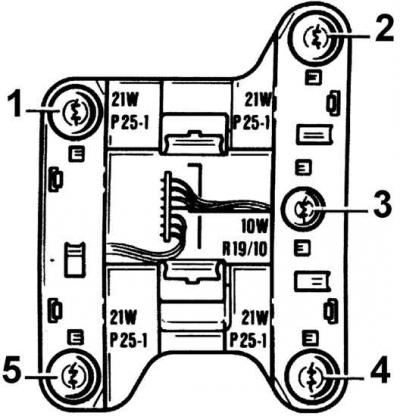
1 – rear turn signal bulb (12V, 21W), 2 – brake light bulb (12V, 21W), 3 – side light bulb (12V, 10W), 4 – rear fog light bulb (12V, 21W), 5 – reversing light bulb (12 V, 21 W)
The reversing light bulbs are replaced from the luggage compartment.
1. Remove the cover (arrows) covering the lights on the corresponding side. On the right side, you need to disconnect the electrical connector.
2. Press the clips towards each other and remove the lamp bulb holder.
3. To replace a faulty light bulb, press the light bulb into the holder and in this position turn it counterclockwise and remove it from the holder.
4. Insert the new bulb into the holder, press it in until it stops and turn it clockwise in this position.
5. Install and secure the bulb holder in place.
6. Install the cover that covers the lights.
Removal the rear light
Hatchback body
1. Remove the rear light cover from the luggage compartment.
2. Unscrew the six nuts (indicated by arrows) securing the rear light.
3. Remove the light from the outside of the vehicle and remove the connector.
Body type Sedan
4. Remove the trunk trim from the required side.
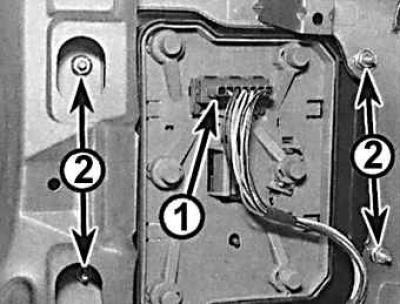
5. Unscrew the nuts (2) securing the rear light. Remove the light from the outside of the vehicle and remove the connector (1).
Replacing the license plate light bulb
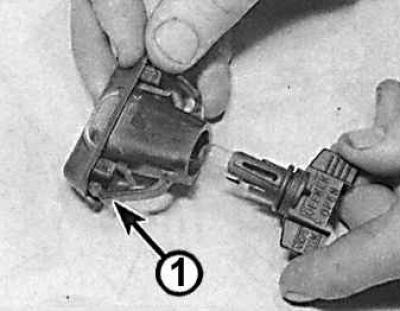
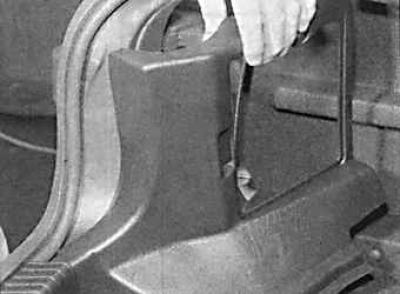
1. Insert the blade of a thin screwdriver under the rubber seal of the lamp and press the retainer (1) of the lamp and remove the lamp from the bumper.
2. Turn the bulb holder counterclockwise and remove it.
3. Pull the bulb out of the holder.
4. Install a new light bulb into the holder.
5. Place the bulb holder into the lamp and turn it clockwise until it stops.
6. Install the light into the bumper until it is firmly secured.
Replacing interior lighting bulbs
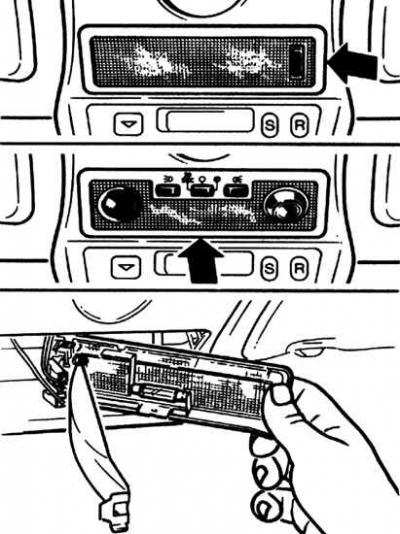
Insert the blade of a thin screwdriver from the right side under the light unit and press the screwdriver to remove it from the socket. If you remove the reading light, insert the screwdriver from below in the middle part of the light unit. Replace the lamps and install the unit in place. If necessary, you can tighten the contacts holding the bulb.
Replacing mirror lighting bulbs
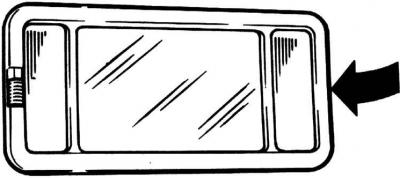
1. Insert the blade of a thin screwdriver from the right side under the mirror frame and, pressing on the screwdriver, remove the frame from the socket.
2. Replace the bulb and install the frame in place. If necessary, you can tighten the contacts holding the bulb.
Replacement of open door signal, footwell and luggage compartment lighting bulbs
1. Insert the blade of a thin screwdriver under the lampshade and, pressing on the screwdriver, remove the lampshade from the socket.
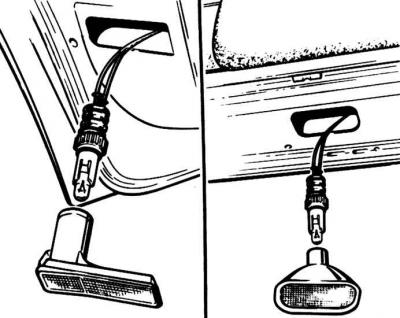
2. Remove the light bulb and replace it (in the picture - replacing the open door indicator light).
3. Replace the light bulb and install the lampshade until it is firmly secured.
Removal and installation headlights and light diffusers
1. Open the hood.
2. Remove the ground wire from the vehicle.
Attention! This will erase the information in the electronic storage devices.
3. Disconnect the electrical connector located next to the headlight. If there is a headlight beam corrector, also disconnect the electrical connector from it.
4. Remove the turn signal lamp.
5. Remove the rubber gasket located between the bumper and the headlight.
6. Remove the radiator grille secured with two screws.
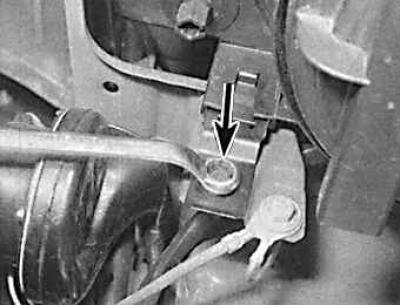
7. Unscrew the upper (indicated by the arrow in the figure on the right) and lower (indicated by the arrow in the figure on the left) headlight mounting bolts.
8. Slightly unscrew the side nut (indicated by the arrow) securing the headlight and remove the headlight by moving it forward and to the side.
9. Remove all bulbs from the headlight.
10. By inserting a screwdriver into the slots on the back of the headlight and turning it, remove the spring clamps securing the glass.
11. Remove the headlight glass together with the sealing gasket.
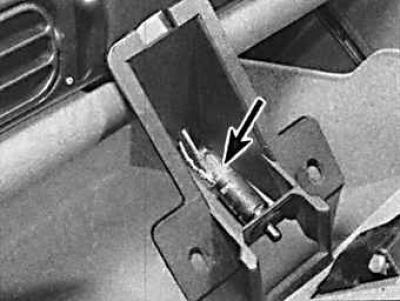
Replacing the switch lighting lamp
The lamps can be replaced after removing the switch handle.
1. Remove the handle to access the lamp (indicated by the arrow) of the switch.
2. Replace the light bulb.
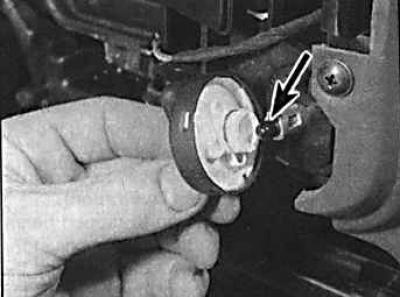
Replacing the glove compartment light bulb
1. Open the glove compartment (the arrow indicates the location of the glove compartment light).
2. Unscrew the two screws and remove the switch and lamp assembly.
3. Remove the lamp from the unit and install a new one.
Replacing the ashtray light bulb
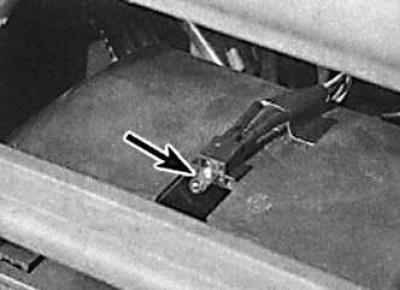
1. Remove the box or radio receiver above the ashtray (the arrow indicates the location of the ashtray lighting lamp).
2. Remove the bulb holder through the opened hole by pulling it outward, or use a screwdriver to carefully separate it from the casing.
Replacing the heater panel backlight lamp
1. Remove the instrument panel trim.
2. Remove the heater control handle by pulling it towards you.
3. Using a screwdriver, remove the heater panel.

4. Remove the light bulb (indicated by the arrow) from the holder.
5. Replace the light bulb.
Replacing the automatic transmission selector illumination lamp
1. Unscrew the selector handle.
2. Remove the selector cover.
3. Press the two selector scale mounting brackets and remove the selector scale.
4. Unscrew the four screws and remove the guide plate.
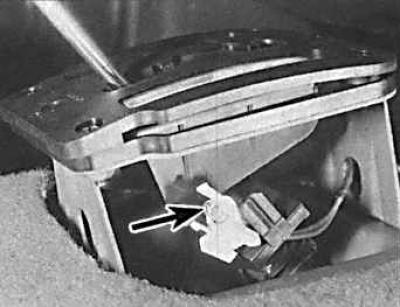
5. Remove the holder and replace the selector illumination lamp (indicated by the arrow).
Replacing the hazard warning light switch illumination lamp
1. Remove the upper steering column cover by first unscrewing the three screws.
2. Check that the switch is in the "Off" position, then remove the switch button.
3. Remove and insert a new lamp.
4. Reinstall the switch button and upper steering column cover.
Replacing the clock backlight lamp
If the clock is installed in the instrument cluster, replacement is carried out in the same way as replacing the indicator lamps.
1. If you are installing a top-mounted clock, you will need to remove the top console to replace the clock backlight bulb.
2. To remove the upper console, remove the interior light and the sunroof opening handle, unscrew the two screws securing the front part of the console, lower the front part of the console down and move it back.
3. To access the lamp, remove the back cover of the watch, having first unscrewed two screws.
4. Replace the lamp (indicated by the arrow) with a bayonet mount.
5. Install the back cover of the watch and then the top console.