Contents: Removal ↳ Installation ↳
Removal
Disconnect the negative (-) battery cable.
Caution: When the battery is disconnected, the contents of electronic memory devices, such as engine fault codes or radio codes, are erased. Before disconnecting, also read the instructions in the chapter "Removal and installation the battery".
Place the car wheels in a straight-line position.
Loosen and remove the radiator guide shroud (not for DOHC engine).
Raise the car onto the trestles.
If equipped, remove the lower engine compartment cover.
Drain the engine oil, see section "Maintenance".
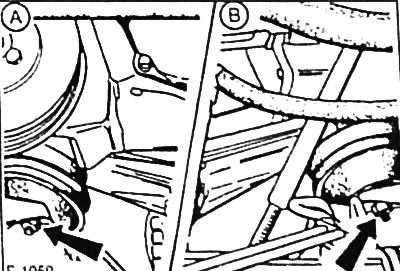
Loosen the nuts "arrows" securing both engine mounts (A: right side of the engine, B: left side of the engine).
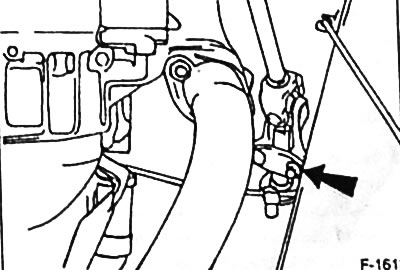
Using a scriber, mark the position of the connecting joint plate in relation to the steering shaft.
Unscrew the bolt "arrow" of the steering shaft connecting joint and move the plate to the side.
Gasoline engine: remove the starter, see p. 167.
Attach a device for hanging the engine to the engine lifting eyes and slightly lift the engine with a crane (hoist).
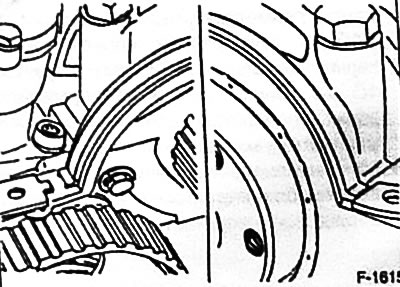
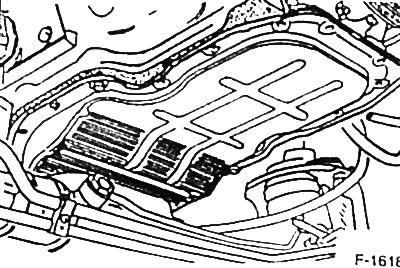
Unscrew all bolts and nuts securing the oil pan and separate it from the crankcase. Press the firmly seated oil pan from the side with a screwdriver.
Caution: Do not damage the sealing surfaces of the crankcase and sump.

Disconnect the brake pipes on the left and right sides of the connecting beam.
Using a garage jack, support the connecting beam, first placing a wooden block between the beam and the jack.
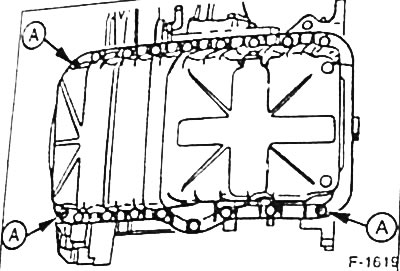
Unscrew the 4 bolts "A" securing the connecting beam and carefully lower it on the jack.
Caution: Lower the connecting beam enough to allow the oil pan to be removed.
Remove the oil pan.
Installation
Carefully clean the sealing surfaces of the oil pan and crankcase from any remaining sealing material. Straighten the mating surfaces of the oil pan if they were bent during removal.
ONS engine and 2.8L engine
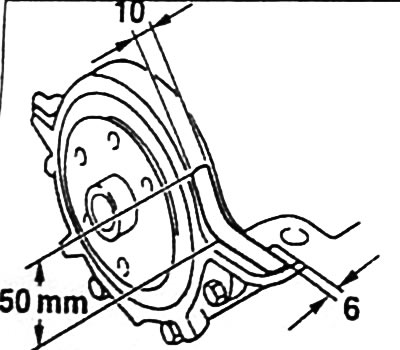
Apply FORD A70SX-19554-BA sealant to the joint at the end cover of the crankcase.
Glue the new sealing kit to the crankcase using FORD A70SX-19554-BA sealant, ensuring the correct position of the oil pan sealing gasket, see figure.
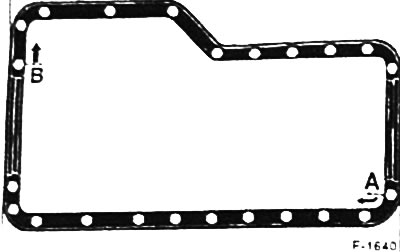
Place the oil pan, screw in all the mounting bolts by hand and then tighten them in 2 steps:
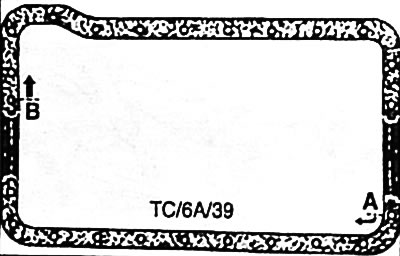
- Step 1: starting from position "A", tighten all bolts by hand to a torque of 1-2 Nm (for an engine with a working volume of 2.8 l - a torque of 5 Nm).
- Step 2: Starting from position "B", tighten all bolts to a torque of 8 Nm (for a 2.8 l engine – 10 Nm).
OHC engine: after 20 minutes of engine warm-up, tighten all bolts to a torque of 10 Nm.
2.0L DOHC engine
Place a new rubber sealing gasket onto the oil pan.
Caution: Ensure precise fit of the sealing gasket (guiding lugs on the left and right of the sealing ring holder).
Caution: After applying the sealant, the oil pan must be bolted in place for no more than 20 minutes.
Apply Hylosil 502 or Loctite 518 sealant to the crankcase from the flywheel side. Apply a 3-5 mm thick and 10 mm wide bead of sealant on both sides.
Caution: The sealant bundle must completely cover the joints of the sealing surfaces.
Move the oil pan so that together with the crankcase it forms one surface at the end.
Attach the oil pan. Apply Loctite 518 sealant to the nuts and bolts, then tighten them evenly to 8-10 Nm (A: tighten the nuts on the studs to 6-8 Nm).
Engines with a working volume of 2.4 and 2.9 liters
Apply FORD 85 TM 19554 AA sealant to the joint at the end cover of the crankcase.
Place a small amount of sealant as a lubricant into the V-groove of the rear main bearing cap, which must be absolutely clean.
Place the new oil pan sealing gasket on the existing 6 studs. If this number of studs is not enough, screw in additional studs.
Place the oil pan in place. Screw in the mounting bolts and nuts by hand.
Caution: The spacer tabs "A" of the oil pan must be located in the corresponding recesses of the sealing gasket.
Tighten the fastener in 2 steps:
- Step 1: Starting from position "A", tighten all bolts to a torque of 5 Nm.
- Step 2: Starting from position "B", tighten all bolts to a torque of 8 Nm.
Diesel engine
Glue the new oil pan sealing gasket to the crankcase using grease.
Caution: Ensure correct position of sealing gasket Turbocharged diesel engine up to 8/93: Seal oil pan with FORO SPM-2G9121-A silicone sealant.
Turbocharged diesel engine since 9/93: Seal the oil pan cover on the oil pan with silicone sealant and seal the oil pan on the crankcase with Loctite 510 or Loctite 518.
Place the oil pan and tighten the fastener evenly to a torque of 10 Nm.
Gasoline engine: install the starter, see p. 167.
Attach the connecting beam and tighten the mounting bolts to a torque of 90 Nm.
Secure the brake lines to the connecting beam.
Connect the connecting joint to the steering shaft and tighten the locking plate fastening to a torque of 25 Nm.
Make sure that the front wheels are in the straight-ahead position with the steering wheel in the center position. If this is not the case, release the locking plate again and turn the steering shaft relative to the connecting shackle.
Lower the engine, ensuring that its supports are in the correct position.
Tighten the engine mount mounting nuts to a torque of 70 Nm.
Attach the oil drain plug with a new sealing ring and tighten it to a torque of 25 Nm (for a diesel engine - 35 Nm).
Lower the car.
Hang and secure the radiator air guide shroud.
Fill with engine oil, see section "Maintenance".
Connect the battery ground (-) cable.
If available, set the clock and enter the radio theft protection code.
Start the engine and let it run for about 20 minutes. Turn off the engine and check the oil pan for leaks.
Engine OHC: tighten the oil pan mounting bolts. Starting from position "A" (see figure TC/6A/39). tighten all bolts to a torque of 10 Nm.
(The original article is available on the website: FORDBOOK)