Contents: Removal ↳ Installation ↳
Removal
Disconnect the negative (-) battery cable.
Caution: When the battery is disconnected, the contents of electronic memory devices, such as engine fault codes or radio codes, are erased. Before disconnecting, also read the instructions in the chapter "Removal and installation the battery".
Cars up to 8/94
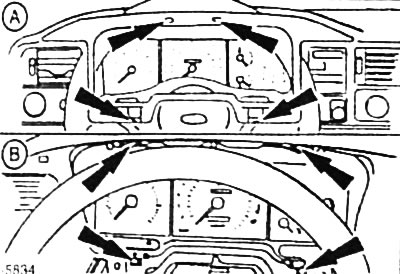
Unscrew the 2 fastening screws, remove the clamps of the instrument panel protective screen - arrows in Figure A - and remove the protective screen.
Unscrew the 4 screws securing the instrument panel assembly - arrows in Figure B - and remove the assembly.
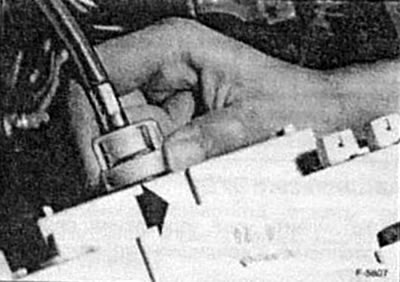
Unscrew the speedometer shaft fastening from the rear side of the instrument cluster assembly. To do this, strongly squeezing the ribbed surface of the plastic ring, move the locking ring on the large diameter in the direction of the arrow, see the figure.
Cars from 9/94
Remove the lower cover in the driver's footwell.
Remove the radio, see p. 181.
Remove the heating/air conditioning control unit, see p. 147.
Unscrew 6 Bwnoe fastenings of the instrument panel trim. Two fastening screws are located respectively on the left under the light switch, in the niche for the radio and above the instrument panel. Disconnect the plug connector from the rear side of the trim.
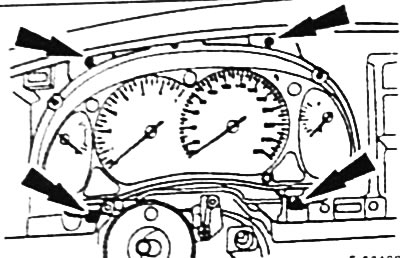
Unscrew the 4 mounting screws and remove the instrument cluster assembly.
Disconnect the multi-pin plug connectors from the rear of the instrument cluster assembly.
Please note: On vehicles up to 8/94, the red multi-pin plug connector of the symbol indicators has a locking device that must be pushed back to disconnect the connector.
Remove the instrument string assembly.
Installation
Insert the instrument panel into the niche and connect the multi-pin plug connectors.
If equipped, insert and secure the speedometer shaft.
Note: The speedometer shaft must be fixed. Pull the shaft and check the strength of its installation.
Place the instrument panel assembly in the mounting position and tighten its fastener securely.
Attach and secure the instrument panel assembly protective screen. Replace damaged sheet steel clamps.
Cars from 9/94
Install the heating/air conditioning system control unit, see p. 147.
Install the radio, see p. 181.
Install the lower cover in the driver's footwell.
Connect the negative (-) wire to the battery. If available, set the clock and enter the anti-theft code for the radio.
For details, please visit the website: FordBook