Rubber coupling of the cardan shaft GAF 30
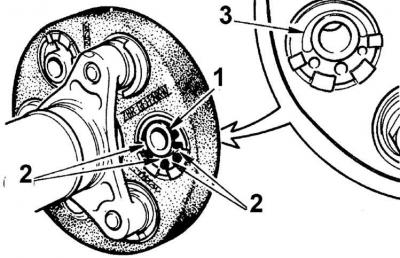
1 – metal coupling, 2 – rubber dampers, 3 – rubber lining
Rubber coupling of the cardan shaft GAF 41
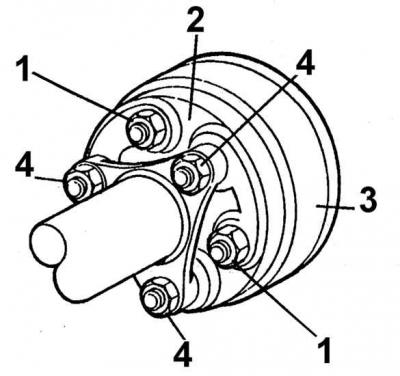
1 – coupling connection nuts with damper, 2 – GAF coupling, 3 – damper, 4 – shaft-coupling connection nuts
Removal the intermediate bearing
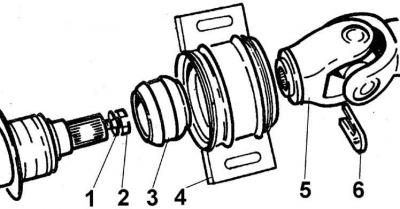
1 – retaining ring, 2 – bolt, 3 – intermediate bearing, 4 – intermediate bearing housing, 5 – cross-shaped joint, 6 – U-shaped mounting plate
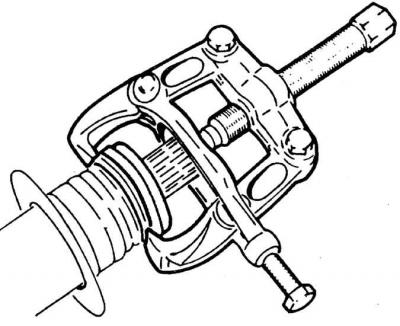
Removal the intermediate bearing using a puller
1. Place the vehicle over the inspection channel or on a lift.
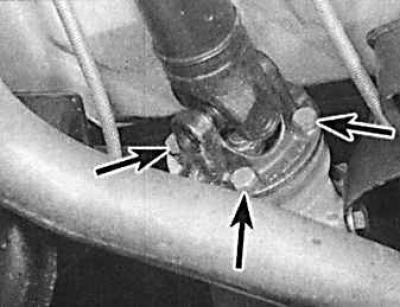
2. Mark the relative positions of the cross-shaped joint and the flange of the main gear pinion and disconnect the propeller shaft from the rear axle (the bolts for fastening the rear flange are indicated by arrows). Unscrew the intermediate bearing housing, marking the position of the gaskets between the bearing housing and the car body (these markings will be useful when installing the propeller shaft and its intermediate bearing).
3. Disconnect the propeller shaft from the gearbox, taking care not to damage the sealing ring at the rear of the housing. After removing the shaft, the hole in the rear of the gearbox housing should be plugged with a plug or the front end of the faulty propeller shaft to prevent oil from leaking out of the gearbox.
Installation
1. Remove the plug from the hole in the rear part of the gearbox housing. Check the installation of the sealing ring of the rear part of the gearbox housing and insert the front end of the cardan shaft into it, paying attention not to damage the edges of the sealing ring.
2. Install the intermediate bearing of the cardan shaft, placing the appropriate gaskets under it in accordance with the markings applied during disassembly (without tightening the mounting bolts).
3. Connect the cardan shaft to the flange of the main gear drive pinion in accordance with the previously applied relative position markings. Install new gaskets to prevent the bolts from unscrewing.
4. Rotate the cardan shaft to install the intermediate bearing and tighten the mounting bolts to the appropriate torque.
5. Check and, if necessary, top up the amount of oil in the gearbox.
Gearbox type MT 75
The difference between the cardan shaft used with the MT 75 type gearbox is in the way the cardan shaft is attached to the gearbox.
Unscrew the three nuts securing the rubber coupling of the cardan shaft to the output shaft of the gearbox and remove the cardan shaft. Two types of rubber coupling are used: GAF 30 or GAF 41.
Coupling GAF 30
The coupling mounting studs must not turn when a torque of 80 Nm is applied. If the stud turns when a lower torque is applied, it must be unscrewed and installed as follows.
1. Clean the threads in the gearbox flange.
2. Apply two drops of anti-loosening agent to the threads of the holes (on both sides of the hole), immediately screw in the stud and allow the agent to harden for 30 minutes.
3. Check the condition of the rubber coupling for mechanical damage and cracks. If there are cracks, the cardan shaft must be replaced, since the cardan shaft is balanced with the coupling as a single unit. When replacing the cardan shaft, install the shaft with the GAF 41 coupling.
4. Secure the coupling to the gearbox using new nuts.
Coupling GAF 41
Unscrewing, checking and installation are carried out in the same way as for the GAF 30 coupling, except that the studs must not turn when applying a torque of 110 Nm.
[The original source of this article can be found at: Fordbook.ru]