You will need: an 8 mm socket head, a 19 mm wrench, a special device for installing the belt, and a knife.
1. Raise the front of the vehicle and place it on a secure support. Remove the right front wheel (see "Wheel replacement").
2. Remove the right front fender liner (see "Removal and installation wheel mudguards and fender liners").
3. Remove the protective cover of the auxiliary drive belts and the air conditioning compressor by unscrewing the bolts securing it to the engine using an 8 mm socket head.
4. Remove the power steering pump drive belt (see "Replacing the power steering pump drive belt").
Note. According to the manufacturer's recommendations, the accessory drive belts and the power steering pump should be cut with a knife for removal, after which they become unusable. This is because both belts cannot be reused even after removal without damage, as they are designed only for one-time stretching when installed on pulleys (belt tension adjustment is not provided). In addition, belt replacement is regulated after a certain mileage or service life.
5. Remove the accessory drive belt by cutting it with a knife.
6. Wipe all accessory pulleys with a clean cloth to prevent accessory drive belt slippage during installation.
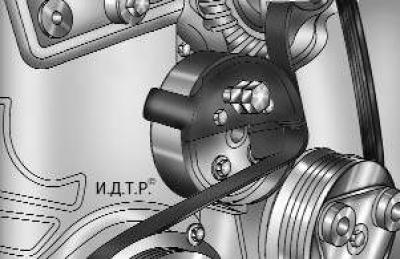
Fig. 4.7. Installing the accessory drive belt mounting device on the water pump pulley
7. Install the new accessory drive belt onto the crankshaft, water pump and air conditioning compressor pulleys so that the belt is located on the center of the pulley grooves. Install the tool onto the water pump pulley in the position shown in Fig. 4.7, pressing it until it clicks, indicating that the tool is fixed on the pulley.
Caution: Make sure that the accessory drive belt installer retainer snaps onto the pulley and secures the accessory drive belt installer securely. Otherwise, the belt will be damaged during installation.
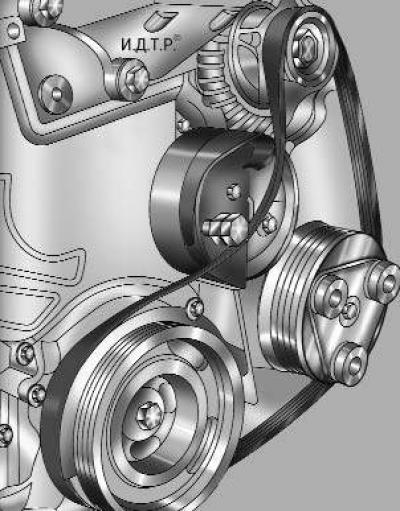
Fig. 4.8. Installing the accessory drive belt mounting device in its original position before installing the belt
8. Remove the belt from the water pump pulley and install it on the alternator pulley. Turn the belt installation tool counterclockwise to the position shown in Fig. 4.8 and place the belt behind the tool tab.
Caution: Make sure the belt is correctly installed on the mounting fixture, otherwise it will be damaged during installation.
9. Engage 1st gear in a manual transmission (or set the automatic transmission selector to the "P" position – parking) and apply the parking brake to the vehicle to prevent the engine crankshaft from turning.
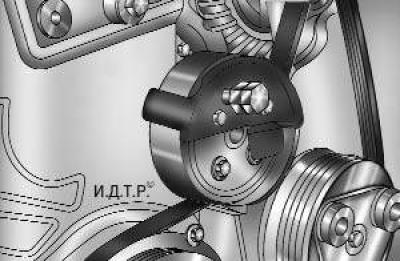
Fig. 4.9. Mounting the accessory drive belt on the water pump pulley
10. Turn the belt mounting tool clockwise by the bolt installed in it (Fig. 4.9) until the belt is placed on the water pump pulley (at this point the belt tension will be released).
Caution: Make sure that the mounting tool is not pinched between the belt and the water pump pulley, otherwise the belt will be damaged.
11. Using a large screwdriver or a pry bar, slide the mounting device off the water pump pulley, overcoming the resistance of its retainer.
12. Set the gearshift lever to neutral position.
13. Turn the crankshaft with a 19 mm wrench by the bolt securing its pulley approximately 90° to a position where the mounting device is not clamped by the belt, and remove it.
Note: The accessory drive belt mounting device is disposable, as it is deformed during installation.
14. Turn the engine crankshaft two revolutions and check the correct position of the belt in the pulley grooves. If necessary, reinstall the belt.
15. Install the power steering pump drive belt (see "Replacing the power steering pump drive belt").
16. Install the parts in the reverse order of removal.
[The original can be found on this resource Fordbook.ru]