You will need: an 8 mm socket head, a 19 mm wrench, a special device for installing the belt, and a knife.
1. Raise the front of the vehicle and place it on a secure support. Remove the right front wheel (see "Wheel replacement").
2. Remove the right front fender liner (see "Removal and installation wheel mudguards and fender liners").
3. Remove the engine splash guard (see "Removal and installation the engine mudguard").
4. Remove the power steering pump drive belt by cutting it with a knife.
Note. According to the manufacturer's recommendations, the power steering pump drive belt should be cut with a knife for removal, after which the belt becomes unusable. This is explained by the fact that the belt, even after removal without damage, cannot be reused, since it is designed only for one-time stretching when put on the pulleys (the belt tension adjustment is not provided). In addition, belt replacement is regulated after a certain mileage or service life.
5. Wipe the power steering pump pulleys and crankshaft pulleys with a clean rag to prevent the power steering pump drive belt from slipping during installation.
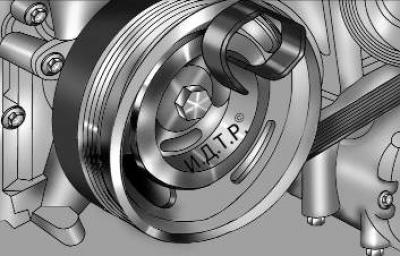
Fig. 4.10. Installing the device for mounting the power steering pump drive belt on the crankshaft pulley
6. Install the power steering pump drive belt mounting tool onto the crankshaft pulley in the position shown in Fig. 4.10.
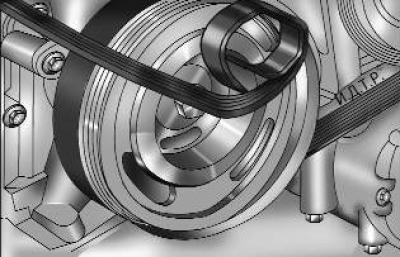
Fig. 4.11. Installing the air conditioner compressor drive belt on the mounting device
7. Place the new belt on the power steering pump pulley, pass it under the bottom of the crankshaft pulley and install it on the mounting fixture as shown in Fig. 4.11.
8. Set the gearshift lever to neutral position.
9. Turn the engine crankshaft clockwise using the pulley mounting bolt, while simultaneously guiding the belt into the pulley groove until the belt is placed on the pulley (at this point the belt tension will weaken).
10. Turn the crankshaft to a position where the mounting tool is not pinched by the belt and remove the tool.
Note: The device for mounting the air conditioner compressor drive belt is disposable, as it is deformed during installation.
11. Turn the crankshaft one revolution and check that the belt is positioned correctly in the pulley grooves. If necessary, reinstall the belt.
12. Install the removed parts in the reverse order of removal.
For more information, please visit the website (FORDBOOK.ru)