Contents: Removal ↳ Installation ↳
Removal
After a long mileage of the car, narrow channels in the radiator may become clogged with coolant sediment and salt deposits. As a result, the radiator performance drops and the engine overheats. In this case, only replacing the radiator can help.
Disconnect the negative (-) battery cable.
Caution: When the battery is disconnected, the contents of electronic memory devices, such as engine fault codes or radio codes, are erased. Before disconnecting, also read the instructions in the chapter "Removal and installation the battery".
Drain the coolant.
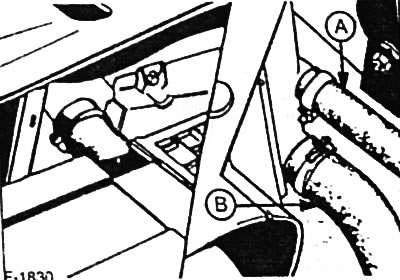
Disconnect the upper and lower "B" coolant hoses and the hose going to the expansion tank from the radiator. First, completely loosen and move the fastening clamps back.
If available, loosen the clamp and disconnect hose "A" from the radiator, which goes to the expansion tank.
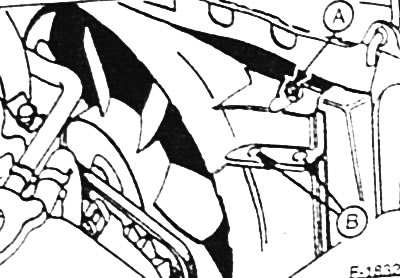
ONS and V6 engines. Unscrew the mounting bolts "A" of the upper air duct, separate the air duct from the clamps "B" and remove. Unscrew the mounting bolts and remove the lower air duct.
DOHC Engine: Remove Fan, see p. 41.
Diesel engine: Remove the air duct and disconnect the temperature sensor plug.
Vehicle with air conditioning system: Disconnect the plug connector of the air conditioning system temperature sensor.
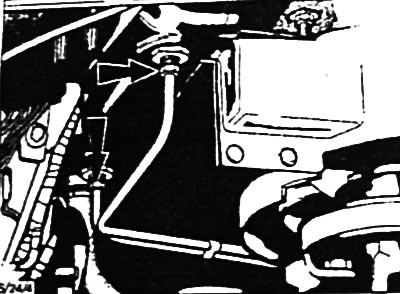
Vehicle with automatic transmission: Place a clean container underneath to catch the transmission oil. Loosen the fastening of the transmission oil cooler connecting pipes at the lower radiator tank. To prevent too much oil from leaking out, plug the pipes with suitable plugs.
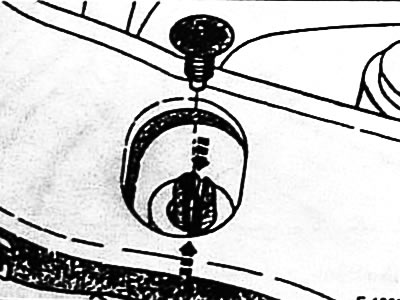
Remove the clamps from the radiator holders.
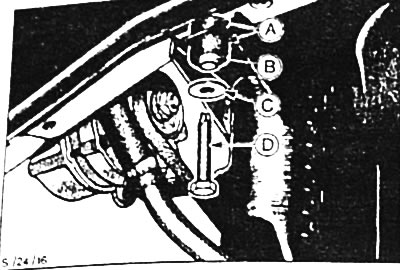
Unscrew the 2 mounting bolts "D" at the bottom and pull them out together with the washers "C", spacer bushings "B" and rubber shock absorbers "A".
Remove the radiator by moving it downwards.
Caution: The fins on the radiator tubes are very sharp, so wear gloves when removing the radiator.
Caution: If the radiator is not going to be installed within 48 hours, it is necessary to rinse it with clean water, blow it with compressed air and close all openings. The radiator can also be filled with coolant and stored with the openings closed. Failure to do this will cause rust, which can later cause leaks.
Installation
If a new radiator is installed, the temperature sensor and air duct mounting clamps should be relocated to it.
If a used radiator is installed, it must be checked beforehand. Check for leaks and damage to the radiator tanks and tubes. Bent fins must be carefully straightened with a screwdriver.
Check all coolant hoses for cuts, cracks and other damage and replace if necessary. Check the perfect condition of the rubber inserts of the radiator holders.
Insert the radiator from below and insert the mounting clamps into the holders through the front trim.
Tighten the lower radiator mounting bolts to 10 Nm. Ensure the correct position of the rubber shock absorbers, see Figure S/24/16.
Attach the air ducts and tighten the fastening to a torque of 10 Nm.
DOHC engine: install fan, see p. 41.
Vehicle with air conditioning system: Connect the plug connector of the air conditioning system temperature sensor.
Diesel engine: Connect the temperature sensor plug.
Vehicle with automatic transmission: remove plugs from pipes and screw pipes to oil cooler. Check oil level in automatic transmission, see p. 205.
Connect the upper and lower coolant hoses and secure them with clamps.
Connect the coolant hose to the expansion tank and secure it with a clamp.
Fill with coolant, see p. 38.
Warm up the engine and check the hose connections and the radiator for leaks.
Check and top up the coolant level if necessary.