Contents: Removal ↳ Installation ↳
Removal
Raise the car onto jack stands.
Remove the exhaust system, see p. 80.
Vehicles with catalytic converter: Remove heat shield from underbody.

Models from 9/94, unscrew the rear axle crossmember mount "1" to gain access to the propeller shaft flange "2".
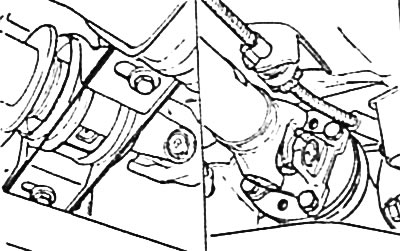
Loosen the fastening of the cardan shaft at the intermediate bearing at the bottom of the body and at the flange of the main gear of the rear axle. When loosening the bolts at the flange, ask an assistant to press the brake pedal.
Gearbox MT-75 (models since 1989)
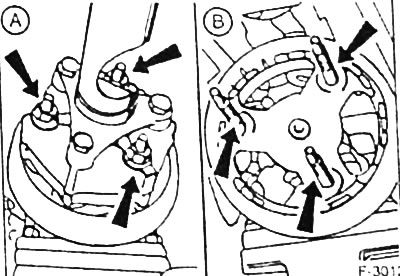
Loosen the fastening to the damper of the coupling with rubber elastic elements screwed to the cardan shaft.
Attention: Do not unscrew the coupling fastening to the cardan shaft.
When using a damper with splined studs, hold the studs with a standard splined socket wrench when loosening the stud mounting nuts.
Remove the cardan shaft as an assembly.
N-Transmission (models before 1989): Remove the propeller shaft from the transmission extension.
Caution: To prevent oil from leaking out of the gearbox, insert a plug into the gearbox hole.
Installation
Gearbox N: Remove the plug from the hole in the gearbox extension and connect the cardan shaft to the splines of the drive shaft. Place the cardan shaft against the flange of the main gear and the intermediate support and secure it by hand with bolts.
Note: Do not forget to install the spacer washers at the intermediate support.
Gearbox MT-75, damper studs have splines
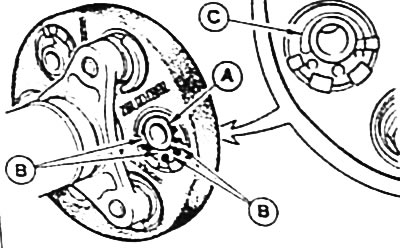
Check the condition of the rubber jumpers "B" of the coupling on the cardan shaft. If the jumpers are cracked, then the cardan shaft assembly with the coupling must be replaced.
Note: The cardan shaft is balanced together with the coupling and the parts of this unit cannot be replaced separately. Cracks on the coupling body in zone "C" are not significant. A - metal bushing.
Place the cardan shaft against the main transmission flange and secure it by hand with bolts. Slide the shaft rubber coupling onto the studs and secure the shaft by hand with bolts at the intermediate support.
Note: Do not forget to install the spacer washers at the intermediate support.
Screw on the rubber coupling mounting nuts and tighten to a torque of 80 Nm.
Caution: Check that the studs are securely seated. If the studs are loose or turn when tightening the fastener, the rubber coupling fastener should be loosened again and the studs should be tightened properly.
To secure the studs, you need to unscrew them and clean the threads on the studs and in the damper.
Apply 2 drops of Locate 270 anti-loosening agent to the stud threads in an arc of 180°.
Screw in the studs and tighten to a torque of 90 Nm.
Caution: Do not screw splined studs into the damper instead of hexagonal studs and vice versa.
Gearbox MT-75, damper studs have a hexagon (old design)
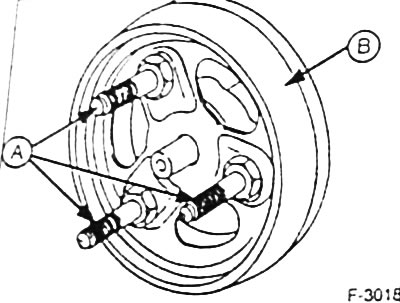
Tighten studs "A" of damper "B" to a torque of 120 Nm.
Place the cardan shaft against the main transmission flange and secure it by hand with bolts. Slide the shaft rubber coupling onto the studs and secure the shaft by hand with bolts at the intermediate support.
Note: Do not forget to install the spacer washers at the intermediate support.
Screw on the rubber coupling mounting nuts and tighten to a torque of 80 Nm.
Attention: Do not screw splined studs into the damper instead of hexagonal studs and vice versa.
Tighten the intermediate support bolts of the propeller shaft to a torque of 20 Nm.
Tighten the bolts securing the propeller shaft at the rear axle to a torque of 65 Nm. When tightening the bolts at the flange, ask an assistant to press the brake pedal.
Models from 9/94. Tighten the 2 rear axle crossmember mounting bolts to 50 Nm.
Vehicles with catalytic converter: Tighten the catalytic converter heat shield fastening to the underbody.
Install the exhaust system, see p. 80.
Lower the car.