Contents: Removal ↳ Installation ↳
Removal the timing belt tensioner using key 21.012
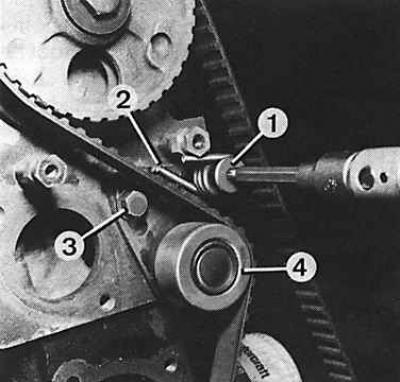
1 – tensioner, 2 – spring, 3 – adjusting bolt, 4 – tensioner roller
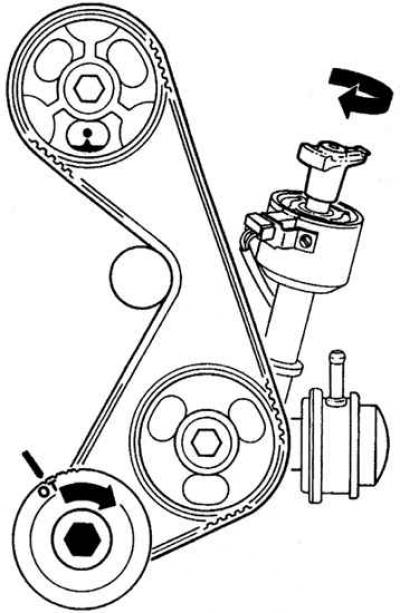
Installation signs of the gas distribution system
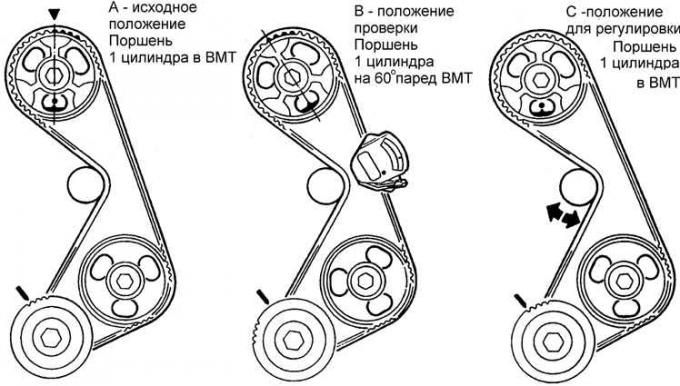
Timing Belt Tension Check Sequence
Removal
1. Remove the negative terminal from the battery.
2. Remove the radiator and disconnect the hose from the thermostat housing.
3. Set the gearbox to neutral and secure the vehicle with the parking brake.
4. Remove the V-belt by loosening the bolts securing the generator and moving it towards the engine.
5. Set piston 1 of cylinder to top dead center by turning the crankshaft by the bolt securing the V-belt pulley in the direction of working rotation until the top dead center mark aligns with the mark on the front crankshaft sealing ring casing, and the mark on the camshaft pulley aligns with the mark on the cylinder head. Mark the position of the distributor rotor in relation to the distributor housing, for which remove the distributor cover by lifting the 2 side mounting brackets with a screwdriver and unscrewing the 2 cover mounting screws.
6. Unscrew the bolts securing the timing belt cover, tilt it to the side and forward and remove it.
7. Loosen the tension of the toothed belt by first unscrewing the Allen bolt (key s=6) on the belt tensioning unit, then the Allen bolt (s=16) and, overcoming the resistance of the spring, tilt the tensioning unit and completely unscrew the bolts.
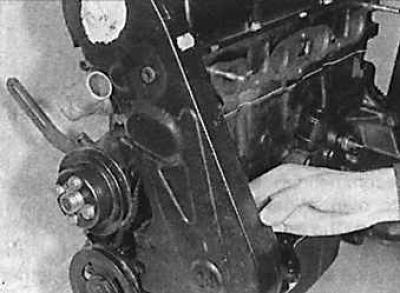
8. Unscrew the auxiliary belt pulley mounting bolt and remove the belt pulley from the crankshaft. If the toothed belt is removed only from the camshaft pulley, then do not remove the pulley from the crankshaft. To prevent the crankshaft from turning when unscrewing the pulley, fix the flywheel by the teeth of the toothed rim or engage fifth gear and have an assistant press the foot brake all the way.
9. Remove the auxiliary drive belt pulley.
10. Remove the guide washer in front of the timing belt drive pulley.
11. Remove the toothed belt, having first marked the direction of its rotation.
Warning! Do not turn the engine by the camshaft pulley, as this may destroy the belt. If there are cracks, traces of oil or damage to the teeth on the belt, the belt must be replaced.
Installation
1. Check that the marks on the camshaft pulley and cylinder head match. If necessary, align the marks.
2. Install the intermediate shaft so that the mark on the distributor rotor is above the mark on the edge of the distributor. First, remove the distributor cover by lifting the 2 side mounting brackets with a screwdriver and unscrewing the 2 cover mounting screws.
3. Install the toothed belt on the crankshaft pulley and tighten the auxiliary V-belt pulley on the crankshaft.
4. Install the timing belt onto the camshaft pulley and loosen the belt tensioner block.
5. Turn the crankshaft two turns by the V-belt pulley so that the tension block is on the toothed belt and tighten the tension block: first with a hexagonal head bolt, and then with an internal hexagon.
6. Turn the crankshaft another 2 revolutions and check the alignment of the marks on the camshaft pulley, distributor rotor and crankshaft V-belt pulley.
7. Turn the crankshaft 2 more revolutions clockwise and then 60° counterclockwise and check the belt tension using the 21-113 belt tension gauge, which must be installed on the longest belt branch. Normal belt tension is 4-5 units for a used belt and 10-11 units for a new belt (see Fig. Timing Belt Tension Check Sequence).
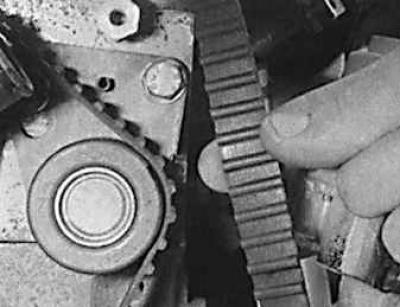
8. If you don't have a belt tension gauge, you can determine the tension by rotating the belt with your thumb and forefinger. The tension is considered optimal if the belt rotates 90° when moderate force is applied.
9. Install the timing belt cover.
10. Install the distributor cap.
(Information for this article was taken from the website: fordbook)