Contents: Removal ↳ Installation ↳
Engine mount components
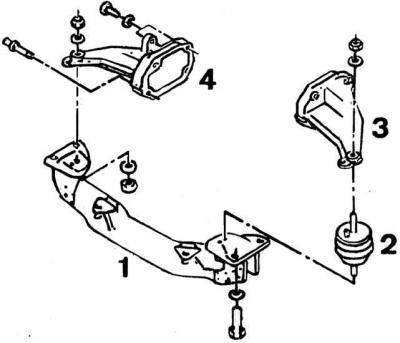
1 – cross beam, 2 – elastic support, 3, 4 – engine mount brackets
Removal
The engine is removed without the gearbox upwards from the engine compartment using a lifting mechanism. It is also possible to remove the engine together with the gearbox, but this is much more difficult, since it requires installing the car on a lift and using an additional lift to lower the engine together with the gearbox down, having first disconnected and removed the units that prevent the power unit from lowering.
1. Remove the negative cable from the battery.
2. Remove the crankcase guard and mudguard.
3. Remove the radiator grille.
4. Disconnect the hood release cable from the hood closing mechanism and remove it from the clips.
5. Remove the bonnet, first marking the position of the hinges to facilitate reinstallation and disconnecting the windscreen washer pipe.
6. Drain the coolant from the cooling system by placing a suitable container under the radiator drain plug and opening the drain plug located at the bottom of the radiator. To speed up the draining of the coolant, open the expansion tank plug. To drain the coolant from the cylinder block, unscrew the drain bolt located in the cylinder block.
7. Loosen the clamps and remove the cooling system pipes and hoses:
- upper and lower radiator hoses;
- expansion tank hoses;
- interior heating system hoses;
- housings of the carburetor automatic starting device.
8. Unscrew the four bolts securing the upper front crossmember, two bolts on both sides at the top and two lower bolts securing the crossmember support and remove it together with the radiator.
9. Remove the air filter.
10. Remove the fuel supply hose from the fuel pump and plug it.
11. Remove the accelerator cable from the carburetor.
12. Disconnect the brake booster vacuum line from the intake manifold
13. Disconnect electrical wires and remove connectors from the following units and sensors:
- generator;
- starter;
- ground bus;
- temperature sensor;
- engine control temperature sensor;
- oil pressure sensor;
- electromagnetic valve on the high pressure fuel pump;
- electromagnetic fan clutch;
- fuel injection systems;
- electric intake manifold heater;
- high voltage wire from ignition coil;
- radiator temperature sensor.
14. Remove the high voltage distributor together with the wires from the ignition distributor.
15. Disconnect the multi-pin connector from the ignition distributor.
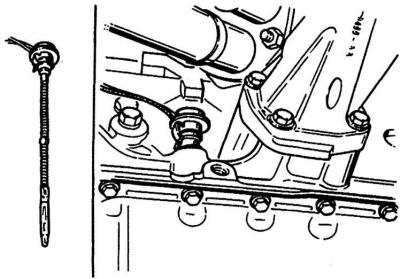
16. Remove the oil level sensor.
17. Disconnect the accelerator pedal cable from the carburetor.
18. Disconnect the fuel and vacuum hoses, as well as the electrical wires, from the carburetor.
19. Remove the V-belt and auxiliary power steering pump (if present in this version). Hang the auxiliary pump to the car body using soft wire.
20. Unscrew the front downpipe from the exhaust manifold.
21. Unscrew the stabilizer mounting clamps and remove the stabilizer.
22. Install the engine lifting hoist (tool 21.068) and lift the engine, then unscrew the engine holders.
23. Unscrew the bolts connecting the engine to the gearbox.
24. Disconnect the electrical wires and remove the starter.
25. Disconnect the ground wire from the engine.
26. Remove the holder located between the engine and gearbox.
27. Support the gearbox using a suitable lift and a wide board and raise the gearbox slightly.
28. Using a lifting mechanism, carefully lift the engine and separate the gearbox from it.
While lifting the engine, simultaneously move it forward and, turning it in a horizontal plane, remove it upwards.
Installation
1. The engine is installed in the reverse order of removal, but it is necessary to pay attention to some features.
2. Lubrication of the splines of the gearbox clutch shaft with oil before connecting these units.
3. When installing the clutch on the flywheel, it is necessary to center the clutch disc with a centering mandrel.
4. If, when connecting the gearbox to the engine, the input shaft of the gearbox does not enter the clutch disc, it is necessary to turn the engine crankshaft slightly.
5. Install a new front exhaust pipe gasket.
6. Fill the cooling system with the appropriate fluid and bleed air from the cooling system.
7. Check and, if necessary, adjust the ignition timing, as well as the engine idle speed and the CO concentration in the exhaust gases.
(The original version can be found on the website: fordbook.ru)