Removal the air damper vacuum device
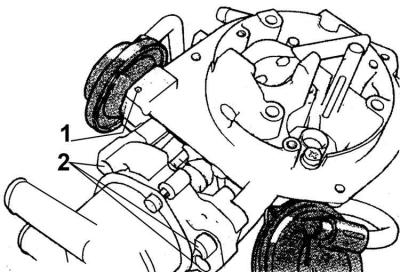
1 – stopper, 2 – screws
Removal the vacuum diaphragm assembly of the starting device

The clamp (indicated by the arrow) must be pressed down.
Fuel pipe
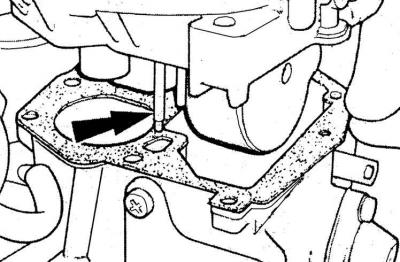
The fuel pipe (indicated by the arrow) must enter the emulsion well.
1. Remove the carburetor from the engine.
2. Clean the outside of the carburetor thoroughly.
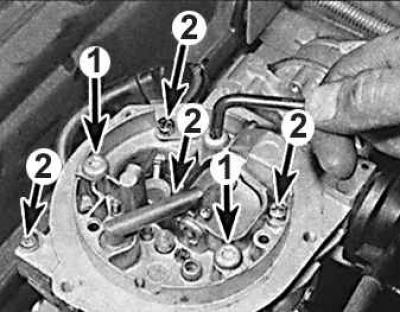
3. Unscrew the five screws (on the latest models – four) securing the carburetor cover (1 – carburetor mounting screws, 2 – cover mounting screws).
4. Remove the carburetor cover, paying attention to the connection between the fast idle cam and the throttle lever.
5. Remove any remaining fuel from the float chamber.
6. If necessary, unscrew the main jets and idle jet.
7. If the float or needle valve is removed, they cannot be reused and new parts must be installed.
8. Unscrew the fuel supply pipe with the filter.
9. Unscrew the three screws securing the first chamber throttle damper bracket. Do not remove the first chamber throttle damper from the bracket unless replacement is required.
10. Unscrew the two mounting screws and, pressing the ball joint, remove the vacuum unit.
11. Unscrew the three screws securing the pump cover.
12. Remove cover, diaphragm, spring, washer and shutter. Mark shutter orientation.
13. Unscrew the two mounting screws and remove the economizer.
14. Remove any remaining fuel from the float chamber.
15. If necessary, unscrew the main jets and idle jet.
16. If the float or needle valve is removed, they cannot be reused and new parts must be installed.
17. Unscrew the fuel supply pipe with the filter.
18. Unscrew the three screws securing the first chamber throttle damper bracket. Do not remove the first chamber throttle damper from the bracket unless replacement is required.
19. Unscrew the two mounting screws and, pressing the ball joint, remove the vacuum unit.
20. Unscrew the three screws securing the pump cover.
21. Remove cover, diaphragm, spring, washer and shutter. Mark shutter orientation.
22. Unscrew the two mounting screws and remove the economizer.
23. Carefully release the nylon clips with a small screwdriver and disassemble the economizer.
24. Unscrew the central bolt securing the coolant chamber and remove the chamber. There are O-ring seals under the bolt head and around the perimeter of the chamber.
25. There are marks on the bimetallic spring housing and the damper lever holder. If there are no marks, they must be applied. Unscrew the three screws holding the ring clamp and remove the clamp and housing.
26. The throttle lever holder can be removed from the carburetor body both with and without the bimetallic body and coolant chamber, after unscrewing the mounting screws.
27. The secondary chamber throttle actuator vacuum device can be removed after removing the throttle lever holder by sliding its roller stops and depressing the star-shaped clamp.
(The original can be found on this resource fordbook)