Air is removed from the brake system by bleeding it using the brake pedal; an assistant is required to perform this work. Depending on the model and equipment, SCORPIO vehicles are equipped with two different anti-lock braking systems (ABS), which are bled in different ways. Therefore, in accordance with Chapter "Anti-lock braking system (ABS)" you should first determine which system is installed on the car, see p. 110.
Attention: When bleeding air, observe the fluid level in the expansion tank. The fluid level should not fall below the MIN mark. If one of the chambers of the expansion tank is completely empty (for example, due to a leak in the system or because you forgot to top up the brake fluid in a timely manner), then bleeding the brake system should be performed at a service station. At a service station, the process of bleeding air from the ABS hydraulic unit is controlled using a diagnostic device for reading fault codes.
Brake system TEVES MK II
Removal air
Air must be bled from the entire system, even if only one brake caliper was replaced.
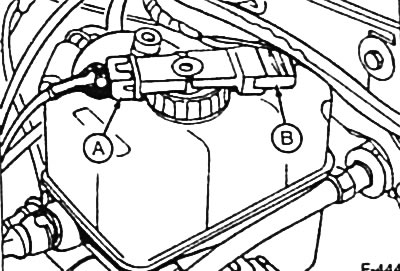
Disconnect the multi-pin plug connectors -A, B- at the expansion tank and unscrew the tank cover.
Top up the fluid level in the expansion tank to the MAX mark. When removing air, observe the fluid level in the expansion tank. The fluid level should not drop too low, otherwise air will enter the system through the tank. Always top up with new brake fluid!
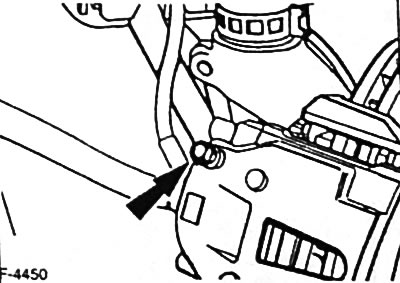
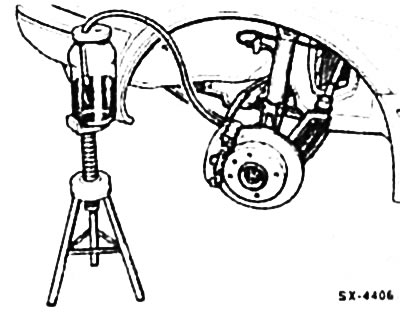
Remove the dust cap from the air bleed valve "arrow" on the left front brake caliper and apply a ring spanner to the valve.
Clean the bleed valve, attach a clean hose to it, and insert the other end into a container half filled with brake fluid (suitable hose and container can be purchased at stores selling car accessories). The container should be located approximately 30 cm above the bleed valve so that the hose is filled and air does not penetrate the brake caliper through the valve thread.
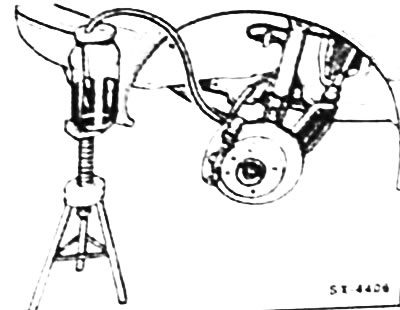
Note: Unlike the image in the picture, the car must be parked with its wheels on a level surface when bleeding air. To avoid damage, carefully open the bleeding valve. It is recommended to spray the valve with a rust remover about two hours before bleeding air. If the valve does not open, the bleeding work should be entrusted to a service station.
Ask an assistant to press and hold the brake pedal.
Open the air bleed valve with a ring spanner a full turn.
Tighten the air bleed valve and release the brake pedal.
Repeat the air removal process until no more air bubbles enter the container along with the brake fluid flowing out and until a lighter-colored fluid begins to emerge.
Tighten the air bleed valve and put the dust cap on it. Similarly, bleed the air from the right front brake caliper.
Tighten the air bleed valve and put the dust cap on it.
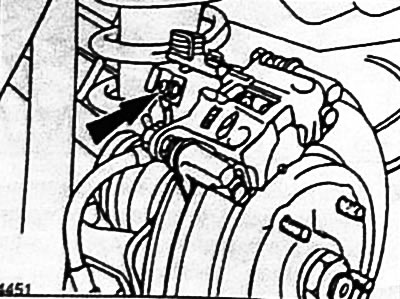
Remove the dust cap from the air bleed valve "arrow" at the left rear brake caliper and apply a ring spanner to the valve. Clean the air bleed valve, put a clean hose on it, the other end of which should be inserted into a container half filled with brake fluid.
Open the air bleed valve with a ring spanner a full turn.
Ask an assistant to press the brake pedal all the way down and hold it down.
Turn on the ignition by turning the key in the ignition switch to position II.
Warning: Do not start the engine.
When the ignition is turned on, the hydraulic pump of the ABS brake system starts working. As soon as the brake fluid reaches the pump, the tone of the pump changes from high to low.
Caution: Do not operate the pump continuously for more than two minutes. If the hydraulic pump operates for more than two minutes, turn the ignition key to position 0 and allow the pump to cool for at least ten minutes.
Safety note: When bleeding the rear brake hydraulic system, release the bleed valve carefully as the hydraulic system may be under very high pressure.
The process of removing air through the valve should continue until air bubbles stop flowing into the container along with the brake fluid flowing out and until a lighter-colored fluid (new) begins to emerge.
Tighten the air bleed valve and put the dust cap on it.
Release the brake pedal and wait until the hydraulic pump switches off.
Remove the dust cap from the bleed valve on the right rear brake caliper and apply a ring spanner to the valve. Clean the bleed valve, attach a clean hose to it, and insert the other end into a container half filled with brake fluid.
The process of removing air through the valve should continue until air bubbles stop flowing into the container along with the brake fluid flowing out and until a lighter-colored fluid (new) begins to emerge.
Ask an assistant to depress the brake pedal halfway and hold it in this position.
Tighten the air bleed valve and put the dust cap on it.
Release the brake pedal and wait until the hydraulic pump switches off.
Turn the ignition key to position 0.
Top up the fluid level in the expansion tank to the MAX mark.
Replace the expansion tank cap and ensure that the tank locking tab is correctly seated in the cap.
Connect the multi-pin plug connectors at the tank lid.
Have an assistant depress the brake pedal several times to ensure that no brake fluid is leaking from the bleed valve.
Brake system TEVES MK IV
If air has to be removed from the entire system, then this is done separately on each wheel brake mechanism. This is the case when the brake fluid is replaced with new one or when air has penetrated into each individual brake cylinder.
Sequence of operations for air removal: 1 - front left brake caliper; 2 - front right brake caliper, 3 - rear left brake caliper; 4 - rear right brake caliper.
If only one caliper was replaced or repaired, it is usually sufficient to bleed the brake cylinder of that caliper.
Before removing air, top up the fluid level in the expansion tank to the MAX mark.
Caution: When bleeding air, observe the fluid level in the expansion tank. The fluid level must not drop too low, otherwise air will enter the system through the tank. Always top up with new brake fluid!
Remove the dust cap from the brake cylinder bleed valve. Clean the bleed valve, attach a clean hose to it, and insert the other end into a container half filled with brake fluid (suitable hoses and containers can be purchased at stores selling car accessories). The container should be located approximately 30 cm above the bleed valve so that the hose is filled and air does not enter the brake caliper through the valve threads.
Note: Unlike the image in the picture, the car must be parked with its wheels on a level surface when bleeding air. To avoid damage, carefully open the bleeding valve. It is recommended to spray the valve with a rust remover about two hours before bleeding air. If the valve does not open, the bleeding work should be entrusted to a service station.
Open the air bleed valve with a ring spanner a full turn.
Ask an assistant to press the brake pedal and quickly release it. As a result, the brake fluid or air, respectively, is pumped out into the container.
Wait a little while until the master cylinder piston returns to its original position.
Press the brake pedal again and release it quickly. Repeat this process of removing air until no more air bubbles come out with the brake fluid flowing into the container and until a lighter-colored fluid (new) starts to emerge.
With the brake pedal depressed, tighten the air bleed valve.
Remove the hose from the air bleed valve and place the dust cap on the valve.
Similarly, remove air from the right front brake caliper.
Safety note: When bleeding the rear brake hydraulic system, release the bleed valve carefully as the hydraulic system may be under very high pressure.
Similarly, remove air from the rear axle brake calipers. First from the rear left, then from the rear right.
After removing the air, top up the brake fluid level in the expansion tank to the MAX mark and tighten the expansion tank cap.
Attention, perform a safety compliance check:
- Are the air bleed valves tightened?
- Is there enough fluid in the brake system?
- With the engine running, perform a leak test. To do this, apply a force of 200 to 300 N (20 to 30 kg) to the brake pedal for approximately 10 seconds. Do not release the brake pedal. Check all connections for leaks.
Finally, perform several braking tests on a street with little traffic.
Hand over the old brake fluid to your local special waste authority.
[A copy of the article is available on the website: FordBook]