Contents: Removal ↳ Installation ↳
Control size of the hydrokinetic transmission depth
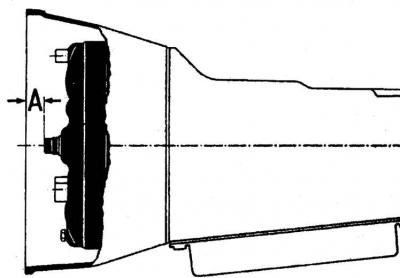
A = 10 mm
Removal
1. Place the vehicle over an inspection channel or on a lift and disconnect the ground wire from the battery.
2. From the engine compartment, unscrew the four upper bolts securing the automatic transmission to the engine cylinder block.
3. Disconnect the exhaust inlet pipe from the manifold.
4. Disconnect the rubber suspension elements from the brackets securing the rear part of the exhaust system and hang the system from the body using wire.
5. Disconnect the cardan shaft from the gearbox and plug the hole in the rear part of the crankcase with a plug made of artificial material to prevent oil leakage.
6. Remove the stabilizer.
7. Disconnect the electrical wires from the starter and remove the starter.
8. On V6 models, remove the distributor cap.
9. Remove the oil filler tube and close the hole in the gearbox housing with a plug.
10. Unscrew 4 bolts securing the transmission beam to the side crossbars and 1 bolt securing the transmission.
11. Disconnect the oil lines from the oil radiator and plug their openings.
12. Remove the two fuses and the gear shift lever linkage.
13. Disconnect the cable from the gear reduction lever and from the cable holder.
14. Disconnect the electrical wiring harness from the engine safety start relay.
15. Disconnect the speedometer drive cable located on the extension housing.
16. Disconnect the vacuum line from the automatic transmission vacuum regulator and remove the bracket.
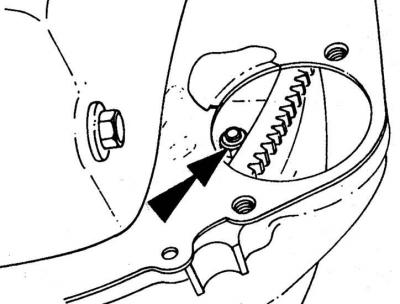
17. Unscrew the bolts securing the hydrokinetic transmission drive disk through the hole in the removed starter (the bolt is indicated by the arrow).
18. Unscrew the bolts securing the crossmember to the gearbox and carefully lower the gearbox.
19. Remove the gearbox, holding the hydrokinetic transmission inside its housing.
Installation
1. If necessary, remove the rings guiding the hydrokinetic transmission flange and press them into the engine cylinder block.
2. Install the hydrokinetic transmission in the crankcase if it has been removed from it. The hydrokinetic transmission oil drain plug must be in the axis of the drive disk hole. After installing the hydrokinetic transmission in the appropriate place in the crankcase, check whether the control dimension (A) between the hydrokinetic transmission flange and the front surface of the crankcase is 10 mm.
3. Tighten the flange bolts after checking that the hydrokinetic transmission rotates freely in the crankcase.
4. Lubricate with automatic transmission oil and insert the oil filler line into the short line on the crankcase.
5. Attach the suspension crossmember to the gearbox.
6. Raise the gearbox and secure the suspension crossmember to the body.
7. Insert and tighten the drive disc mounting bolts to the hydrokinetic transmission to the appropriate torque.
8. Connect the electrical wires to the starter and the engine safety relay, as well as the vacuum line to the transmission vacuum regulator.
9. Connect the pipes to the oil radiator and the speedometer drive cable.
10. Connect the cable to the holder near the gearbox and also to the gear reduction lever.
11. Set the gear shift lever and gearbox control lever to position "D" and secure the external control elements of the automatic transmission (without their drive).
12. Remove the synthetic plug from the hole in the rear of the gearbox housing and install the propeller shaft.
13. Install the front suspension stabilizer.
14. Attach the brackets holding the vacuum lines and oil lines.
15. Attach the rear exhaust system hanger to the body.
16. Check the oil level and top up the gearbox oil if necessary (see the corresponding description in subsection 7.3.2.2).
17. Check the tightness of connections and pipelines.