Contents: Removal ↳ Installation ↳
Removal
1. Disconnect the wire from the negative terminal of the battery.
2. Remove the hood cover.
3. Raise the vehicle, support it on stands and remove the front wheels.
4. Remove the front fender liner (chapter 11).
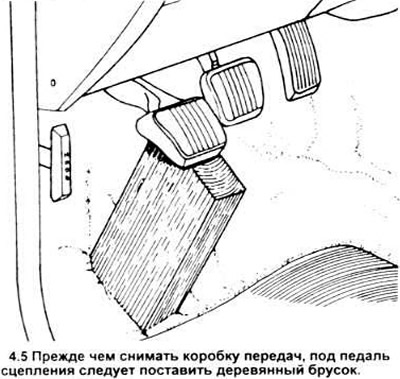
5. Place a block of wood approximately 188 mm (7 inches) high under the clutch pedal so that the pedal is slightly raised from its normal position (see illustration).
6. Drain the gearbox oil (chapter 1).
7. Disconnect the clutch cable.
8. Unscrew the lock bolt and disconnect the speedometer cable (section 6).
9. Disconnect the switch connection (section 3).
10. Unscrew the bolts securing the gearbox to the engine and remove the engine (chapter 2C).
11. Remove the gearbox electrical connectors.
12. Disconnect the axial drives (chapter 8).
13. Connect the chain for the lifting device to the box.
14. Check that all wires and hoses are disconnected.
15. Unscrew the nuts securing the box.
16. Remove the gearbox from the vehicle.
17. Check the clutch components (chapter 8). New clutch parts should be installed.
Installation
18. Install the removed clutch parts (chapter 8).
19. Lower the gearbox on the support studs, tighten the nuts. Tighten the nuts to the required force.
20. Connect the axial drives.
21. Insert the electrical connectors.
22. Connect the switch assembly.
23. Connect the speedometer cable, install the lock bolt. Tighten the bolt to the required tightening torque.
24. Connect the clutch cable.
25. Install the engine (chapter 2C). Tighten the gearbox-to-engine mounting bolts to the required torque.
26. Pour oil into the box.
27. Install the wing liner.
28. Put the wheels on and lower the car.
29. Install the hood cover.
30. Remove the block from under the clutch pedal.
31. Connect the wire to the negative terminal of the battery.
(The original source of the publication is on the website: FORDBOOK)