Warning: as a result of clutch wear, asbestos-containing dust is formed, which settles on the elements of the mechanism and is extremely harmful to your health. Do not blow it off with compressed air or inhale it. Do not use gasoline or gasoline-containing solvents to clean this dust. Wash dust into the drain pan with brake cleaner. After wiping the clutch elements with a rag, place the used rag and cleaner in a resealable container.
Withdrawal
1. Remove the gearbox from the car (chapter 7, part A).
2. Use a punch to mark the location of the pressure plate relative to the flywheel, so that you can then install it correctly.
3. Loosen the pressure plate bolts in a criss-cross pattern so as not to warp the basket.
4. Unscrew and disconnect the pressure plate and clutch disc from the flywheel (see picture).
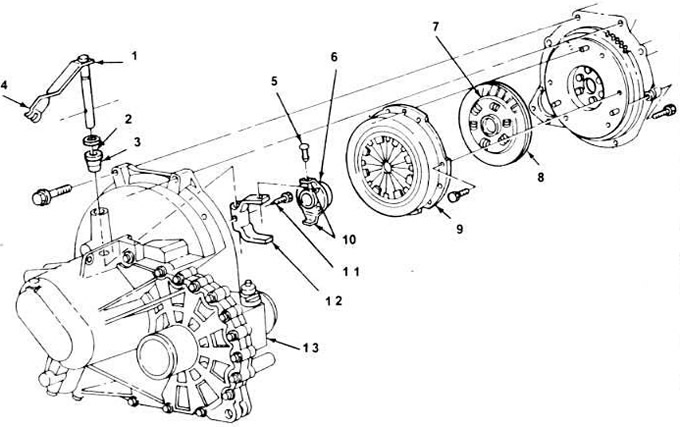
3.4. Three-dimensional image of the clutch block and its constituent elements.
1. Clutch release shaft.
2. Lubricate the seal opening.
3. Sealing sleeve.
4. Lubricate the end of the lever.
5. Pin.
6. Thrust bearing.
7. Note: install with a spring damper towards the gearbox.
8. Driven disk.
9. Pressure plate.
10. Lubricate both eyelets.
11. Pin 9 mm.
12. Thrust bearing yoke.
13. Checkpoint block.
5. Carefully remove the clutch, being careful not to touch the gasket surfaces.
Examination
6. Examine rubbing surfaces of a conducted disk, a pressure disk and a flywheel. There may be scratches, burnt areas, deep grooves, cracks, other types of wear and damage. If the flywheel is worn or damaged, replace it (see chapter 2C).
7. To see how worn the clutch disc is, measure the distance from the rivet heads to the gasket surface. When you remove a drive, it is recommended that you replace it. Slide the clutch disc over the input shaft to make sure it is tight and that the splines are not bent or worn.
8. Remove and inspect the thrust bearing and its yoke as described in section 4.
9. Check the flatness of the pressure plate with a straight edge. Look for signs of overheating, cracks, deep grooves and burrs. The inner ends of the diaphragm spring pins must show no signs of wear. Replace it with a new one if any problems are found (see picture).
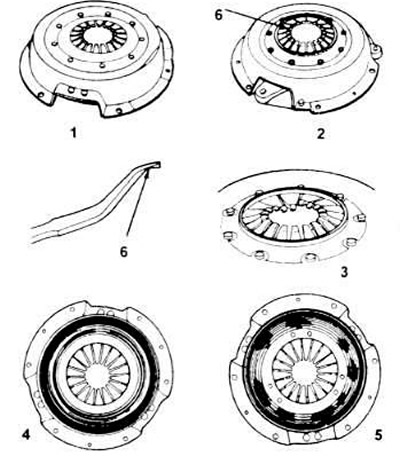
3.9. If signs of heavy wear are visible, replace the clutch.
1. Normal finger wear.
2. Strong wear of the fingers.
3. Burnt or bent fingers.
4. Serious scratches.
5. Clutch vibration.
6. Heavy wear.
10. Make sure the pressure plate is firmly seated on the flywheel pins. If there is a leak, replace it with a new one.
Installation
11. Place the clutch disc on the flywheel, centering it with the special tool (see picture).
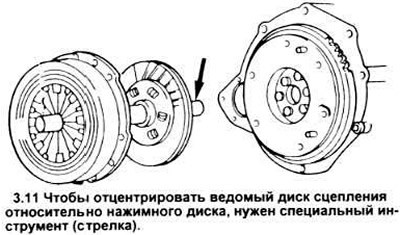
12. Hold the clutch disc in place with a centering tool. put the pressure plate on the flywheel pins, align with the marks made during disassembly.
13. Install the bolts and tighten them in a criss-cross pattern one two turns at a time. until the required tightening torque is reached.
14. Install the fork and thrust bearing (see section 4).
15. Install the gearbox (see chapter 7, part A).
Visitor comments