


Car body repair and care Ford Taurus 1 and 2

Tightening torque specification
Specification of tightening torque values Nm (foot pounds) Hood Latch Bolt 9.5-13.6 (7-10) Bonnet hinge bolt 9.5-13.6 (7-10) Bolt for fastening the door hinge to the...
Specification of tightening torque values Nm (foot pounds) Hood Latch Bolt 9.5-13.6 (7-10) Bonnet hinge bolt 9.5-13.6 (7-10) Bolt for fastening the door hinge to the...
General information and care
General information These models use a "monocoupled" body. This chapter covers only general body maintenance practices and some repairs. Body - maintenance 1. It is...
General information These models use a "monocoupled" body. This chapter covers only general body maintenance practices and some repairs. Body - maintenance 1. It is...

Hood — removal, installation, adjustment
1. Open the hood. 2. Scratch or paint alignment marks around the hood support bolts (see illustration). 3. Have an assistant hold the hood while you use a small...
1. Open the hood. 2. Scratch or paint alignment marks around the hood support bolts (see illustration). 3. Have an assistant hold the hood while you use a small...

Front fender liner — removal and installation
1. Raise the front of the vehicle, support it securely on stands and remove the affected front wheel. 2. Remove the plastic clips that secure the liner to the body. This...
1. Raise the front of the vehicle, support it securely on stands and remove the affected front wheel. 2. Remove the plastic clips that secure the liner to the body. This...

Removal and installation the hood lock and cable
Latch 1. Mark the position of the latch with paint, disconnect the cable, unscrew the two locking bolts and disconnect the latch (see figure). 10.1. Bonnet release...
Latch 1. Mark the position of the latch with paint, disconnect the cable, unscrew the two locking bolts and disconnect the latch (see figure). 10.1. Bonnet release...
Door — removal, installation, adjustment
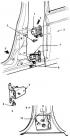
1. Mark the location of the door retaining bolts with paint. 2. Have an assistant hold the door and unscrew the locking bolts (see picture). Disconnect all electrical...
1. Mark the location of the door retaining bolts with paint. 2. Have an assistant hold the door and unscrew the locking bolts (see picture). Disconnect all electrical...
Trunk lid — removal, installation, adjustment
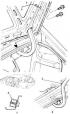
1. Open the trunk lid. 2. Use paint to make alignment marks around the flanges of the luggage rack hinge bolts. 3. Loosen and unscrew the hinge bolts. 4. Remove the...
1. Open the trunk lid. 2. Use paint to make alignment marks around the flanges of the luggage rack hinge bolts. 3. Loosen and unscrew the hinge bolts. 4. Remove the...

Tailgate of bodies (station wagon) — removal, installation, adjustment
1. Lift the door and secure it in the open position. 2. Remove all electrical connectors and connections. 3. Mark the location of the hinge screws with paint. 4....
1. Lift the door and secure it in the open position. 2. Remove all electrical connectors and connections. 3. Mark the location of the hinge screws with paint. 4....

Bumpers — removal and installation
1. Raise the vehicle and support it securely on stands. 2. Working under the vehicle, unscrew the bolts securing the energy absorber and bracket assemblies to the bumper...
1. Raise the vehicle and support it securely on stands. 2. Working under the vehicle, unscrew the bolts securing the energy absorber and bracket assemblies to the bumper...

Removal and installation the door decorative panel
1. Disconnect the wire from the negative terminal of the battery. 2. Unscrew the screws of the decorative door panel (see pictures). 15.2, a. Details of the decorative...
1. Disconnect the wire from the negative terminal of the battery. 2. Unscrew the screws of the decorative door panel (see pictures). 15.2, a. Details of the decorative...
Door lock and its drives — removal and installation
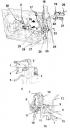
1. Remove the decorative panel ( section 15 ), carefully separate the moisture insulation. 2. Remove the inner lock handle assembly and disconnect the drive rod (see...
1. Remove the decorative panel ( section 15 ), carefully separate the moisture insulation. 2. Remove the inner lock handle assembly and disconnect the drive rod (see...

Outside mirror — removal and installation
1. Remove the door trim panel ( see section 15 ) and a triangular lid (see figure). 17.1. Installation parts of the outside mirror. 1. Mirror 2. Spacer ring. 3....
1. Remove the door trim panel ( see section 15 ) and a triangular lid (see figure). 17.1. Installation parts of the outside mirror. 1. Mirror 2. Spacer ring. 3....

Dashboard trim panels — removal and installation
1. Disconnect the wire from the negative terminal of the battery. Steering column cover 2. Unscrew the mounting screws and remove the steering column cover from the...
1. Disconnect the wire from the negative terminal of the battery. Steering column cover 2. Unscrew the mounting screws and remove the steering column cover from the...

Center console — removal and installation
Models produced in 1986 and 1987 1. Using a small screwdriver, remove the two button plugs from the base of the front of the console and unscrew the two mounting screws...
Models produced in 1986 and 1987 1. Using a small screwdriver, remove the two button plugs from the base of the front of the console and unscrew the two mounting screws...
Door glass — removal, installation and adjustment
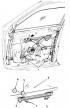
Removal 1. Remove the door decorative panel and moisture insulation ( see section 15 ). 2. Remove the door seals along the contour of the door glass. 3. On the front...
Removal 1. Remove the door decorative panel and moisture insulation ( see section 15 ). 2. Remove the door seals along the contour of the door glass. 3. On the front...
Automatic shoulder belts — general information
The latest models of cars are equipped with automatic seat belts. They are called automatic because they do not need to be hung on a bracket - the shoulder belt...
The latest models of cars are equipped with automatic seat belts. They are called automatic because they do not need to be hung on a bracket - the shoulder belt...
This section is available on russian, bulgarian, belarusian, ukrainian, serbian, croatian, romanian, polish, slovak, hungarian
See other similar sections for Ford cars:
• Body and coating: Body repairs Ford Focus 1 (1998-2004)
• General information: Repair on the road Ford Mondeo 1 and 2 (1993-2000)
• Power unit: Engine overhaul Ford Transit 2 (1986-2000, diesel)
• Body and coating: Body repairs Ford Focus 1 (1998-2004)
• General information: Repair on the road Ford Mondeo 1 and 2 (1993-2000)
• Power unit: Engine overhaul Ford Transit 2 (1986-2000, diesel)
Taurus 1 and 2
- General information
- Characteristics
- Maintenance
- Troubleshooting
- Engine
- Four-cylinder engine
- Six-cylinder engine
- Overhaul
- Cooling system
- Fuel/exhaust systems
- Engine electrics
- Emission control
- Transmission
- Mechanical gearbox
- Automatic gearbox
- Clutch and drives
- Chassis
- Brake system
- Car suspension
- Steering
- Body
- Repair and maintenance
- Electrical equipment