General information
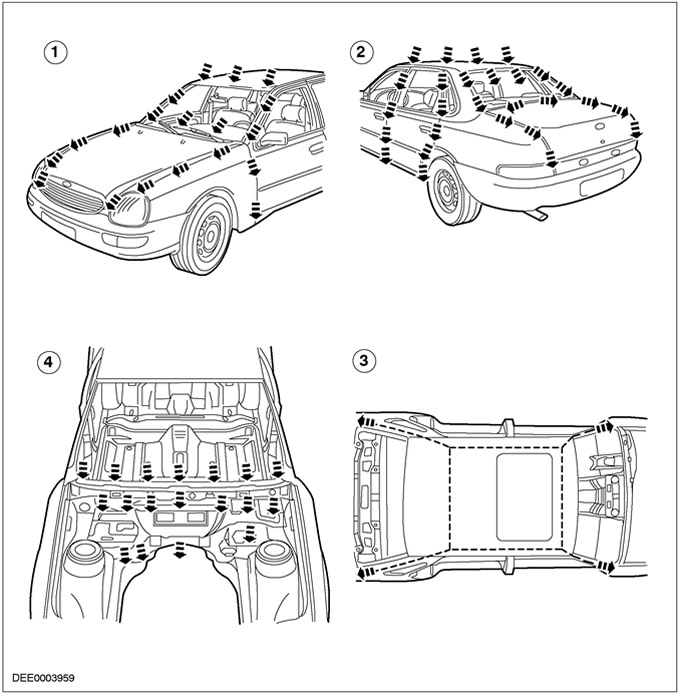
If water intrusion occurs after a body repair, the cause can be determined using the checks described below. Finding water intrusions requires a systematic and logical procedure. Before performing extensive inspections, a full inspection should be performed.
visual inspection
- The following signs may indicate existing leaks:
- Check the gap and accuracy of installation of auxiliary parts such as hood, tailgate, doors and so on.
- Check for correct installation and possible damage to sealing elements such as plugs, rubber door seals, etc.
- Check the water drain holes for blockages.
For more information about the presence of possible leaks, you can use various checks:
- Checking with the use of water supply from a hose
- Water splash test
- road test
- Testing with an ultraviolet lamp
- Checking with a special mirror
- Chalk check (powder)
- Testing with a smoke tube
Checking with the use of water supply from a hose
NOTE: Never point the water jet directly at the rubber seal.
- Perform a hose test with the help of a second person (inside the car).
- Use detachable spray tips (water nozzle to ensure a fine atomization of the water jet).
- Start at the bottom and spray the entire area, working your way up.
- The following is used for testing using a water supply from a hose:
- softened water (with liquid soap)
- special mirror
- Testing with an ultraviolet lamp
Water splash test
- Additional checks can be carried out in the car wash.
- Some leaks start here or only show up here.
- The interior of the respective vehicle should be checked using the backlight during the washing procedure.
Road test
If no leaks are found during the above checks, road tests should be carried out on wet roads.
Road tests in various conditions:
- At various speeds.
- On various road surfaces (from asphalt to cobblestone pavement).
- When the vehicle is loaded or unloaded.
- Movement through puddles (water splash).
Testing with an ultraviolet lamp
- Moisten the area to be checked from the outside with clean water.
- Prepare test fluid (see instruction manual) and apply it from the outside using an appropriate water sprayer.
- Illuminate the corresponding area from the inside using an ultraviolet lamp.
- The test fluid will make the leak visible.
UV lamp
Benefits of UV Lamp:
- It is not necessary to dry wet areas before testing.
- The place of water entry and the path of its passage can be accurately identified.
- There is no need to remove most of the auxiliary elements from the car.
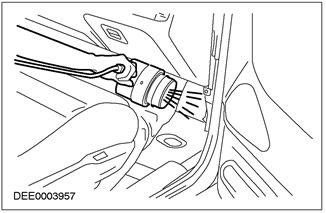
Checking with a special mirror
To see hard-to-reach places, you can use a special mirror.
Special mirror
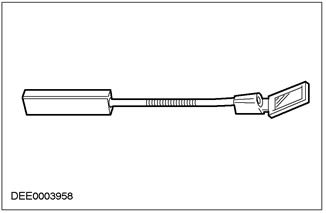
Advantages
- Switchable light is built into the mirror area.
- The angle of the mirror can be adjusted manually using the knob.
- The connector between the handle and the mirror is flexible.
Chalk check (powder test)
This test checks the clamping and seating surfaces of the seal.
Performing a check:
- Dust the door seal with powder or chalk.
- Coat the seal seating surface with a thin layer of grease.
- Close the door slowly and open it again.
- Check the width and continuity of the imprint on the door seal.
Testing with a smoke tube
Leak detection test.
- Set the interior ventilation control to maximum.
- Assistant delivers smoke to the area to be checked (in the cabin), using the appropriate handset.
- The second assistant determines where the smoke comes out.
Other testing equipment
If leaks are found, other equipment such as stethoscopes or ultrasonic measuring instruments can be used.
Repairing a leak using recommended tools, accessories and materials
Tools and accessories:
- Dry, absorbent fabric
- Removable spray tip
- Backlight, fluorescent tube
- Mirror.
- Compressed air
- Device for installing the sealing lip
- Wet/dry vacuum cleaner
- Compressor for sealant
- Interior Trim Puller
- Blade or pocket knife
- Wedge (wooden or plastic)
- hot air gun
- UV lamp
- Special mirror for detecting hidden leaks
- Stethoscope
- Checking device using air supply
- Ultrasonic Measuring Instrument
Materials: (refer to microfiche spare parts)
- sealant (tape and plastic compound)
- Universal label
- Flange Sealant
- Window Sealant
- Waterproofing (PVC)
- Foam waterproofing
- Double-sided adhesive tape for waterproofing
- Butyl Foam Waterproofing Tape
- Methylated alcohol (available)
- Polyurethane adhesive
- Silicone remover
- Tar removal composition
Water leaks according to mileage or operating time
The increase in mileage has an impact on the problem of leaks in the car. Possible influencing factors:
Maintenance and care of seals:
- Lack of maintenance, lack of maintenance or improper maintenance
- Using the wrong materials
Seal damage:
- As a result of aging, wear or mishandling/improper installation.
Heavy pollution of the car:
- Severe contamination of the vehicle can seriously impair the functioning of the water drain channels, as well as the rubber seals.
Factors depending on the service life:
- External factors
- Ultraviolet radiation
- Extreme climatic conditions
Corrosion can have a serious effect on the body, especially as a result of:
- Slight or heavy rusting of the seal holder
- Rusting sealed body welds
- through corrosion
Water leaks after body repair
If the vehicle has a leak after a body repair, the following points should be taken into account in particular:
- The correct installation of auxiliary elements and their seals should be checked (e.g. rear lights, etc.).
- The doors and tailgate/tailgate should be checked for correct alignment. The corresponding seals must not be damaged and must be installed correctly.
- Check for proper sealing of welds.
- The correct installation of the rubber sealing rings should be checked.
- The seals of windows fitted with rubber seals must be installed precisely and be in contact all the way around.
- Windows with direct glazing must have a correct and complete adhesive bond.
Water drain system
If the vehicle has water intrusion, the areas where water enters or drains should be checked first.
| Pos. | Spare Part No | Name |
| 1 | - | Water drain, front |
| 2 | - | Water drain, side and rear |
| 3 | - | Draining water from sunroof |
| 4 | - | Water drain tank |
Water ingress, diagnosis and corrective action: Vehicle front
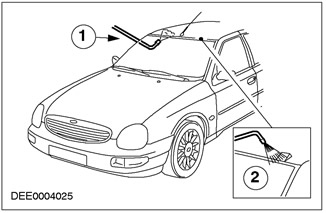
Windshield (installed with rubber)
Diagnostics:
- Water inflow into the rack area «A»
Cause:
- An old or incorrectly installed seal can cause the rubber seal to not properly or insufficiently clamp to the windshield or window frame. This causes water to pass between the rubber seal and the windshield or between the rubber seal and the window frame.
Corrective action:
- Seal the problem area by applying window sealing compound between the rubber seal and the windshield or between the seal and the window frame. Wipe off excess sealant immediately.
- If a new leak is found after the necessary leak test, the rubber seal must be replaced.
Windshield seal
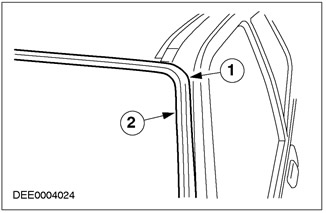
| Pos. | Spare Part No | Name |
| 1 | - | Window frame seal |
| 2 | - | window seal |
Windshields (direct glazing)
- Diagnosis: Water inflow into rack area «A» or instrument panel area
- Cause: Tears in sealant bead
- Corrective action:
NOTE: Repairs should be carried out in accordance with established methods (Maintenance microfiche/ TIS CD, group 42/501-11).
- Breaks in the sealant bead can be found from the inside using compressed air. A leak can be identified from the outside by escaping air.
- The second method of verification is by means of a test using water. The outer covering must also be carefully lifted up using a plastic wedge. Leakage should be detected from the inside, involving a second assistant in this.
Water penetration diagnostics
| Pos. | Spare Part No | Name |
| 1 | - | Compressed air test |
| 2 | - | Water test |
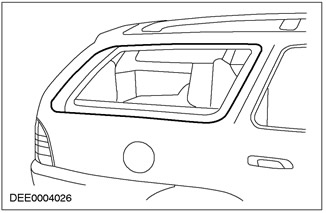
Side windows
In the case of fixed window doors (installed using rubber or direct glazing) the same problems can occur as for the windshield. Therefore, the same corrective actions should be used.
Windows doors
Door seal
Diagnostics:
- Water ingress into the bottom of the door interior trim or bottom trim panel area.
Cause:
- Waterproofing or foam sealing installed behind the interior trim of the door is designed to drain infiltrated water through the door drain holes either down or out. If the waterproofing or foam waterproofing is damaged or incorrectly installed, water may enter the interior of the vehicle.
- In addition to this, the drain holes may become clogged with leaves, dirt, or excess material to protect the cavity. Water collects in the doors and enters the interior of the car.
NOTE: If waterproofing or foam waterproofing is damaged, it should always be replaced.
- Check the waterproofing or foam waterproofing for damage or correct installation.
NOTE: When removing foam waterproofing, the butyl tape must be cut off with a knife.
- If the waterproofing is to be re-adhered, double-sided adhesive tape should be used. For foam waterproofing, butyl tape is used.
- Before installing waterproofing or foam waterproofing, check the drain holes for blockages.
Corrective action:
NOTE: When installing the butyl tape, do not touch the mating surface (it impairs adhesion).
- Detach the interior trim of the door.
Door seal
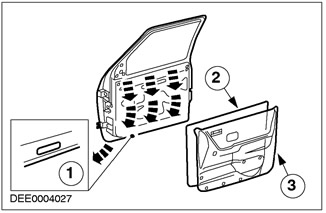
| Pos. | Spare Part No | Name |
| 1 | - | Drain holes |
| 2 | - | Foam waterproofing |
| 3 | - | Interior door trim |
Door seals
Diagnostics:
- Water inflow into the area of the bottom trim panel
Cause:
- Insufficient clamping force between seal and door.
Corrective action:
- Check clamping force:
- The easiest way to check the clamping force between the seal and the corresponding bearing surface is to check with a paper tape. It consists of placing strips of paper at various points between the door and the seal and closing the door completely. If it is possible to eject the paper without much resistance, the clamping force is too low.
- Adjust clamping force:
NOTE: When adjusting the clamping force, always take into account the alignment of the edges of the respective elements.
- The clamping force is usually adjusted using the striker of the door lock. When making adjustments, take into account the alignment of the distances from the door to the fender or from the front door to the rear door.
- Another adjustment method is to change the position of the seal mounting flange. The clamping force increases as the flange moves towards the door.
NOTE: Do not move the flange too far towards the door as this can reduce the bearing surface of the seal against the door.
- Check the bearing surface:
- Apply chalk evenly to the seal surface. Coat the door bearing surface evenly with petroleum jelly.
- Close the door completely, the lock should work. Open the door. Chalk imprint (bearing surface) can be identified by the lubricant film.
- The bearing surface must be at least 5 mm wide at all points.
Seal check
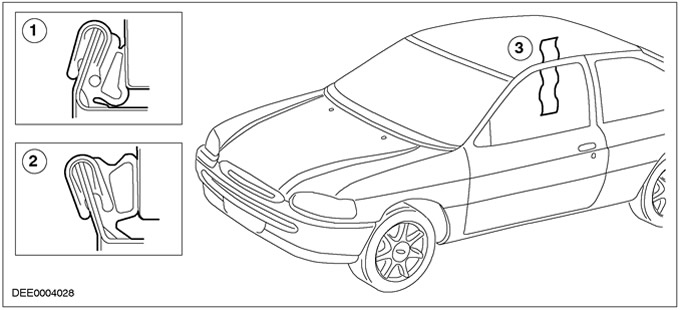
| Pos. | Spare Part No | Name |
| 1 | - | Panel flange bent too far inward: small footprint |
| 2 | - | Panel flange adjusted correctly: correct bearing surface |
| 3 | - | Check clamping force using paper tape |
Other reasons:
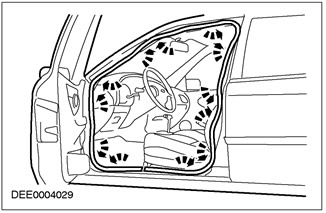
- The door seal must completely seal the door where it contacts the body.
- Water can enter directly or indirectly into the interior of the vehicle if the seal is damaged anywhere.
Corrective action:
- A damaged or worn door seal should always be completely replaced.
- When replacing the seal, the following must be taken into account:
- Always install the seal first in the area of small radii (corners).
- Then evenly secure the seal to the flange by lightly tapping with a rubber mallet. Twisting of the installed seal is absolutely not permitted.
NOTE: The prescribed seal length should not be reduced.
Correction of the installation of the door seal
Another reason:
- The door seal is attached to the welded flange around the entire perimeter. If this weld flange is deformed or damaged in any way (usually in areas with small radii), leaks may occur in this place.
- A stretched seal carrier can also cause leaks.
- In both cases, water enters the vehicle interior under the seal holder.
Corrective action:
- Straighten the deformed welding flange using a hammer and anvil, preventing and if necessary repairing any damage to the paintwork.
NOTE: If the seal has a joint, it must always be at the bottom of the door frame.
- A stretched seal carrier must be straightened out by hand. If this is no longer possible, the seal must be replaced.
Leaks through door seals
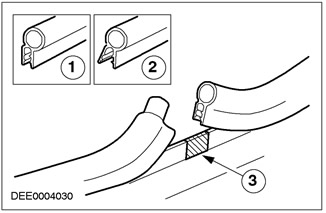
| Pos. | Spare Part No | Name |
| 1 | - | Correct seal holder |
| 2 | - | Stretched seal holder |
| 3 | - | Joint seal |
Sunroof
Diagnostics:
- Water ingress into the roof hatch
Cause:
- The sunroof is installed in the water trap. Water flows out through the water trap, water drain holes and drain hoses. Drain hoses go down both sides through the rack «A» and rack «WITH».
- Drain holes or drain hoses may be clogged with leaves, dirt, underbody protection material, and so on.
Corrective action:
NOTE: In the case of a sunroof, the outer rubber seal and lock actuator or latch mechanism should be checked first.
- Check the water trap for leaks.
- Check the drain hoses for leaks and for proper connection to the water trap.
- Check the drain system for blockages and blow out with compressed air if necessary.
- Check the outer seal and the correct adjustment of the sunroof.
Sunroof
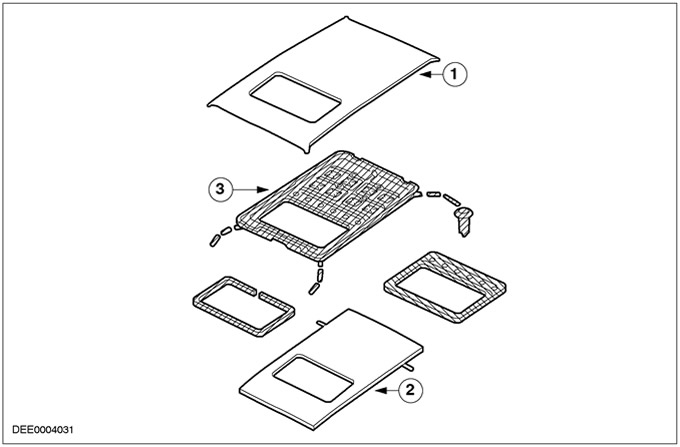
| Pos. | Spare Part No | Name |
| 1 | - | Roof |
| 2 | - | roof molding |
| 3 | - | Water trap with drain |
Apron panel and heating/ventilation
Diagnostics:
- Water entry to the front of the footwell
Cause:
- The apron panel is sealed in several places relative to adjacent elements, such as connection with a column «A» or floor. These seals can be destroyed.
- The heater and the housing of the ventilation system are connected to the apron panel. The through area is sealed with foam waterproofing that is attached to the hull.
- The body has drain holes to allow water to drain.
- If the foam waterproofing is defective or the drain is clogged, water may enter the front of the footwell.
Seal for heater and ventilation housing

Corrective action:
- Seal welds with damaged seals.
- If a leak is found in the heater or ventilation system housing, the drain holes should be checked first.
NOTE: Damaged foam waterproofing should always be replaced.
- It may be necessary to remove the housing to inspect the foam waterproofing and its support surface for damage.
Checking foam waterproofing and water drain holes
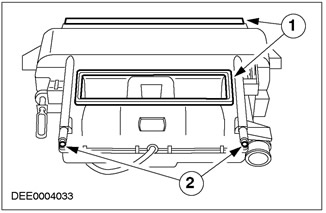
| Pos. | Spare Part No | Name |
| 1 | - | Foam waterproofing |
| 2 | - | Water drain holes |
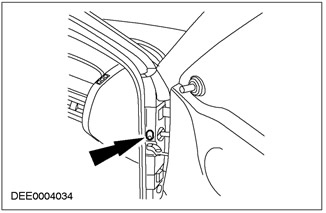
Other reasons:
- Bolts and holes for wiring cables and hoses should be checked for leaks in the area of the apron panel and instrument panel (rubber o-rings in particular).
- If the footwell area is damp, also check the door hinge seal, door light switch, and cable routing holes.
Door light switch seal
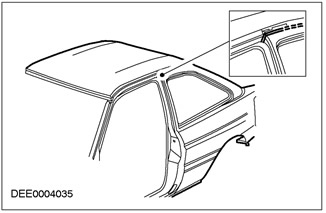
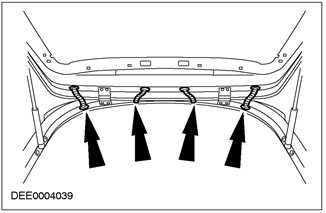
Rear spillway seal
Diagnostics:
- Water ingress into the side area of the headlining
Cause:
- The outer roof panel is sealed in the area of the welded joint to the side panel. This sealed weld can be covered with a trim tape or socket.
- In the case of cars «station wagon» And «hatchback» there is an additional seal against the rear cross member of the roof.
- Water can enter here if there is a break in the sealed weld.
Corrective action:
- Remove trim strip or socket. Check and reseal the sealed weld.
Gutter seal
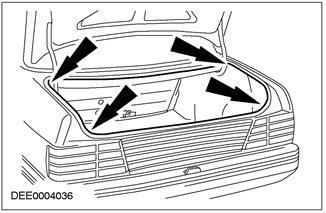
Luggage compartment seal
Diagnostics:
- Water inflow into the luggage compartment
Cause:
- The tailgate seal matches the door seal.
- If there is water intrusion, the seal should be checked for damage and the seal holder should be checked for correct installation.
- The clamping force and bearing surface of the lid should also be checked for leaks.
Corrective action:
- The lid is adjusted using the counter part of the lock or lock.
- Rubber hard stops are installed on both sides of the luggage compartment opening. They are usually adjustable and the clamping force can be changed.
- Small-radius tailgate seals are also problem areas.
Check seal for correct installation position
Another reason:
- The seal does not attach evenly along the perimeter of the bonnet due to deformation or unevenness of the weld flange.
Corrective action:
- Check seal and bearing surface.
- Straighten deformed or uneven weld flange.
Rough weld flange

Another reason:
NOTE: The seal holder covers the defective weld.
- Leaky weld on weld flange (penetration). Water can enter the luggage compartment under the seal holder.
Corrective action:
- Pull the seal away from the seal holder.
- Seal the leaking weld with sealant.
Penetration welds
Hinged tailgate
Diagnostics:
- Water ingress into rear headlining area
Cause:
- Leakage problems through the tailgate correspond to problems with the doors.
- In addition to this, the area to be compacted must be much larger. Cable and hose openings must also be sealed.
- Rubber o-rings for wiring holes must be checked for damage and correct installation (completely disconnected).
- The tailgate hinge attachment points may leak.
Corrective action:
- Check rubber o-rings and replace if necessary.
- Check the attachment points of the hinges and, if necessary, re-seal them with sealant.
Check cable and hose routing holes for rubber o-rings
Forced air suction
Diagnostics:
- Water ingress into the side area of the luggage compartment
Cause:
- Forced air extraction for the passenger compartment is often located in the lower area of the side panel of the luggage compartment. The housing of the ventilation system is sealed with foam waterproofing on the side of the body.
- The rubber damper for forced air suction must be able to move freely.
Corrective action:
- Remove forced air suction. Disconnect the bumper if necessary.
- Check the sealing area between body and body as well as the rubber damper.
- Replace damaged foam waterproofing if necessary.
Check the forced air intake seal
Rear window
Diagnostics:
- Water ingress into the luggage compartment area
Cause:
- Leak through rear window.
- Check for leaks in the same way as you would for a windshield leak.
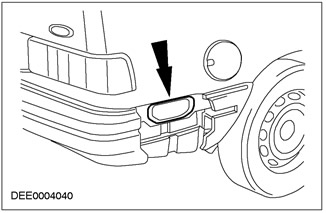
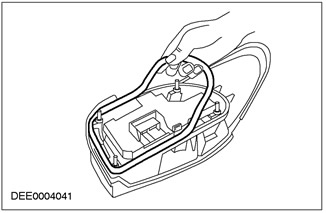
Reversing lights
Diagnostics:
- Water ingress into the rear area of the luggage compartment
Cause:
- Leaks through reverse lights. There are two sealing methods:
- Sealing with foam waterproofing
- Sealing with plastic sealant
- If the reversing light is leaking, it usually means that the seal has not been properly installed.
Corrective action:
- Remove the reversing lamp. Check the case and glass for damage. Check the plastic seal for leaks.
NOTE: Sealant should always be removed when making repairs.
Check seal of reversing lights
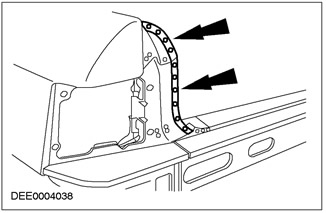
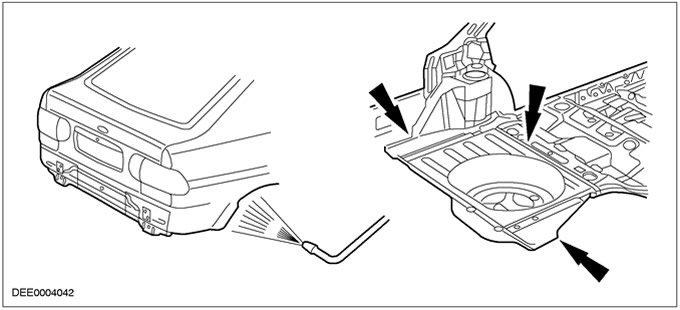
Panel connections with sealed welds
Diagnostics:
- Water ingress into the luggage compartment area
Cause:
- Several panel joints must be installed during manufacture in the wheel arch and luggage compartment areas. These connections are sealed with sealant.
- Uneven application of sealant can lead to rupture in the sealed weld.
Corrective action:
- Open the sealed weld.
- Find a leak in the sealed weld.
- Reseal with sealant.
Possible water intrusion at panel joints in the luggage compartment
Visitor comments