Contents: General information ↳ Economic considerations ↳ Extent of damage ↳ Damage assessment according to dent… ↳ Prerequisite for performing repairs ↳ Repair procedure ↳ Repair tools/products ↳ Repair procedure ↳ Reflection of light when pressed ↳ Scheme ↳ High Edge ↳ Unstable pressure zone ↳ Large area dent ↳ Stable pressure zone ↳ Squeezing out a dent near a… ↳ The pivot point of a dressing tool… ↳ Special lever for dents near… ↳ Door area ↳ Equipment ↳ Pressing out a dent through a window… ↳ Hood ↳ Restoring corrosion protection ↳ Quality control ↳
General information
Minor dents can be repaired without damaging the paintwork. The dent is repaired from the inside using special straightening tools. Prerequisites include having a specific diagnosis, determining the correct repair method, and the technician having sufficient experience in using special tools and knowing the working materials.
- This option is limited to those body surfaces that are accessible from both sides. This repair method is rarely used on body elements with double skin or closed body sections. The same applies to extreme areas, edges and bends of body elements that have increased rigidity.
- Satisfactory results are possible only for minor dents that are small and have a small radius of deformation. Therefore, this method is especially suitable for damage caused by hail, parking and transport.
Economic considerations
Whether it is cost-effective to remove dents without damaging the paintwork depends on:
- Area and depth of the dent.
- Access to the repair area.
- Rigidity of the repair area.
- Suitability of the material
- The number of dents on a specific area of the body panel.
- Is there any existing damage to the paintwork?.
Extent of damage
The repair method is suitable for dents up to approximately 50 mm in diameter.
Damage assessment according to dent size
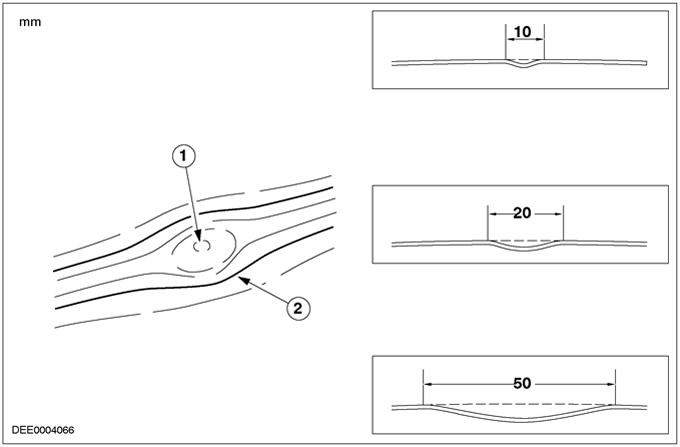
| Pos. | Spare Part No | Name |
| 1 | - | Center of the dent |
| 2 | - | Edge of the dent |
Prerequisite for performing repairs
The material in the center of the dent should not be stretched.
Repair procedure
- Perform diagnostics of the damaged area.
- Mark the dent.
- Prepare the area to be repaired.
- Set the adjustable lamp to the desired position.
- Restore the original shape of the dent.
- Replace the corrosion protection material.
- Perform quality check.
Repair tools/products
- Special straightening tools for removing dents
- Adjustable lamp
Repair procedure
1. Decide on a repair method.
2. Mark the dent
NOTE: Do not use marker containing solvent (damage to paintwork).
- The dent is marked in the repair area to facilitate recognition.
3. Prepare the repair area
- Make sure that the inside of the dent is accessible. Do not make repair holes.
- Clean the damaged area of the body. A good visual inspection is important for a positive result.
- Polish the repaired surface if it is matte. The repair procedure can only be accurately checked if there is sufficient light reflection.
4. Set the adjustable lamp to the required position.
- The adjustable lamp should be positioned and adjusted so that the dent can be clearly seen in the reflection on the paintwork (oval shape).
- As the pressure on the dent increases, the oval shape turns into lines that intersect each other. The intersection of the lines is the pressure point for the straightening tool.
Reflection of light when pressed
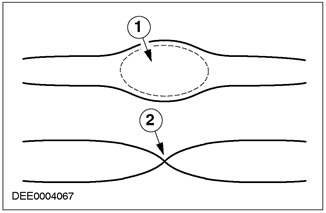
| Pos. | Spare Part No | Name |
| 1 | - | No pressure on the dent |
| 2 | - | Pressure applied to the dent |
5. Location of the dressing tool
- Place the tip of the straightening tool on the edge of the dent.
- When moved back and forth with light pressure applied to the dent with the tip of the tool, the reflected light shows the position of the dressing tool.
6. Operating principle when pressure is applied
- The work is reduced to the formation of a semicircle, working chronologically.
- To restore the surface, all that is necessary is to work on one half of the dent.
- The unused half of the dent is restored by itself, due to the tension created by the pressure.
Scheme

| Pos. | Spare Part No | Name |
| 1 | - | Pressure application sequence |
| 2 | - | Starting position |
NOTE: Never start from the center of the dent. If you start from the center of the dent, the edge will be raised and remain visible as a high spot (stretching of the material). This raised edge can only be restored after extensive rework.
High Edge
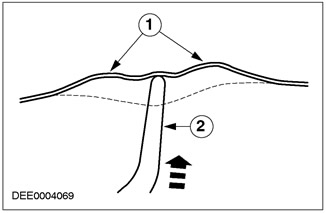
| Pos. | Spare Part No | Name |
| 1 | - | High edges |
| 2 | - | Dressing tool |
Exception:
- Dents with sharp edges and minimal material stretching are first straightened in the center.
- After pressing out the dent, you can see slightly convex areas. This is caused by the presence of excess steel in the center of the dent due to the stretching of the material.
- Use a plastic drift to straighten out the slightly raised area.
Unstable pressure zone
When working with large, relatively weak areas of the body, the trajectory of the straightening tool when applying pressure is correspondingly greater. The restoration process will take longer.
Large area dent

| Pos. | Spare Part No | Name |
| 1 | - | Shape recovery trajectory |
| 2 | - | Dressing tool |
Stable pressure zone
NOTE: Work areas around the internal reinforcement with only light pressure to avoid creating high areas (stretching of the material).
The areas of the body with stable pressure with internal connections have a much more stable surface than the areas with weak pressure. Here only short pressure movements are required, because the body steel is less springy.
Be careful when applying pressure if you are using a tool with a small contact surface.
Optical inspection:
- It is possible to completely remove all remaining unevenness only by continuously visually checking the surface using an adjustable lamp. In addition, towards the end of the straightening procedure, the dent should be checked several times when viewed from different directions. To do this, change the position by approximately 90°.
Squeezing out a dent near a connection
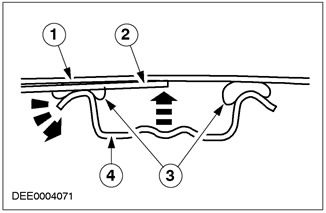
| Pos. | Spare Part No | Name |
| 1 | - | Roof surface |
| 2 | - | Dressing tool |
| 3 | - | Sealant roller |
| 4 | - | Roof connection |
The pivot point of a dressing tool using an S-hook
| Pos. | Spare Part No | Name |
| 1 | - | Rotated using S-hook |
| 2 | - | Dressing tool |
- To make it possible to apply force in the roof area, an S-hook support should be used.
- Release the headliner only in place, depending on the number of dents and their location.
- Access to dents around interior components can be gained by removing the component (interior lamp).
- Check accessibility before starting repairs if the dent is located near the sunroof.
- Repairs around internal connections are carried out using special tools included in the tool kit.
- Remove the sealant bead from the joint using a metal spatula so that the straightening tool can be inserted into the required position.
Special lever for dents near internal connections

| Pos. | Spare Part No | Name |
| 1 | - | Point of contact |
| 2 | - | Direction of movement |
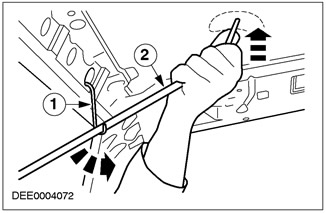
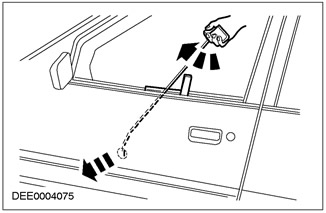
Door area
- Dents in the upper half of the door can usually be straightened out without removing the interior trim.
- When the window is open, access is provided through the window cavity. To prevent damage to the window, a protective block should be inserted into its cavity.
- A plastic wedge provides access.
Equipment
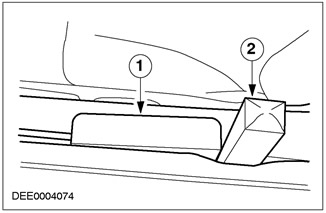
| Pos. | Spare Part No | Name |
| 1 | - | Protective block |
| 2 | - | Plastic wedge |
In this case, pressure is applied without the use of additional support, simply by turning the bent dressing tool.
Pressing out a dent through a window channel
Hood
- The hood is moved into working position using telescopic stops and held in the required position using "rubber cords".
- In the bond area, the bead of sealant should be partially opened using a metal spatula to provide access to the dent.
Restoring corrosion protection
All interior areas to be repaired must be refinished where accessible and the paintwork must be restored.
- Clean the interior area using silicone remover.
- Prime and paint the interior repair area.
- Finally, in areas where repair is not possible (no access), inject cavity protection material.
Quality control
To ensure the quality of repairs that meet factory standards, the following points should be observed:
- Check the repair area for unevenness. Do this optically, looking at the surface from different angles.
- Paint the repaired surface area, clean it and polish it if necessary.
- Check the correct installation of the connected elements and the interior trim, as well as the absence of damage.
(The text of the article was copied from the website: «www.fordbook.ru»)