Contents: General information ↳ Thermoplastics (plastomers) ↳ Duroplastics ↳ Plastics Used by Ford ↳ Identification of plastics ↳ Visual inspection ↳ Mechanical check ↳ Thermoelastic straightening ↳ Elastic deformations of planes ↳ Extended cracks and twisting ↳ Welding of plastics ↳ Required tools and materials ↳ Plastic welding gun ↳ Preparing the repair site (crack) ↳ Welded seam with V-shaped edge… ↳ Preparing a technical heat gun and… ↳ Welding temperature ↳ Values for the most important… ↳ Back side of plastic welding gun ↳ Performing welding ↳ Alignment of the fast welding nozzle… ↳ Position of the gun for welding… ↳ Welded seam ↳ Welding errors ↳ Reworking of the weld seam ↳ Reciprocating welding of plastics ↳ Performing welding ↳ Reciprocating welding ↳ Bonding plastic ↳ Tools and auxiliary equipment ↳ Preparing the repair area (scratches) ↳ Grinding out a scratch ↳ Preparing the repair site (cracks) ↳ Preparing for gluing ↳ Gluing a crack ↳ Gluing a crack using reinforcement ↳ Grinding ↳ Application of two-component putty ↳ GRP repairs ↳ Required tools and auxiliary… ↳ Grinding the repair area ↳ GRP Repair Components ↳ Application of polyester resin ↳ Insert fiberglass mat ↳ Applying putty ↳ Apply putty ↳ Final application of putty ↳ Grinding using a hand-held surface… ↳ Precautionary measures ↳
General information
Due to differences in design, repair of plastic elements involves different repair methods:
- Thermoplastic straightening
- Welding of plastics (PC, PP/EPDM, etc.)
- Bonding of plastic (all plastic elements)
- Lamination of plastics (only GRP elements with polyester resin)
When performing repairs, the characteristics of plastic are of great importance. Two main groups can be distinguished:
- Thermoplastics (plastomers or thermoplastic plastics)
- Duroplastics (thermosetting plastic)
Thermoplastics (plastomers)
- Heat causes thermoplastics to change from a solid state to a thermoelastic state and then to a thermoplastic state.
- After thermoplastics cool, they return to their solid state.
Duroplastics
Duroplastics are much heavier and more brittle than thermoplastics.
- When heated, their strength remains largely unchanged.
- When the critical temperature is exceeded, duroplastics are destroyed.
- Cooling will not return them to their original state.
Plastics Used by Ford
| Abbreviation | Name |
| ABS. | Acrylonitrile butadiene styrene (polymer) |
| PA | Polyamide |
| PC | Polycarbonate |
| PP | Polypropylene |
| PP/EPDM | Polypropylene/ethylene propylene rubber |
| PC/PBT | Polycarbonate/polybutylene terephthalate |
| PBT/PC | Polybutylene terephthalate/polycarbonate |
| PUR | Polyurethane |
| GF | Glass fiber reinforced |
Identification of plastics
If the plastic does not have any markings, its type can be determined using two different procedures/techniques:
- Visual inspection
- Mechanical check
Identification of the plastic type is required when performing plastic welding to determine the correct use of the appropriate welding electrode.
Visual inspection
Visual inspections mainly serve to identify PUR and GRP materials. Thermoplastic components (e.g. bumpers) are often painted and therefore difficult to identify.
Identification characteristics:
- PUR: If cracks or similar damage occur, visible pores in the foam.
- GRP: recognizable glass fiber structure on the inside.
Mechanical check
- Degree of hardness; the higher the tone, the harder the plastic.
- Elasticity; the more muted the tone, the higher the elasticity of the plastic.
NOTE: Mechanical tests may allow identification of the plastic group but not the plastic type.
According to damage statistics, plastic bumpers are the most frequently repaired.
NOTE: If the polyurethane (foam) on the inside is bonded to the outer shell of the bumper, this PUR foam should not be removed to perform repairs. If there is serious damage such as cracking or splitting of the outer shell, do not perform any repairs in the foam area. The rule for this case is: replace the element.
The outer shell of plastic bumpers is mainly made of thermoplastic materials. Depending on the extent of damage and availability, the following repair procedures can be applied:
- Thermoelastic straightening
- Gluing
- Welding
Thermoelastic straightening
Bumpers often have deformations that occur in the elastic zone. They usually take the form of dents, depressions and bends. Many of these deformations (for example, in a bumper) are immediately or after some time self-healing. This self-healing depends on the extent of the damage and the temperature. Most deformations of planes in the elastic zone are eliminated (the shape of the element returns to its original shape) by heating with a stream of hot air (technical heat gun).
Elastic deformations of planes
NOTE: The required heat exposure depends on the type of plastic. Do not heat outside the elastic zone. The deformation of the plastic cannot be reversed. Never use an open flame!
The dents or depressions on the surface should be heated uniformly to approximately 200°C using a technical heat gun and, if possible, applying heat alternately from both sides. If you do not overdo it with the heat, the deformation will be eliminated and the surface of the element will return to its original shape.
To a certain extent, the correction can be supported by using mechanical tools such as a hammer handle, plastic wedge, etc.
Extended cracks and twisting
If there are extended cracks or even twisting in the damaged area, the possibilities of thermoelastic straightening are limited. For this type of damage, gluing repair is most suitable.
- To prevent tension in the material, cut away cracked or twisted areas (using a hacksaw).
- Heat the recess to approximately 200°C (evenly, outside and inside) and correct the shape to the original using a narrow spatula or the handle of a hammer.
Welding of plastics
NOTE: Do not weld plastic in the area where foam is installed.
Plastic welding is the most suitable method for repairing cracks in plastic bumpers where the back of the damaged area is not suitable for gluing repair. Examples: Ribbed section, box section, narrow rounded sections in reinforced areas.
Required tools and materials
In addition to the tools available at a service station (such as scrapers, grinders, etc.), the following tools are required for welding plastic:
- Technical heat gun (approx. 1500 W)
- Welding nozzles
- Various welding electrodes
- Milling cutter Ш 5.5 mm for processing welding groove.
- Heart-shaped scraper.
Plastic welding gun
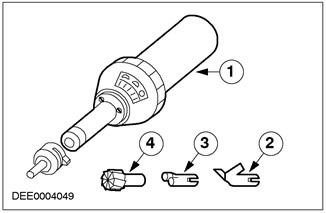
| Pos. | Spare Part No | Name |
| 1 | - | Plastic welding gun |
| 2 | - | Nozzle for fast welding |
| 3 | - | Wedge nozzle (fixed nozzle) |
| 4 | - | End mill |
Preparing the repair site (crack)
Prepare the crack area for V-groove welding.
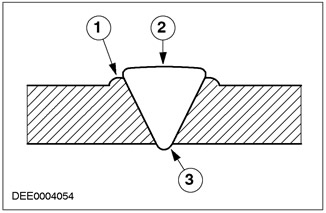
Welded seam with V-shaped edge preparation

| Pos. | Spare Part No | Name |
| 1 | - | Part to be repaired |
| 2 | - | Welding filler metal (of a certain shape) |
Preparing a weld with a V-shaped edge preparation:
- Make a groove for welding using a scraper (end mill).
- Maintain a connection angle of 60° - 70°.
NOTE: Drill out the end of the crack (3mm drill bit) to prevent further cracking. Before welding, in the place where the edge alignment is uneven, fix the beginning of the crack using pliers.
- Drill out the end of the crack.
Preparing a technical heat gun and welding electrode
Convert a heat gun into a plastic welding gun (extended nozzle and quick weld nozzle).
Adjust the welding temperature (200°C -700°C) according to the prescribed values.
Welding temperature
The welding temperature is determined by two factors:
- Type of plastic
- Thickness of the welding electrode
Values for the most important materials and the thickness of a typical welding electrode (5.7 mm x 3.7 mm)
|
Thermoplastic |
Welding temperature in°C (prescribed value) |
Setting up the control potentiometer for a plastic welding gun |
|
|
Wedge nozzle |
Quick Weld Nozzle 5.7mm |
||
|
ABS. |
350 |
4,5 |
5,3 |
|
PP |
300 |
3,8 |
4,5 |
|
PP/EPDM |
300 |
3,8 |
4,5 |
|
PBT/PC |
300 |
3,8 |
4,5 |
|
PA |
400 |
5,1 |
5,6 |
|
PC |
350 |
4,5 |
5,3 |
|
PC/PBTP |
350 |
4,5 |
5,3 |
- Weld PBT/PC plastic using PP welding electrode only.
- Glass fiber reinforced plastic cannot be welded.
- The blue painted plastic parts of the Ford Ka cannot be painted and are therefore not suitable for repairing plastic parts.
Back side of plastic welding gun
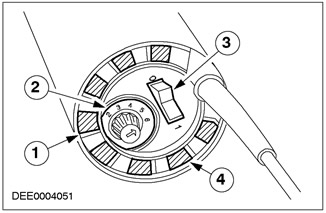
| Pos. | Spare Part No | Name |
| 1 | - | Air intake opening |
| 2 | - | Temperature control unit |
| 3 | - | Switch |
| 4 | - | Air flow switch |
- These temperature values are the air temperature for the plastic welding gun. The material temperature is much lower.
- Follow the manufacturer's instructions when adjusting the temperature.
- Preheat the welding equipment to the specified welding temperature for 3-4 minutes.
- Make a bevel on the welding electrode at the front to ensure gradual filling at the beginning of the groove (crack).
Performing welding
When welding plastics, the following requirements must be observed:
- Correct temperature conditions
- Uniformity of welding speed
- Uniformity of working pressure
Insert the beveled welding electrode into the heated preheating chamber of the rapid welding nozzle until the tip of the welding electrode emerges from the back side.
Alignment of the fast welding nozzle position
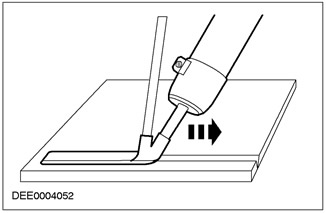
The reverse side of the fast welding nozzle should be positioned parallel to the repaired surface in the longitudinal direction. Parallel positioning in the longitudinal direction is achieved by appropriately tilting the welding equipment.
Position of the gun for welding plastic
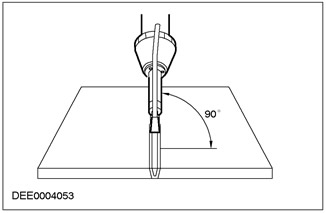
- The plastic welding gun should be moved in such a way that the welding electrode is positioned strictly vertically in relation to the groove.
- The welding procedure can be started when the welding electrode and the plastic to be welded are in a plastic state.
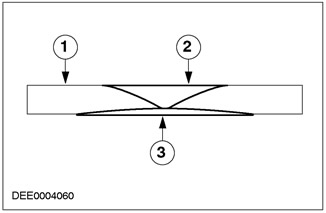
Welded seam
| Pos. | Spare Part No | Name |
| 1 | - | Welding bead |
| 2 | - | Reinforcement of weld seam |
| 3 | - | Weld base |
NOTE: An optimal joint is achieved when a small, even weld bead is formed along the edge of the weld. It is very important to weld through the crack. Check the weld from the back and re-weld if necessary.
The working pressure during welding is applied only to the welding electrode.
Welding errors
Deformation:
- The repair area was overheated.
- The presence of tension in the material when welding parts.
- The plastic element is too thin.
Bad weld joint:
- Welding temperature too low.
- Welding speed too high.
- Welding of various materials.
The weld seam is recessed:
- Groove along crack too wide
- The welding temperature is too high.
Reworking of the weld seam
- After cooling, the convex part of the weld can be removed using a hand-held angle grinder and P80 grit sandpaper.
- Then, surface grinding is carried out using a surface grinder and sandpaper with a grain size of P120 - P220.
- Clean the treated repair surface using a plastic cleaning solution.
- Apply a thin layer of plastic primer to the repaired surface.
Reciprocating welding of plastics
Reciprocating plastic welding is the preferred method for repairing cracks in hard to reach areas.
- In reciprocating welding, the welding electrode moves freely.
- Preparation of the groove along the crack is similar.
Performing welding
- The plastic welding gun is equipped with an extension nozzle only.
- The welding electrode and the groove along the crack come into a plastic state through vertical reciprocating movements.
- The welding electrode in a plastic state is inserted vertically into the groove.
Reciprocating welding
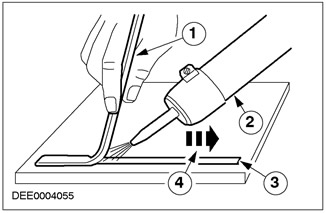
| Pos. | Spare Part No | Name |
| 1 | - | Welding electrode |
| 2 | - | Plastic welding gun |
| 3 | - | Welding groove |
| 4 | - | Welding direction |
The following requirements must be observed when performing reciprocating welding:
- Uniform heating of the welding electrode and the welding groove.
- Uniform welding speed.
- Vertical position and uniform pressure on the welding electrode.
All other repair actions are described in the chapter "Welding plastics - Reworking the weld".
Bonding plastic
General information
Gluing technology has some advantages over welding technology:
- Within the thermoelastomers group, all semi-rigid auxiliary elements (such as bumpers, front grilles, etc.) can be repaired without identification.
- For all thermoplastic components, a two-component polyurethane adhesive should be used.
- To ensure the original mechanical properties, reinforcing tapes can be attached to grooves (on cracks, up to a maximum of 100 mm) and fractures.
Required tools and equipment
To glue thermoplastic elements, you can use tools and equipment from a paint shop. To clean cracks and scratches, you can use angle grinders and belt grinders. For fine grinding, use hand-held surface grinders with suction. An infrared heater ensures fast and effective drying.
Repair kit for plastic parts
- Plastic cleaning solution
- Plastic soil
- Glue Repair Kit
- Three double cartridges
- Three emulsion tubes
- Metal reinforcing tapes
- Reinforcing fiber
Tools and auxiliary equipment
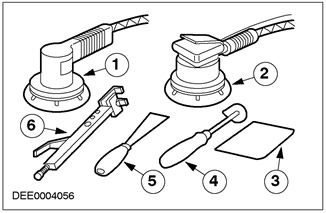
| Pos. | Spare Part No | Name |
| 1 | - | Angle grinder with variable speed |
| 2 | - | Surface grinding hand machine |
| 3 | - | Plastic putty |
| 4 | - | Scraper |
| 5 | - | Paint spatula |
| 6 | - | Pliers |
Preparing the repair area (scratches)
Before repair, clean the plastic parts on both sides using a high pressure cleaning solution and then dry.
Clean the surface to be repaired using a plastic cleaning solution.
Grinding out a scratch
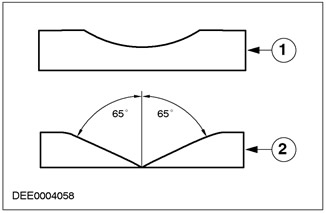
| Pos. | Spare Part No | Name |
| 1 | - | Preparing the scratch |
| 2 | - | Preparing the crack |
- Scratches should be sanded thoroughly, ensuring a flat surface and using a hand-held surface sander. Sandpaper, grain size P80 - P120
- Fine sanding using a hand-held surface sander: sandpaper, grit P120
NOTE: Use protective gloves when cleaning. Clean the repair area thoroughly using plastic cleaner and paper towels.
- Spray plastic primer evenly over the repair area.
Preparing the repair site (cracks)
- Grind the crack on the front side so that it is flat using an angle grinder or belt grinder. Grinding surface width 40-60 mm
- Sand using a hand-held surface sander. Sandpaper: grit P120.
- Drill out the end of the crack (3mm diameter) to prevent further cracking.
- Rub the back side along the crack.
- Clean the repair area on both sides using plastic cleaner and paper towels.
- Spray plastic primer evenly over the repair area.
Preparing for gluing
- The two-component adhesive is applied to the cleaned and primed repair area using a hand-held gun.
- Pressing the gun lever forces resin and hardener out of the dual cartridge and into the attached emulsion tube.
Gluing a crack
Even minor depressions such as cracks require preparation. To ensure sufficient priming for the use of adhesive, the surface of the repair area must also be treated. This also prevents the repair area from settling later.
- After cleaning and priming, fill the scratch cavity with excess glue.
- During the application process, the end of the emulsion tube should be dipped into the adhesive to prevent air penetration.
- Spread and level the adhesive using a flexible plastic spatula.
- Practice curing the adhesive using an infrared heater or drying oven.
Gluing a crack using reinforcement
The repair area is reinforced to increase the torsional resistance in the event of cracking and rupture of a large extent. For this purpose, appropriate reinforcing materials (metal strips, reinforcing fibers) are fixed on the back side.
- Cover the crack on the front side with PE sheet and adhesive tape.
- On the back side, fill the groove made along the crack with plastic glue.
- A wide strip of reinforcing fibre is fixed over the groove in the adhesive bead.
- The ends of the crack are reinforced by fixing a metal strip, which is attached to the plastic element using pliers.
- Then smooth the reinforcing material over the entire surface.
- Dry using an infrared heater or drying oven.
- The PE sheet prevents excess adhesive from forming on the front side of the crack.
- Remove the PE sheet after the glue dries.
- Spread glue over the repair area on the front side.
- Practice the curing procedure using an infrared heater or drying oven.
- Cool the glue to room temperature to prevent the glue from coming off when sanding and to prevent wear on the sandpaper.
Grinding
NOTE: When dry sanding, use a suction device and a dust mask.
- Sand off the protruding adhesive using a hand-held surface sander. Sandpaper: grit P120 - P220.
- Manually correct any distortions and curved areas.
- Use an abrasive pad to roughen painted surfaces.
- Clean the plastic element thoroughly using plastic cleaner and paper towels.
NOTE: Dry the plastic primer (matte finish) thoroughly.
- Spray a thin layer of plastic primer onto the repair area and sanded areas for subsequent application of 2K putty.
Application of two-component putty
To prevent the formation of porosity at the edges and to smooth out unevenness, it is advisable to apply 2K putty (MS, HS) with an elasticity-enhancing additive.
- Once dry, cool the 2K filler to room temperature and sand using a hand-held surface sander and fine-grit sandpaper.
- Use a fine-grit sandpaper to sand down any warped or crooked areas by hand (wet sanding).
- Check the relief of the repair area and correct it if the relief is uneven.
- Apply stain according to manufacturer's instructions.
GRP repairs
General information
GRP is a hard and brittle material in its mechanical properties. Due to these mechanical properties, cracks and breaks often lead to serious damage. The stability and safety of GRP elements are impaired if the reinforcing glass fibre cracks. In the event of serious damage that affects the structure of the element, such elements must be replaced. Minor damage (such as abrasion, cracks up to 80 mm, holes up to approximately 60 mm in diameter, etc.) can be repaired in accordance with technical and appearance standards, provided that the damage is not in heavily used or hard-to-reach areas. To ensure excellent repair quality, please observe the following points:
- The room temperature should be at least 15°C and the air should be as dry as possible.
NOTE: Fingerprints will remain on the film and prevent proper bonding.
- The repair area must be thoroughly dried and cleaned.
- Before repair, the GRP element to be repaired must be dried using an infrared heater or drying oven.
- In case of large cracks and tears, the strength of the outer shell can be restored by using reinforcing material on the reverse side.
Required tools and auxiliary equipment
- Hacksaw (body saw) for separating cracks.
- Axial grinder, angle grinder or belt grinder for grinding the repair area.
- Surface grinding hand-held machine for grinding and polishing repair surfaces.
- Manual sanding unit for sanding small surfaces.
Grinding the repair area
- Sand the edge of the hole into a V-shape and flat using an angle grinder and P80 - P120 grit sandpaper.
- Remove layers of putty and paint.
- If cracks have formed, they are ground down at the base of the crack by 3 mm. This eliminates any internal stress.
- To ensure subsequent adhesion of the repair material, careful, flat sanding is important.
NOTE: Surface should be sanded by hand.
- Grinding with an angle grinder generates heat, which changes the surface structure of the resin. This results in poor adhesion.
GRP Repair Components
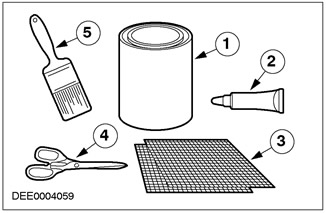
| Pos. | Spare Part No | Name |
| 1 | - | Polyester resin |
| 2 | - | Hardener |
| 3 | - | Fiberglass mats |
| 4 | - | Scissors |
| 5 | - | Brush |
Application of polyester resin
The polyester resin is mixed with the hardener and, using a brush, applied in a thin layer to the clean repair area.
Insert fiberglass mat
- Cut the fiberglass mat to the required size and insert it into the overlay polyester resin.
- Apply more polyester resin over the fiberglass mat and add a second or third mat if necessary.
NOTE: Completely immerse the fiberglass mat in the polyester resin. No air can be present in the repair area.
- Apply polyester resin using a brush.
- Allow the polyester resin to dry at room temperature.
- On the back side, reinforce large cracks and tears with reinforcing material to restore the strength of the outer shell.
Applying putty
- The recesses on the front side are filled with polyester filler to provide a smooth, flat surface.
- Repeat the procedure if necessary.
Apply putty
| Pos. | Spare Part No | Name |
| 1 | - | Repair element made of GRP |
| 2 | - | Polyester putty |
| 3 | - | Fiberglass insert |
Final application of putty
Restore the surface relief by applying polyester putty.
Grinding using a hand-held surface grinder
- Remove any protruding polyester material using a hand-held surface sander. Sandpaper with a grit of P120 - P220.
- The repaired surface can be painted after sanding.
Precautionary measures
- Polyester resin, adhesive, solvents and thinners are flammable and should be kept away from open flames or flames.
- Cutting and grinding operations should only be carried out in rooms equipped with exhaust ventilation (suction units).
- If there are no rooms with suction systems, use only tools with suction systems.
- The use of protective equipment such as gloves, safety glasses, aprons and respirators is very important.
For additional information, refer to Section 501-25A / 501-25B / 501-25C / 501-25D / 501-25E / 501-25F / 501-25G. It is also important to follow all applicable regulations, health and safety laws, data sheets, precautionary notices and guidelines for handling adhesives containing isocyanate ester, polyester resin, solvents and thinners.