Contents: Removal ↳ Installation ↳
Schematic diagram of the automatic adjustment mechanism of the rear brake pad clearance of the Gerling brake
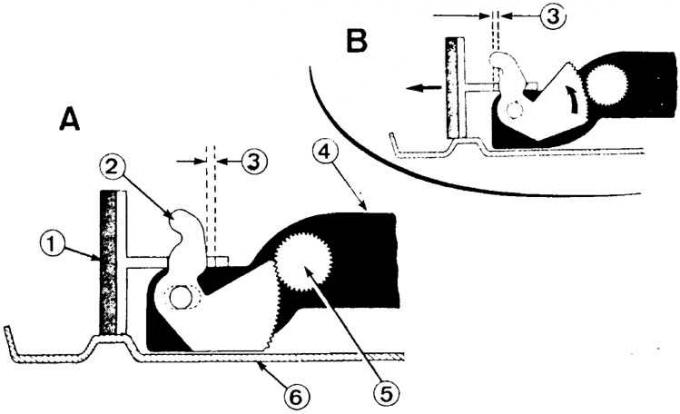
A - normal position, B - braking position, 1 - brake shoe, 2 - toothed plate lever, 3 - gap, 4 - control connector, 5 - controls, 6 - brake shield carrier
Attention! Brake linings are glued to brake shoes. New synchronous shoe (front) has a lining slightly thicker than asynchronous shoe (rear). Front brake lining wears faster and both shoes reach the limit of wear almost simultaneously.
Removal
1. Loosen the rear wheel nuts.
2. Raise and secure the rear of the vehicle, remove the rear wheel.
3. Remove the brake drum.
4. Remove the front brake shoe conductor (synchronous) by pressing the cup against the shoe conductor spring with pliers and turning it 90° while simultaneously holding the conductor rod from behind, remove the cup with the spring and remove the shoe conductor rod.
Berlin 2.0 dm³ and combi
5. Pull the front brake shoe away from the backplate while simultaneously rotating the top end of the shoe outward.
6. Disconnect the upper and lower return springs from the front shoe.
7. Remove the front brake shoe (synchronous).
Berlin 1.3 and 1.6 dm³
8. Lift the front brake shoe from the support at the bottom, use a screwdriver resting against the support, remove the end of the shoe from the support, move it towards the rear shoe and unhook the lower return spring.
9. Pull the front shoe away from the cylinder and move it near the cylinder towards the rear shoe to avoid damaging the rubber cylinder boot.
10. Release the upper return spring using pliers inserted into the hole in the wheel hub flange, located above the upper return spring after the hub flange has been rotated accordingly.
11. Tilt the lower part of the front brake shoe forward and upward until the clearance adjustment lever is disengaged from the latch.
12. Disconnect the front brake shoe from the pressure rod.
All types
13. Remove the cup, spring and conductor of the rear brake shoe (asynchronous), in the same way as the conductor of the front shoe.
14. Remove the rear brake shoe with the handbrake lever and unhook the handbrake cable.
15. Disconnect the automatic clearance adjustment lever together with the spring from the rear brake shoe (asynchronous).
Installation
1. Check and clean the parts and the brake shield (you can wash it with alcohol).
2. Apply a small amount of Wolfracote special grease to the six elements of the brake backing plate.
3. Connect the automatic clearance adjustment lever together with the spring and the handbrake cable to the rear brake shoe (asynchronous).
4. Insert the rear shoe (asynchronous), resting its ends on the piston and support at the bottom of the supporting brake shield.
5. Install the rear brake shoe conductor (asynchronous).
Berlin 2.0 dm³ and combi
6. Hook the return springs (upper and lower) onto the front brake shoe (synchronous), holding the shoe perpendicular to the brake shield carrier.
7. Install the lower end of the front brake shoe (synchronous) in the support at the bottom of the supporting brake shield, and the upper end of this shoe in the piston groove.
8. Press the front shoe against the brake shield.
9. Install the front brake shoe (synchronous) conductor.
Berlin 1.3 and 1.6 dm³
10. Connect the clearance adjustment lever to the latch and attach the upper return spring to the front shoe (synchronous).
11. Press the latch down and tilt the front brake shoe up to release the clearance adjustment lever.
12. Connect the clearance adjustment lever to the push rod.
13. Tilt the front brake shoe (synchronized) down and reconnect the clearance adjustment lever to the latch.
14. Install the front brake shoe (synchronized) next to the support at the bottom of the brake shield and insert the lower return spring.
15. Use a screwdriver to pry up the front brake shoe (synchronous) and install it on the support.
16. Pull the upper part of the front shoe (synchronized) forward until it is locked by the adjusting lever.
17. Press the front brake shoe (synchronous) against the supporting brake shield and secure the end of the shoe in the piston groove after loosening the latch with a screwdriver until the conductor hole in the shoe is aligned with the conductor hole in the supporting brake shield.
18. Install the front brake shoe (synchronous) conductor.
All types
19. Set the automatic brake shoe clearance adjustment mechanism to move the brake shoes back.
20. Install the brake drum.
21. Press the brake pedal several times to activate the adjustment mechanism.
22. Install the rear wheels and tighten the wheel nuts.
23. Lower the vehicle and tighten the wheel nuts to the appropriate torque.