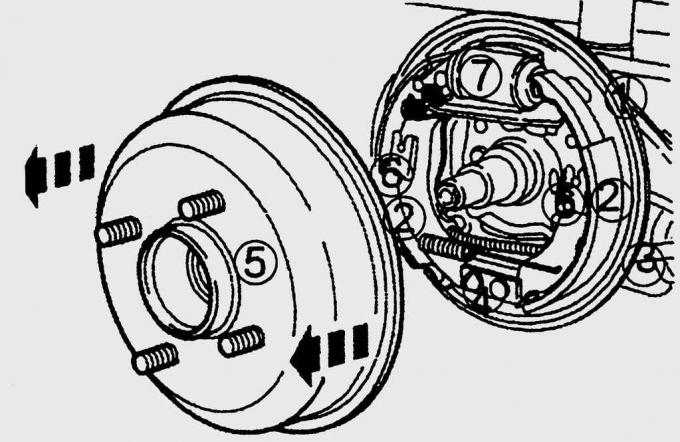
Fig. 14.23. Rear wheel drum brake mechanism: 1 – rear brake protective cover; 2 – brake shoe; 3 – parking brake cable; 4 – stop; 5 – brake drum with wheel hub; 6 – Brake shoe mounting clamp; 7 – wheel brake cylinder
Be sure to replace all the pads on one axle of the vehicle, even if only one pad is worn out. Otherwise, this will lead to different friction coefficients on the wheels, which will pull the vehicle to one side during intensive braking. Carefully run in new brake pads and avoid abrupt braking during the first 500 km. Brake pads are replaced with new ones if the old ones are worn out, oiled (the parking brake does not brake the vehicle). Carefully ensure that all spare parts of the brake system for your vehicle are original and approved for use (Fig. 14.23).


SEQUENCE OF WORKS
1. Remove the protective cover from the parking brake lever and lift it up the lever.
2. Loosen the nut and release the parking brake cable.
3. Loosen the nuts and remove the rear wheel.
4. Remove the rear wheel hub with the brake drum. Remove the wheel speed sensor, if installed.
5. From the back of the rear brake cover, remove the brake shoe mounting clamp.
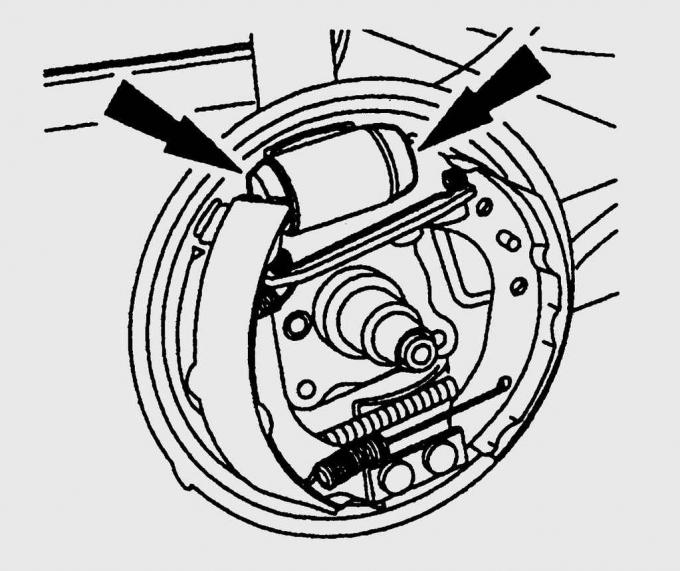
Fig. 14.24. Locations of installation of brake pads on pistons of wheel brake cylinder
6. Remove both brake shoes from the wheel brake cylinder pistons by tilting them to the sides (Fig. 14.24). Do not damage the protective covers of the wheel brake cylinders.
7. Use a small clamp to secure the wheel brake cylinder pistons in their original position.
8. Remove the brake pads from the lower stop and tilt them downwards.
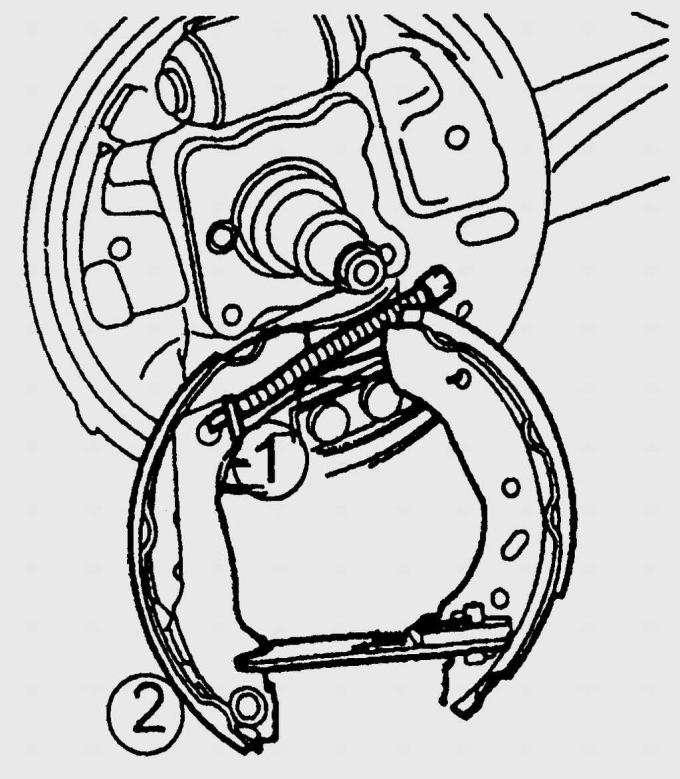
Fig. 14.25. Disconnecting the parking brake cable (1) from the brake release shoe (2)
9. Pull back the brake shoe 2 (Fig. 14.25) and disconnect the parking brake cable 1 from it. Squeeze the clamp on the rear brake protective casing and pull the parking brake cable out of the protective casing.
10. Remove first the lower, then the upper return springs.
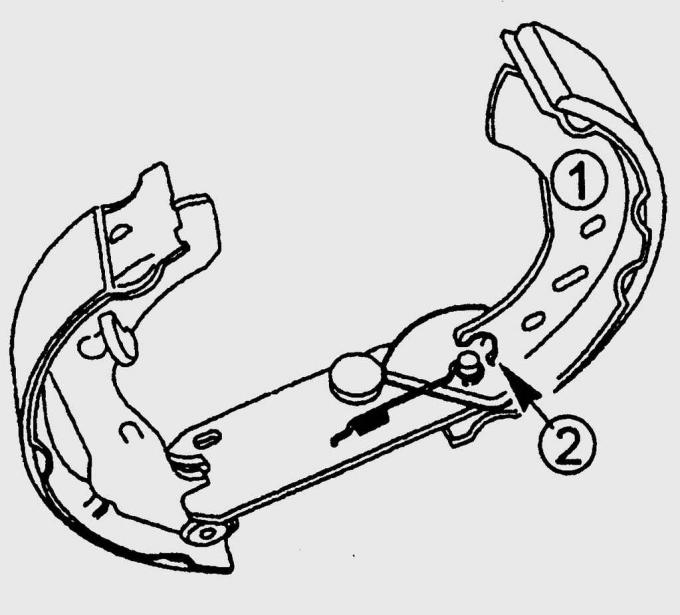
Fig. 14.26. Removing the front (running) brake shoe (1) from the spacer plate (2)
11. Release the front (running) brake shoe 1 (Fig. 14.26) from the spacer plate. If present, turn the automatic adjuster so that the brake shoe latch is released.
12. Turn it 90° and remove the lower brake shoe spacer plate.
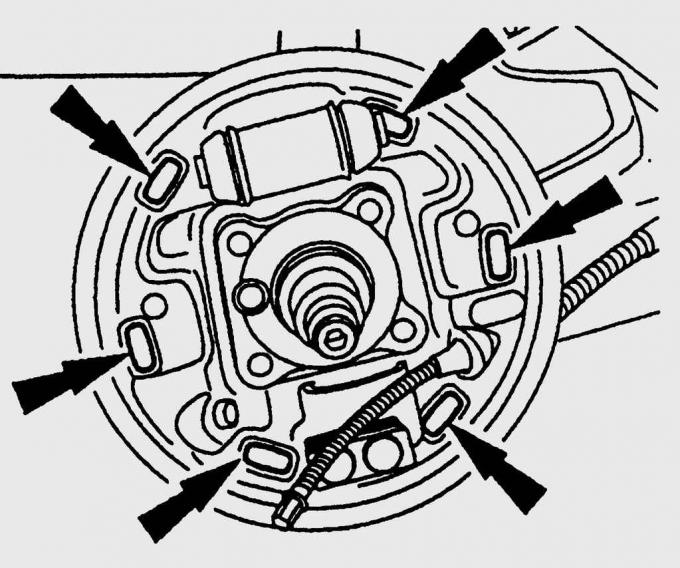
Fig. 14.27. Location of brake pad bearing points on the rear brake protective casing
13. Clean the rear brake boot and brake shoe bearing areas, check and lubricate them with a thin layer of copper-based grease (Fig. 14.27).
14. Assemble the brake shoes and spacer plates. Make sure that the automatic adjuster is set to its original position.
15. Install the return springs on the brake pads.
16. Connect the parking brake cable.
17. Carefully install the brake shoes on the wheel brake cylinder pistons by turning them. Do not damage the protective covers. First remove the clamp that secures the wheel brake cylinder pistons in their original position.
18. Place both brake shoes on the support.
19. Install the wheel hub and brake drum on the axle. First tighten the new wheel hub mounting nut to 235 N·m, then loosen it 2 1/2 turns. Turn the "free" brake drum by hand several times and at the same time tighten the hub mounting nut again to 235 N·m.
20. Partially fill the hub cap with new wheel bearing grease and, using a pipe of the appropriate diameter and a hammer, carefully install the cap onto the wheel hub.
21. Press the brake pedal several times until strong resistance appears, which allows the newly installed brake shoes to be centered in relation to the brake drum and brings the automatic adjuster into the working position in which it adjusts the brake shoe clearance.
22. Install the wheels and lower the vehicle.
23. Adjust the parking brake.
24. During the final test drive, carefully check the operation of the brakes and the parking brake.
This article was borrowed from the website [FordBook]