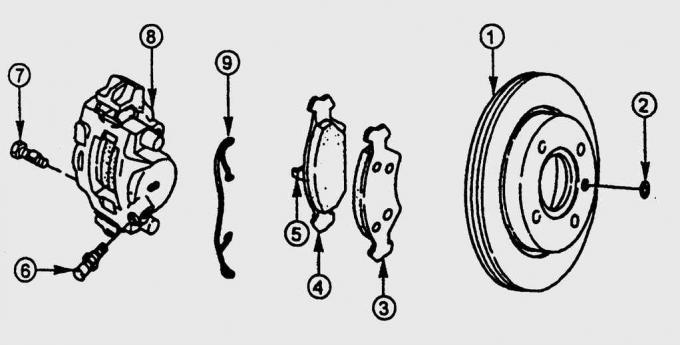
Pic. 14.17. Front disc brake: 1 - brake disc; 2 - clamp; 3 - external brake shoe; 4 - internal brake shoe; 5 - mounting plate; 6 - bleed valve; 7 - bolt; 8 - support; 9 - spring mounting bracket
Be sure to replace all pads on the same vehicle axle, even if only one pad is worn. Otherwise, this will lead to different coefficients of friction on the wheels, which will lead the car to the side during heavy braking. If the brake pads are to be reinstalled, they must be marked before removal. During the first 500 km of driving, the structure of new brake pads changes due to heat, so avoid frequent heavy braking during this time. Otherwise, the brake pads may quickly harden, resulting in poor braking performance. Make sure that all spare parts of the brake system are original and approved for use (pic. 14.17).
SEQUENCE OF WORK
1. On a level surface, loosen the front wheel mounting bolts, then raise the front of the vehicle and support it on jack stands. Turn out bolts of fastening and remove a wheel.
2. Turn out a steering wheel to facilitate access to brake pads.
3. Use a narrow blade screwdriver to remove the retaining clip from the caliper.
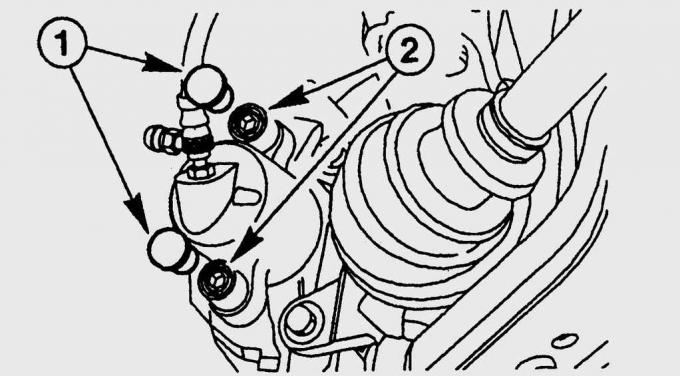
Pic. 14.18. Location of protective caps (1), covering guide pins (2) front brake caliper mounting
4. From the inside of the caliper, remove the protective caps 1 (pic. 14.18) from both caliper guide pins.
5. Unscrew guide pins 2.
6. Remove the brake caliper. When removing the caliper, the outer brake pad may remain in the brake pad guide.
7. Remove the outer brake shoe from the caliper.
8. Raise the caliper and use soft wire to tie it to the A-pillar. The caliper must not hang on the brake hose. The brake hose must not be stretched or kinked. If necessary, remove the brake hose from the shock absorber bracket.
9. Remove the inner brake pad from the caliper sliding piston.
10. Clean with alcohol (never petrol) and with a rag or hard toothbrush the brake pad guides on the caliper. Use a screwdriver to carefully remove the caked crust of dust.
WARNING
Be careful not to damage the protective O-ring of the sliding piston.
11. Check the brake disc for grease, dirt and cracks.
12. When installing new brake pads, use a sturdy screwdriver or hammer handle to gently press the sliding piston completely into the caliper cylinder. Take care not to damage the piston and protective cap.
WARNING
When the piston is pushed in, the brake fluid is forced out of the brake cylinder into the reservoir, so constantly monitor the fluid level in the reservoir, pump it out a little if necessary.
13. Insert the inner brake lining into the guides. Pre-lubricate mating surfaces with grease (copper paste), trying not to get on the disc and friction linings.
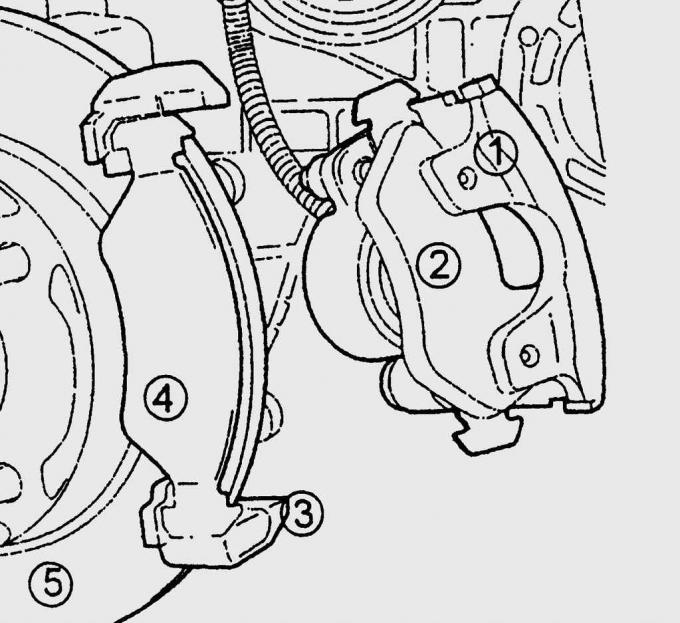
Pic. 14.19. Caliper and brake pads of the front disc brake: 1 - caliper; 2 - internal brake shoe; 3 - brake pad guide; 4 - external brake shoe; 5 - brake disc
14. Install the outer brake shoe on the shoe guide (pic. 14.19).
15. Reinstall the caliper and secure it with two guide pins to the brake shoe guide. Don't forget to install protective caps.
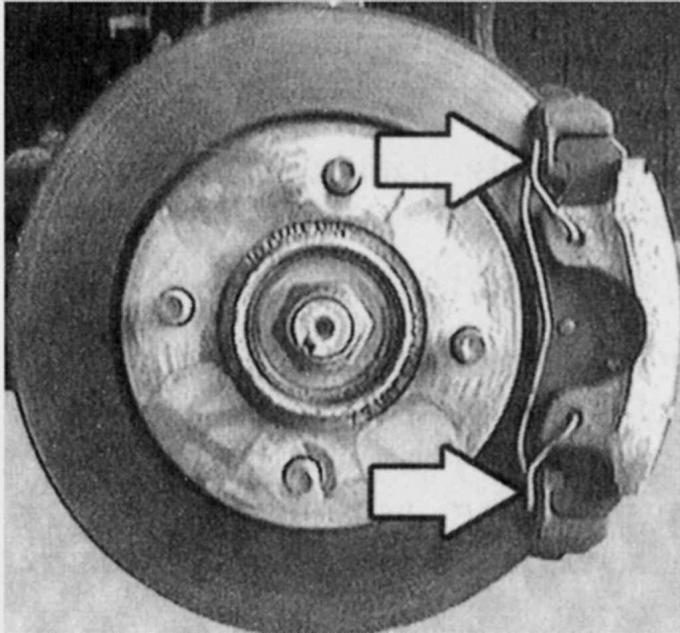
Pic. 14.20. Places of fastening of a spring fastening bracket in a guide of brake pads
16. Insert the spring mounting bracket into the brake caliper. After the caliper is fixed in both holes, press it under the brake pad guide, otherwise the wear of the outer brake pad will not be adjusted automatically (pic. 14.20).
17. Press the brake pedal several times so that the brake pads are pressed against the brake disc.
18. Check the brake fluid level in the reservoir. If necessary, use a syringe to remove the brake fluid to the mark «MIN» or add fresh brake fluid up to the mark «MAX».
19. Install the wheels and lower the vehicle.
20. Carefully run in new brake pads. On a minor road, brake gently from 100 km/h to 50 km/h several times. Allow the brakes to cool between braking.
Visitor comments