Contents: Removal ↳ Installation ↳
Injector defects can cause loud knocking in the engine and raise suspicions of bearing damage. If you suspect this, you should switch the engine to idle mode and loosen the union nuts of the high-pressure fuel lines one by one. If the knocking disappears after loosening the union nut, this indicates a defective injector.
Injector defects can also be found by loosening the union nuts of the high-pressure fuel lines when the engine is idling at an increased crankshaft speed. If the crankshaft speed does not change after loosening the union nut, this indicates a defect in the corresponding injector. Injectors can be checked using a pressure gauge (service station work).
The first signs of injector malfunction appear as follows:
- No flashes.
- Knocking in one or more cylinders.
- Engine overheating.
- Engine power loss.
- Excessive black smoke from the exhaust.
- High fuel consumption.
Removal
Disconnect the negative (-) battery cable.
Caution: When the battery is disconnected, the contents of electronic memory devices, such as engine fault codes or radio codes, are erased. Before disconnecting, also read the instructions in the chapter "Removal and installation the battery".
Clean high pressure fuel lines using cleaning agent or diesel fuel.
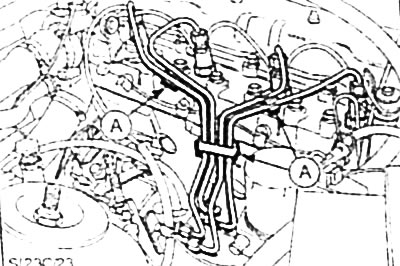
Remove the high-pressure fuel lines as a complete set, for which purpose loosen the union nuts on the high-pressure fuel pump and injectors with an open ring spanner. Cover the connection points with caps to protect them from dirt.
Note: Do not change the shape of the pipe bends. A - high-pressure fuel pipe holders.
Disconnect the return fuel lines from the injectors. To protect the connections from dirt, cover them with caps.
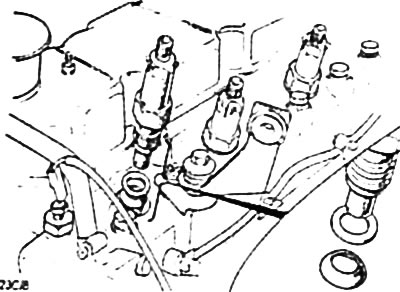
Unscrew the injectors using a standard socket wrench, such as HAZET 4555, and place them in the same order they were installed. Remove the copper sealing rings and heat compensation washers from the injector holes in the cylinder head.
Note: Models with 9/93 have an electrical connector (for the nozzle needle lift sensor) on the cylinder 1 injector (from the fuel injection pump side). Disconnect the electrical wire and unscrew the injector using a socket asterisk. If necessary, first provide the socket asterisk with a slot for the wire. Insert the wire into the socket asterisk.
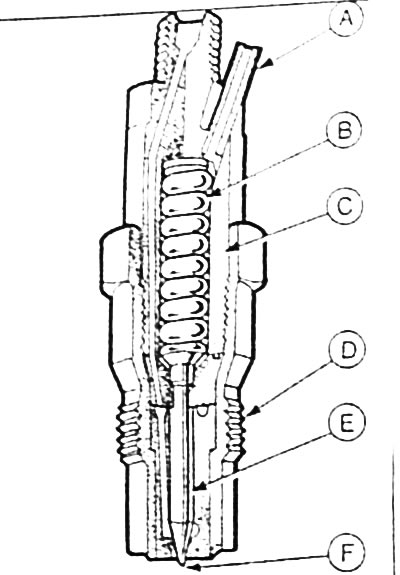
A - fuel outlet fitting; B - pressure spring; C - nozzle body; D - base; E - spray needle; F - spray needle pin
Clamp the injector base in a vice equipped with soft metal jaws. Disassemble the injector.
Check the needle and the needle seat of the sprayer for wear, roughness and damage. Use a wooden spatula to clean the spray nozzle from carbon deposits.
Caution: Never clean the nozzle or needle with wire, a file or sandpaper. The individual parts of the nozzles are not interchangeable.
The spray needle should slide in the spray body under its own weight. It should move freely.
Installation
Insert 4 new heat compensation washers with the convex side facing up into the holes for the injectors in the cylinder head, and then 4 new copper sealing rings.
Insert the injectors and tighten to a torque of 90 Nm, and for models with 9/93 to a torque of 70 Nm.
Caution: Tightening the base to a higher torque may cause deformation of the injector, which will result in the nozzle needle sticking or some other malfunction.
Attach high-pressure fuel lines to the injectors and high-pressure fuel pump and tighten the union nuts to a torque of 25 Nm.
Connect the return fuel lines to the injectors.
Slightly loosen the union nuts on the high-pressure fuel lines for all injectors.
Turn the engine crankshaft with the starter until fuel starts to emerge from the union nuts. Tighten the union nuts of the high-pressure fuel lines to the specified torque.
Connect the battery ground (-) cable.
If available, set the clock and enter the radio theft protection code.
The original article is posted at: Fordbook.ru