Contents: Removal ↳ Installation ↳ Checking the tightness of the nozzle… ↳ Adjusting the initial injection… ↳
Nozzle
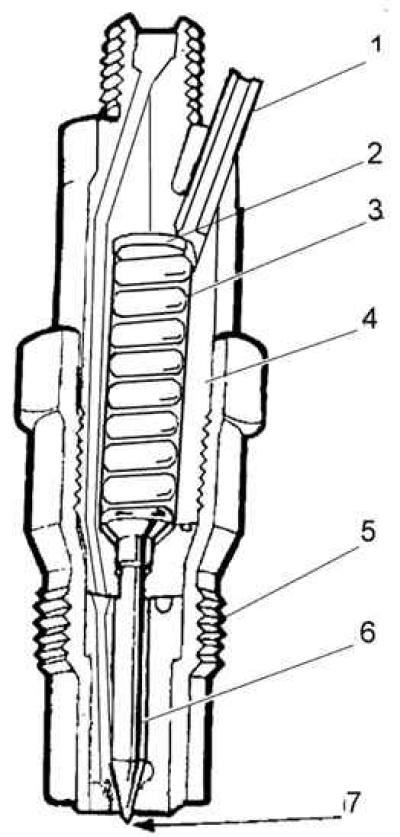
1 – fuel outlet channel, 2 – adjusting washer, 3 – spring, 4 – injector body, 5 – sprayer body, 6 – needle, 7 – nozzle
To determine the faulty injector, you must perform the following steps.
1. Make sure the engine is in good condition and the compression level is the same in all cylinders.
2. Start the engine and warm it up to operating temperature.
3. Loosen the nut of the fuel line fitting on the injector being tested. Note whether the engine speed has changed. Perform the same test at fast idle.
4. If the injector is in good condition, there will be a clear decrease in engine speed, accompanied by uneven operation. If the injector being tested is faulty, the change in engine speed will be insignificant and the extraneous knocking will disappear, if it was present before.
Removal
1. Remove the air filter.
2. Clean the high-pressure fuel lines, unscrew the union nuts on the fuel pump and protect them from contamination.
3. Unscrew the fuel lines from the injectors and close them.
4. Unscrew the injectors with a socket wrench and remove the copper sealing rings and heat-insulating washers from the holes.
5. Clamp the sprayer body in a vice with soft jaws, disassemble the nozzle and use a wooden tool to clean all the nozzle parts.
6. The nozzle needle, under its own weight, should slide tightly in the nozzle socket.
Installation
Thermal insulation washer
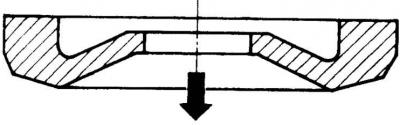
1. Install new heat-insulating washers, convex side up, into the cylinder head, then new copper sealing rings.
2. Further installation is carried out in the reverse order of removal.
It is permissible to use the injectors if, after their disassembly, cleaning and subsequent assembly, they restore their functionality and pass all tests.
Checking the tightness of the nozzle sprayer
It is produced on a device for testing sprayers.
Checking the injectors for leaks

Install the nozzle on the device and create a pressure of 2.0 MPa below the nozzle opening pressure. If within 10 seconds no fuel appears in the form of a falling drop on the protruding part of the atomizer around the needle, the atomizer socket is sealed. If the atomizer is slightly worn, its protrusion is slightly moistened, without forming a drop.
Adjusting the initial injection pressure
The initial injection pressure is adjusted by installing a gasket under the spring. Increasing the gasket thickness increases the injection start pressure, decreasing it decreases it. Changing the gasket thickness by 0.01 mm changes the injection start pressure by approximately 1 kg/cm².
Fuel atomization
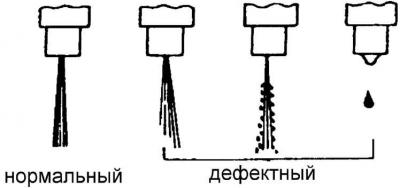
A mandatory condition for the operation of the injector is the quality of spraying. The spray torch must be uniform across the entire cross-section of the spray cone, and the spray must be foggy. The beginning and end of the injection must be clear. In new injectors, the injection is accompanied by a sharp sound. In working injectors, the absence of this sound is not a sign of a malfunction.
The original post is on the web portal FORDBOOK.ru