A defective cylinder head seal is recognized by various signs, see point 1.5.
Withdrawal
Disconnect the ground wire (-) from the battery.
Attention! As a result, data in electronic storage devices, such as an engine fault memory or a radio code, are erased. Please read the section carefully "Removing and installing the battery", before disconnecting it.
Remove the air filter see point 5.6.
Loosen the clamp and remove the air intake hose from the intake manifold.
Unscrew the charge air cooler -10- (arrow) and take it off.
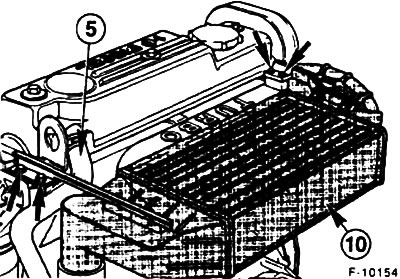
Remove the crankcase ventilation hose -5- from the cylinder head cover.
Drain the coolant see point 3.3.
Remove the upper radiator hose from the thermostat housing, first release and slide the mounting clamp.
Remove the coolant hoses leading to the cylinder head:
- Compensation tank connecting hoses from cylinder head and thermostat housing.
- Connecting hose from the heat exchanger of the heating system.
Remove the exhaust gas recirculation dilution hoses from the exhaust gas recirculation valve (EGR) on the exhaust manifold. Regarding the EGR system see point 7.1.
Remove the vacuum hose of the brake booster, as well as the oil return hose from the vacuum pump, possibly unscrew them, see item 1.11.
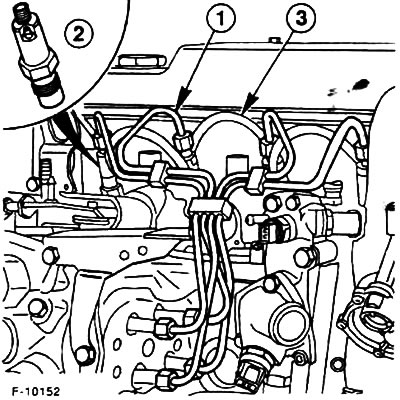
Remove the oil drain pipes -3- from the jets.
Loosen the union nuts of the high pressure lines -1- on the nozzles -2- and the high pressure fuel pump. Remove pipelines complete with brackets.
Attention! You cannot change the shape of pipelines. Close the nozzles with suitable plugs, which will prevent dirt from getting inside.

Remove the fuel supply line of the high pressure fuel pump from the fuel filter -1- To do this, squeeze the release buttons -arrows- and remove the quick-locking lock -3- from the pipe.
Unscrew bracket -2- and put it aside together with fuel filter -1- and fuel heater -4-.
Unscrew the bracket for the oil gauge with one bolt from the thermostat housing.
Disconnect the following electrical wires - from the remote thermometer sensor (near the thermostat housing), - from the engine fan thermal switch (on the thermostat housing), - wires of glow plugs, - from the hydraulic switch (next to the fuel filter).
Remove the coolant hose from the thermostat housing.
Unscrew the thermostat housing, two bolts.
Raise the vehicle.
Unscrew the front exhaust pipe from the turbocharger, tie it with a wire so that it cannot fall, see point 8.
Remove the alternator V-belt see paragraph 1.19.
Remove the toothed belt from the camshaft sprocket, see 1.7.
Loosen the camshaft sprocket bolt. Using a sturdy screwdriver inserted into the hole in the sprocket, hold the shaft from turning while loosening the bolt. Lightly tapping the sprocket with a plastic hammer, disengage the cone and remove the sprocket.
Remove the timing belt sprocket under the camshaft by unscrewing the Togh bolt.
Remove both rear toothed belt guards.
Remove the toothed belt side covers.
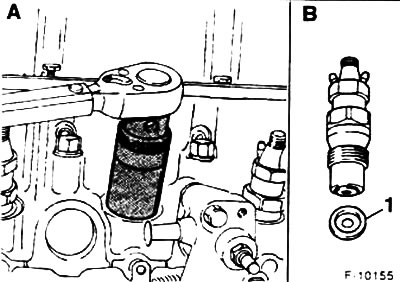
Unscrew the jets using a suitable removable wrench socket and ratchet, e.g. Hazet 4555.
Remove the wires from the glow plugs, unscrew the plugs, see point 7.5.
Unscrew a cover of a head of the block of cylinders and the oil deflector located under it.
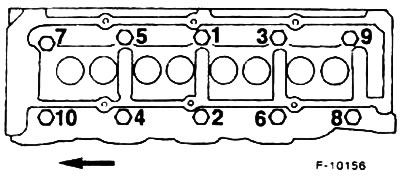
Loosen the cylinder head mounting bolts 1/2 turn in reverse order, i.e. from 10 to 1. Then unscrew all the bolts using the T70 Tox wrench.
Remove the cylinder head.
Attention! After removing the head, do not lay it on the sealing surface, otherwise the fully open valves may be damaged, it is best to lay it on two wooden blocks.
Installation
Before installing the cylinder head, carefully clean the sealing surfaces of the cylinder head and cylinder block from seal residues with a scraper. Do not allow seal residues to enter the openings Cover the openings with rags.
If the fuel injection system is open, then try not to work with compressed air at this time, do not move the car. Close open parts with plugs or rags if the repair is not completed.
Check the flatness of the sealing surfaces of the cylinder head and cylinder block using a steel ruler along the longitudinal and transverse axes. Permissible deformation due to heat cannot exceed 0.06 mm over the entire length. The cylinder head must not be adjusted. If more deformation is found, replace the head.
Check the cylinder head for cracks, check the cylinder surfaces for grooves.
Important! Holes for fixing bolts of a head of the block of cylinders carefully clear of oil and other remains of consolidation. Remove any oil or coolant that has accumulated in the mounting bolt holes with compressed air or a rag.
Replace the cylinder head gasket.
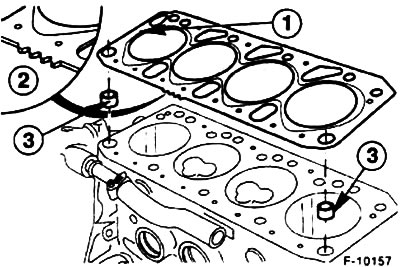
Check that both guide bushings -3- are firmly seated in the engine block. Guide bushings allow precise centering of the cylinder head and gasket.
Lay a new gasket or sealing mass so that the holes are not blocked, and the inscription on the seal "TOP/OBEN" at point -1- must be on the side of the cylinder head.
Attention! The cylinder head seal has teeth -2-. Install only the exact same seal. The number of teeth serves as a yardstick for determining the thickness of the seal, it also determines how far the pistons can protrude from the cylinders. Seals for cylinders corresponding to the upper size limit, perforated.
Before installing the cylinder head, check that the camshaft is at TDC, see point 1.7.
Install the cylinder head.
Install and hand tighten new cylinder head mounting bolts.
Attention! Cylinder head fixing bolts must be replaced. These are malleable bolts that can only be used once.
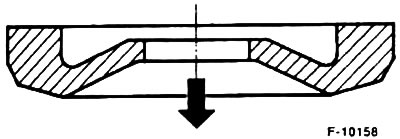
Attention! Carefully tighten the cylinder head bolts. Before proceeding with the tightening of the bolts, check the accuracy of the torque wrench. In addition, an angle washer, such as HAZET 6690, is required to tighten the bolts. If you do not have an angle washer, make a paper template and mark it at 120°and 180°. Install the wrench and tighten the bolt to the marked mark. (See fig. E-10156).
step by step (three stages) tighten the cylinder head bolts, start with the #1 bolt.
- First stage: torque wrench, 10 Nm
- Second stage: torque wrench, 100 Nm
Then wait three minutes for the bolts to "sat down". Perform the next step, according to the tightening sequence, for each bolt separately.
Third stage:
- loosen the bolts by 180°using a spanner wrench.
- tighten with a torque wrench to 70 Nm.
- tighten the bolts with an open end wrench by 120°.
Attention! The cylinder head mounting bolts must not be tightened further.
Install the camshaft timing belt sprocket as it was before removal, screw it on; adjusting pin must be installed. Tightening torques: Bolts M6: 10 Nm; Bolts M8: 30 Nm.
Screw on the two rear toothed belt guards. Install the timing belt, install the timing belt covers, see point 1.7.
Screw in the glow plugs, tighten them; tightening torque 30 Nm. Connect the electrical wires to the glow plugs.
Screw in the jets with a new thermal seal and tighten them to 70 Nm. The recess in the seal must point upwards, the arrow points to the cylinder head.
Install the V-belt see paragraph 1.19.
Screw on the front exhaust pipe, see point 8.
Check valve clearances, adjust if necessary see paragraph 1.17.
Install the cylinder head cover with a new seal, lightly tighten it with bolts with a torque of 5 Nm.
Connect the crankcase ventilation hose to the cylinder head.
Install the bracket with the fuel filter, connect the fuel lines. The quick locks should click into place and you should be able to hear it clearly.
Screw on the thermostat housing with a new seal, see point 3.5.
Screw the oil level indicator bracket to the thermostat housing.
Connect the high pressure fuel lines to the jets and the pump, tighten the union nuts to 20 Nm.
Connect the oil drain hoses to the jets.
Connect the electrical wires to the cylinder head, see section "Withdrawal".
Connect the vacuum hose to the brake booster, connect the oil return hose to the vacuum pump.
Connect vacuum hoses from the exhaust pipe to the EGR valve (on the suction pipe), see point 7.1.
Connect the coolant hoses and secure with clamps:
- connecting hoses from the expansion tank to the cylinder head and thermostat housing.
- connecting hose to the heat exchanger of the heating system.
Screw the charge air cooler to the cylinder head.
Connect the air intake hose to the suction manifold, tighten the fastening clamps.
Install the air filter see point 5.6.
Fill in the coolant see point 3.3.
Check the engine oil level, add oil if necessary. If the cylinder head was removed because the head seal failed, it is recommended to completely change the oil, including the oil in the oil filter, as coolant may have entered the oil.
Connect ground wire (-) to the battery. Set the clock, set the anti-theft code of the radio.
Attention! Bleed the fuel system before starting the engine see point 7.4.
Warm up the engine, check all hose connections for leaks, check engine oil and coolant levels.
Visitor comments