Four-cylinder petrol engine.
To remove the cylinder head, the engine must be cooled to room temperature. The intake and exhaust manifolds do not need to be removed. The fact that the cylinder head seal is defective is recognized by one or more of the following signs:
- Loss of power.
- Loss of coolant. White thick exhaust gases when the engine is hot.
- Oil loss.
- The coolant in the engine oil, the oil level does not decrease, but increases. Gray engine oil, foam bubbles on the oil level indicator, oil too thin.
- Engine oil in coolant.
- The coolant spurts out a lot.
- No compression in two adjacent cylinders.
Withdrawal
Disconnect the ground wire (-) from the battery.
Attention! As a result, data in electronic storage devices, such as an engine fault memory or a radio code, are erased. Please read the section carefully "Removing and installing the battery", before disconnecting it.
Drain the coolant see point 3.3.
Remove the air filter and air intake pipe, see point 5.6.
Squeeze the plastic tabs on the fuel supply lines -1- and remove the fuel lines. Wrap the end of the pipeline with a rag so that when it is removed from the fuel line, fuel cannot splash. Close the ends of the fuel lines with suitable plugs; for this purpose, for example, clean screws of a suitable diameter can be used. To simplify installation, mark the fuel lines with adhesive tape before removing them.
Attention! Remove fuel lines carefully to slowly bleed pressure from the fuel system.
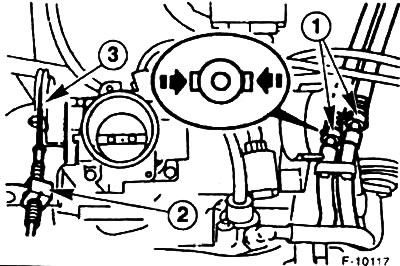
Remove the clip -2- and disconnect the gas draft.
Disconnect the plug -1- of the power steering pressure switch. Unscrew the pressure pipe bracket -2- from the engine.
Unscrew the ground wire from the engine lifting lug.

Remove vacuum hoses from fuel pressure regulator -2- and suction pipe. The figure also shows: 1 - return fuel line; 3 - distribution tube; 4 - valve; 5 - plug for jets; 6 - fuel supply line.
Disconnect the multi-pole plug next to the throttle valve connector.
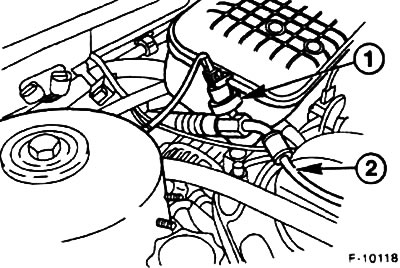
Remove vacuum hoses from exhaust gas recirculation valve -4-, -3- at measuring point -2- of pipe -1-. Remove the engine ventilation hose near the ignition coil.
From the underside of the vehicle, remove the underpressure hose from the regulating valve -5-pulse air system.
Remove the wire plug from the ignition coil and from the EST sensor next to the ignition coil, see point 4.3.
Unscrew the front exhaust pipe from the exhaust manifold.
Remove the wheel housing trim -1-, unscrew the V-belt pulley cover -2-.
Remove the V-belt see paragraph 1.19.
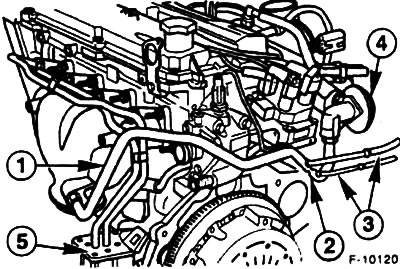
Remove the brake booster vacuum hose from the intake manifold. To do this, press the retaining clip on the suction manifold slightly into the manifold, hold it in this position and carefully pull the hose out of the spring sleeve.
Unscrew the heat shield from the suction manifold.
Unscrew the bracket-holder of the engine wire bundle from the intake manifold, two bolts.
Remove the hose clamps, remove the coolant hoses from the thermostat, see point 3.5.
Disconnect the coolant temperature sensor connectors from the thermostat housing and crankshaft position sensor on the flywheel.
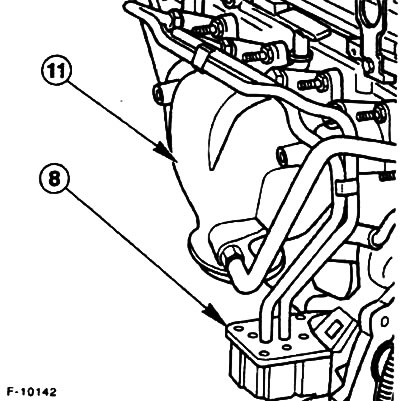
Unscrew the filter of the air impulse system -8- fixed with one bolt from the engine block. 11 - exhaust manifold.
Support the engine with a jack under the oil pan. Use wooden spacers to prevent damage. The engine should be slightly raised on the jack.
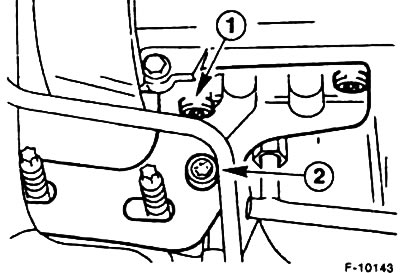
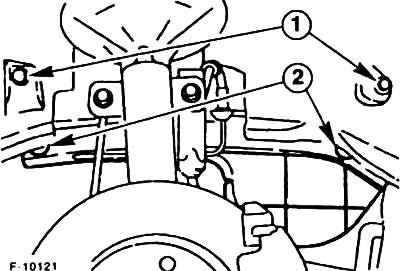
Unscrew the fixing nuts on the right motor shaft support. Remove the bracket.
Attention! In this case, the engine must be supported on a reliable support, otherwise it will fall down.
Remove the front retainer plate from the cylinder head. To do this, unscrew the two bolts -1- on the cylinder head and the two bolts on the power steering pump bracket.
Remove toothed belt, remove camshafts, see section.1.3.
Attention! It is not necessary to remove the crankshaft sprocket and the lower crankshaft protective cover, since the toothed belt does not need to be removed.
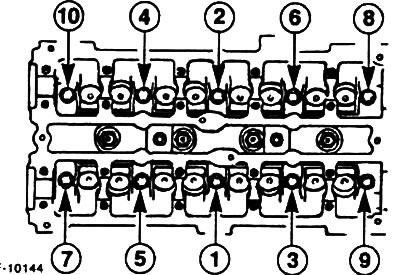
Unscrew using a long socket wrench (size T55), cylinder head bolts, starting with bolt 10, in reverse order.
Attention! Loosening the cylinder head bolts can cause deformation or large cracks in the cylinder head.
Check if all hoses and wires from the cylinder head to the engine and body have already been removed.
Pull out the oil level gauge.
Then, with the help of an assistant, remove the cylinder head from the engine.
Attention! After removing the cylinder head, do not place it on the sealing surface, otherwise the fully open valves may be damaged. The block head can only be laid on two wooden blocks.
Installation
Before installation, use a suitable scraper to clean the sealing surfaces of the cylinder block and cylinder head from seal residues. Do not scratch surfaces while doing this. Do not allow any seal residue to enter the openings. Cover the holes with rags.
Check the cylinder head for cracks, check the cylinder surfaces for grooves.
Check that the holes for the cylinder head bolts are clean, if oil is found in them, blow out the holes with compressed air. If there is no compressed air, then take a thin screwdriver, wind a rag around it that absorbs well, and clean the bolt holes.
Attention! Oil from the holes must be removed in any case.
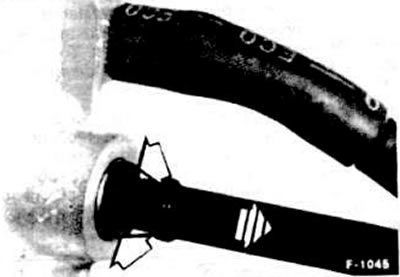
To center the head of the block, it is necessary to make guide pins. To do this, take two old cylinder head bolts, cut off the heads from them and cut slots for a screwdriver into them.
Screw the guide pins into the bolt holes 7 and 8 (see fig. F-10144).
Ensure correct seating of guide bushings in engine block Guide bushings must be firmly seated in bolt holes -4- and -6-.
Lay the cylinder head seal in this way so that the inscription "TOP/OBEN" looked at the cylinder head. The cylinder head seals are serrated on the leading edge. The new seal must have the same marking as the old one.
Attention! To prevent damage to the pistons and valves, it is necessary to turn the crankshaft in such a way before installing the cylinder head, so that the piston of the first cylinder is at a distance of 20 mm from TDC. After finishing the installation of the cylinder head and camshafts, i.e. when they are at TDC, rotate the crankshaft so that it is again at TDC for the first cylinder.
Install the cylinder head carefully, being careful not to damage the seal.
Use a screwdriver to unscrew the guide pins.
Lightly oil the head and threads of the new cylinder head bolts and screw them in by hand.
Attention! Use only new cylinder head bolts.
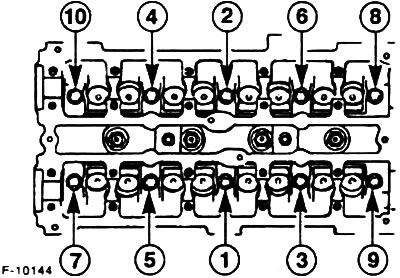
Tighten the cylinder head bolts in three steps in order 1-10. First step: tighten with a torque wrench to 30 Nm. Second step: tighten with a torque wrench to 50 Nm. Step Three: Tighten the bolts with an open-end wrench by 90° (1/4 turn).
Attention! Once the bolts have been tightened, they can no longer be tightened. The bolts must be tightened very carefully and the accuracy of the torque wrench must be checked before tightening. In addition, an angle washer such as HAZET 6690 is required to tighten the cylinder head bolts.
Install the camshafts see point 1.4.
Install the toothed belt see point 1.3.
Screw the front bracket and the power steering pump bracket to the cylinder head. Tighten the three bolts to 50 Nm.
Screw on the right engine bracket with new self-locking nuts. Lower the jack, tighten the nuts with a torque of 90 Nm.
Remove the jack.
Screw the motor wire guide onto the suction pipe with two bolts.
Snap the brake booster vacuum hose into the quick lock on the intake manifold
Screw the heat shield to the exhaust manifold. At the same time, screw on the bracket for the coolant pipe and the oil level indicator.
Screw on the front exhaust pipe, see point 8.
Install all electrical wires and vacuum hoses in accordance with the marks made during the dismantling process and secure them.
Install the throttle.
Connect the supply and return fuel lines according to the markings, and fasten the quick locks.
Connect the ventilation hose to the cylinder head.
Install the V-belt see paragraph 1.19.
Install the belt pulley cover.
Install the air filter and air intake pipe, see point 5.6.
Check the engine oil level, add oil if necessary. If the cylinder head was removed due to a defective seal. then the engine oil should be changed completely, including the oil in the filter, since the engine oil contains coolant.
Check if the coolant contains antifreeze and fill it up, see point 3.3.
Connect ground wire to battery (-). Set the clock, set the anti-theft code for the radio.
Warm up the engine to operating temperature, check all fluid levels and check all hose connections for leaks.
Visitor comments