Drain the coolant into a previously prepared container. If the coolant has been in use for no more than two years and is not contaminated, it can be used further.
Remove the upper coolant hose that connects the radiator to the thermostat housing.
Disconnect the tube through which air is sucked in from the intake manifold.
Remove the air intake silencer together with the air filter.
Remove the intake silencer housing.
Disconnect the vehicle's heating hoses.
Disconnect the vacuum line connecting the vacuum pump to the brake booster mechanism, as well as the oil drain line from the engine lubrication system.
Remove the fuel return overflow tubes from the injectors.
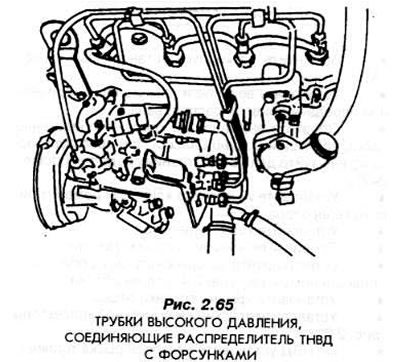
Remove the high-pressure fuel pipes as a set (Fig. 2.65). Immediately close their openings using plastic caps.
Remove the dipstick bracket.
Remove the thermostat housing.
Disconnect the elastic hoses from the high-pressure fuel pump that connect it to the fuel supply pump.
Remove the fuel filter.
Unscrew the bolts securing the front exhaust pipe from the exhaust manifold. After disconnecting, hang the exhaust pipe.
Remove the generator mount and remove the V-belt.
Remove the upper timing belt cover.
Unscrew the bolts securing the generator casing and remove the TDC pin socket plug. Turn the crankshaft so that the elongated hole in the fuel injection pump drive gear is in the position corresponding to 11 o'clock on the clock dial.
Screw the TDC setting pin into the corresponding socket located in the engine housing.
Slowly turn the crankshaft until it is in the correct position relative to the TDC alignment pin.
Slightly loosen the center bolt securing the gear mounted on the camshaft.
Remove the camshaft drive timing belt tensioner.
Remove the camshaft drive toothed belt.
Remove the gear mounted on the camshaft.
Remove the timing gear (Fig. 2.66).
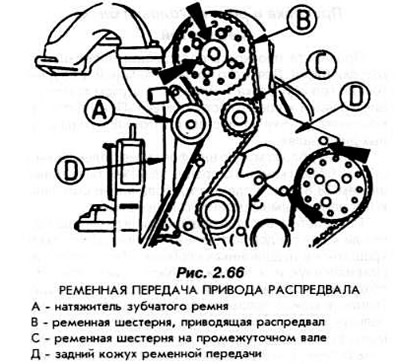
Remove both parts of the back cover.
Remove the side bottom cover.
Unscrew the injectors using the GV-2304 key.
Remove the thermal covers from the spray nozzles.
Remove the spark plug wire harness.
Remove the spark plugs.
Remove the cylinder head cover.
Unscrew the mounting bolts and remove the cylinder head. These bolts cannot be reused. New bolts must be used when installing the cylinder head.
If there is oil and water in the cylinders, remove them.
The cylinder head is installed in the reverse order. In addition, when installing the cylinder head, you must perform the steps listed below:
Degrease the cylinder head seating surface.
Select the cylinder head gasket according to the instructions contained in the subsection devoted to engine installation.
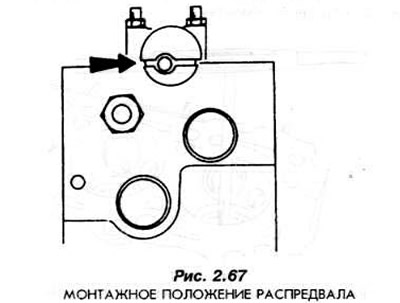
Before installing the cylinder head, it is necessary to set the camshaft to the position shown in Fig. 2.67.
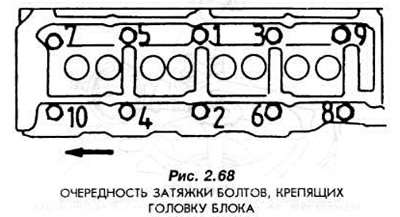
Only new bolts must be used to secure the cylinder head. The bolts must be tightened in the order shown in Fig. 2.68.
The torques and tightening angles of the bolts are given in section 1.1. During installation of the cylinder head, it is necessary to strictly maintain the required values of torques and tightening angles.
The toothed belt drive should be assembled according to the instructions contained in Section 2.3 "Engine Assembly".
The cooling system must be bled after filling with liquid. The bleeding method is given in section 2.8 "Cooling system".
[This publication was borrowed from the website: FORDBOOK.ru]