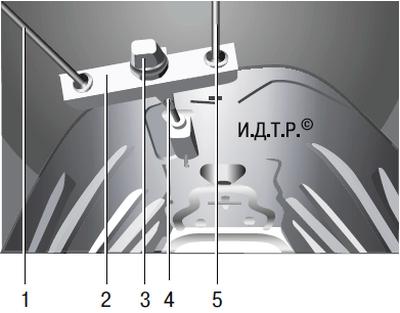
Fig. 9.6. Adjustment unit of the parking brake drive: 1, 5 – rear cables of the parking brake drive; 2 – equalizer; 3 – adjusting nut; 4 – front parking brake cable.
You will need: 13 and 17 mm wrenches, a set of flat feeler gauges.
To pre-check the correct adjustment of the parking brake drive, lift the drive lever up to the stop, and you should hear 7 or 8 clicks of the ratchet device. If the number of clicks does not fit into the specified interval or the car is not held by the parking brake, adjust the drive. The adjustment unit of the parking brake drive is located below on the base of the body.
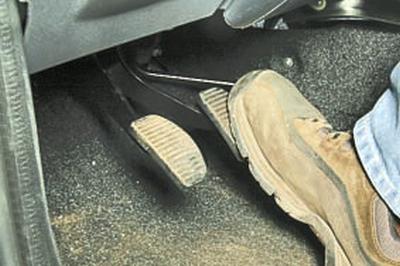
1. Set the correct gaps between the brake pads and the brake discs of the wheels. To do this, press the brake pedal hard several times with the parking brake lever lowered all the way down.
2. Place the vehicle on a lift or inspection pit. If you are working on an inspection pit, lift the rear of the vehicle and place it on reliable supports.
3. Disconnect the intake pipe of the additional muffler from the exhaust pipe (see Removal and installation of main and additional mufflers), remove the muffler suspension cushions from the brackets and lower the muffler down, resting the intermediate pipe on the rear suspension crossmember.
4. Remove the additional muffler heat shield (see Removing and installing heat shields).
5. Completely loosen the tension of the rear cables 1 and 5 (Fig. 9.6) of the parking brake drive, for which unscrew the adjusting nut 3 to the end of the threaded end of the front cable 4 of the drive, loosening its lock nut.
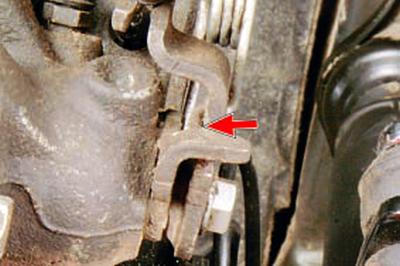
6. Insert a flat feeler gauge 1.2 mm thick between the parking brake actuator release levers and the supports on the calipers of both rear wheel brake mechanisms (the location of the feeler gauge installation is shown in the photo by the arrow).
7. Screw the adjusting nut 3 (see Fig. 9.6) onto the threaded end of the front cable 4 until one of the release levers on the caliper begins to move.
NOTE: An assistant is required to perform step 7 because you must simultaneously turn the adjusting nut and watch the release levers.
8. Remove the feeler gauges and check the free rotation of the wheels. If you feel any drag on any wheel, repeat steps 5–7.
9. If the wheels still drag after repeated adjustment, repeat steps 5–7, replacing the 1.2 mm thick feeler gauge with a 1.0 mm thick feeler gauge.
10. If, after adjustment using a 1.0 mm thick feeler gauge, the wheels still start to drag, repeat the adjustment, each time replacing the feeler gauge with a thinner one (0.2 mm thicker), until the wheels rotate completely freely.
11. Tighten the front cable end lock nut.
12. If after all adjustment attempts the desired result cannot be achieved, check the condition of the brake pads of the rear wheel brake mechanisms, brake discs and drive cables. Replace faulty parts (see the relevant subsections) and adjust the parking brake drive as described above.
13. Install the parts in the reverse order of removal.
14. Lower the car onto its wheels.
USEFUL TIP: If you don't have a feeler gauge, the following simplified version of adjusting the parking brake system is acceptable.
1. Perform the operations described above in points 1–4.
2. Turn the adjusting nut clockwise, screwing it onto the threaded end of the front cable and periodically checking the ease of rotation of the rear wheels.
Screw the adjusting nut onto the cable end until you feel a noticeable resistance to its rotation.
3. Loosen the adjusting nut until the rear wheels are completely free.
4. Place the car on its wheels, apply the parking brake, set the gearshift lever to neutral and try to roll the car manually. If this is successful, the drive is incorrectly adjusted or faulty. In this case, repeat the adjustment, performing it more carefully.
If repeated adjustment does not produce the desired result, see point 12.