Note: See warning in paragraph 1 this chapter.
Examination
1. Pump failure can cause severe engine damage due to overheating.
2. There are three ways to check the operation of the pump installed on the engine. If the pump is defective, it must be replaced with a new or refurbished one.
3. After the engine has warmed up to normal operating temperature, pinch the upper radiator hose. If the pump is working properly, you should feel a jolt when the hose is released.
Warning: Keep your hands away from the electric fan!
4. Remove timing belt covers (chapter 2A). The coolant pump has a vent hole. If the pump seal is faulty, coolant will leak from this hole. You can use a flashlight to locate the holes on the pump to check for leaks.
5. On models with 4-cylinder engines, the pump is located on the timing belt side of the timing mechanism and it will be useful to remove the timing cover to check for leaks (chapter 2A).
6. On V-6 models, the pump is located on the transmission side. To check for leaks, it will be helpful to remove the pump drive belt cover. Also inspect the belt for traces of coolant on it.
7. If the pump shaft bearings are faulty, this can be identified by a howling sound from the accessory drive belt during engine rotation. Shaft wear can be detected by shaking the pump pulley up and down. Do not confuse the sound of an accessory drive belt slipping, when a squealing sound is heard, with a howling sound caused by pump bearing failure.
Withdrawal
4-cylinder engines - production models up to 06.1998
8. Empty the cooling system (Chapter 1).
9. Remove the engine oil level dipstick. Detach the coolant hose from the exhaust system heat shield. Turn out the bottom and top bolts, taking into account the position of the coolant hose. Remove the heat shield from the front of the engine.
10. Remove the toothed belt and its tensioner (chapter 2A). As mentioned in this chapter, if the belt is contaminated with coolant, then it must always be replaced.
11. Now you need to remove the front engine mount by hanging it with a lifting device.
12. Turn out 3 bolts of fastening of a forward support of the engine to a stretcher. Then raise the engine about 20 mm.
13. Disconnect the lower radiator hose from the pump nozzle. On models with an air conditioning system, access to this pipe is easier when the hydraulic steering pump is removed and moved to the side, as indicated in chapter 10 (see fig. 8.13). In this case, its hoses do not need to be disconnected.

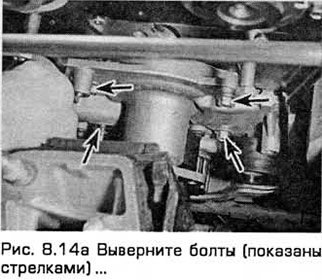
14. Turn out bolts and remove the pump of system of cooling (see fig. 8.14, a, b). If the pump needs to be replaced, remove the toothed belt guide pulley bolts and replace them on the new pump.

4-cylinder engines - production models from 06.1998
15. Empty the cooling system (Chapter 1).
16. Loosen pump pulley bolts.
17. Remove the accessory drive belt (Chapter 1), then remove the pump pulley.
18. Remove the toothed belt and upper parasitic pulley (chapter 2A). If the belt is contaminated with coolant, then it must always be replaced.
19. Apply the parking brake. Raise the front end and place it on stands.
20. From under the car, disconnect the coolant hose from the pump.
21. Turn out two bolts of the pump. Remove the pump from the engine compartment. Remove the pad.
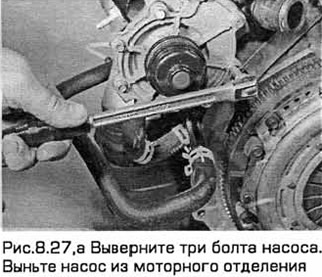
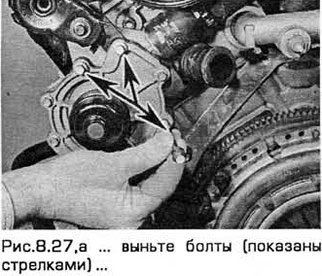
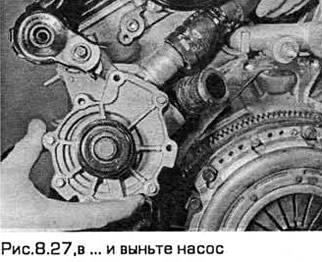
V-shaped 6-cylinder engines
22. Remove the battery (chapter 5A).
23. Empty the cooling system (Chapter 1).
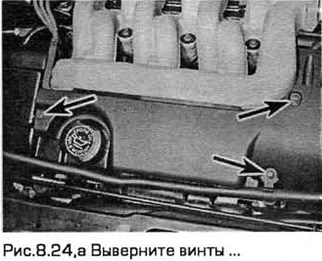
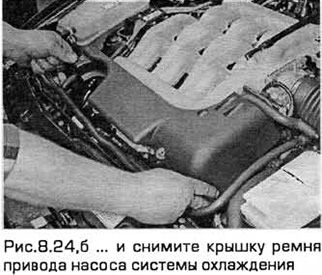
24. Remove the screws and remove the pump drive belt cover mounted on the engine from the top front (see Fig. 8.24, a, b).
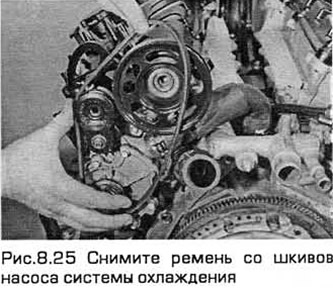
25. To loosen the belt, turn the belt tensioner clockwise and remove the belt from the pulleys (see fig.8.25) If you install this belt again, mark it so that it rotates in the same direction after installation.
26. To access the pump, disconnect the coolant hoses, remembering their position. Release the wiring from the fasteners on the pump and move it to the side.
27. Turn out three bolts of the pump. Remove the pump from the engine compartment (see fig.8.27,a-c).
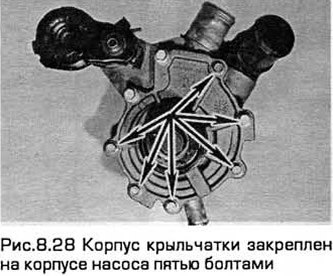
28. The impeller housing is fixed to the pump housing with five bolts (see Fig. 8.28, a). At the time of writing, the impeller was not supplied separately from the pump (just like her pad). Therefore, if the pump is noisy or leaking, you need to replace its entire assembly.
Installation
29. If you have removed the impeller housing, thoroughly clean the mating surfaces. The gasket must always be replaced after it has been removed (see fig. 8.10). Lock the new gasket in place with grease when installing. Install the impeller housing on the pump and tighten its bolts to the required torque.
30. Install the pump in the reverse order of removal, and tighten its bolts to the required torque. Recharge the cooling system (Chapter 1).
Visitor comments