Warning: The air conditioning system is under high pressure. Do not loosen connections or remove components until you have relieved system pressure. The refrigerant must be drained into a suitable container by dealers or air conditioning specialists. Always protect your eyes when disconnecting system components.
Note: This paragraph applies to components belonging to the air conditioning system only. For details on components common to this system and the heating/ventilation system, see paragraphs 9 and 10.
Capacitor
1. The system must be emptied at the dealers.
2. Disconnect the negative battery cable (chapter 5 paragraph 1).
3. Remove the lower radiator shield (Chapter 1).
4. Using Ford tool 34-001, disconnect the refrigerant lines from the condenser. Close any openings immediately to prevent dirt or moisture from entering the system.
5. Turn out bolts of fastening of the condenser (see fig. 7.5) and remove it from the vehicle. To prevent leaks, store it in the position it occupies in the car.
6. Installation - in the reverse order of removal.
7. If a new condenser needs to be installed, add 20 cm3 of refrigerant to the system.
8. Removal, refilling and leakage control operations must be carried out by the same person who emptied the system.
Evaporator
9. The evaporator is mounted together with the heater heat exchanger. With the exception of draining the coolant and using Ford tool 34-001 and 34-003 to disconnect the pipes, the procedure is the same as described in paragraph 9.
10. If a new evaporator is to be installed, add 20 cm3 of refrigerant to the system.
11. Remove, refill and check for leaks must be carried out by the same person who emptied the system.
Compressor
12. The system must be emptied at the dealers.
13. Disconnect the negative battery cable (chapter 5 paragraph 1).
14. Remove the lower radiator shield (Chapter 1).
15. Remove the accessory drive belt (Chapter 1).
16. Turn out bolts of fastening of the compressor from the block of cylinders/crankcase. Push the side of the compressor and remove the clamp bolt to disconnect the refrigerant piping. Plug the connection, return the compressor from tilted to vertical position. Disconnect its electrical connector. Then pull out the compressor.
Note: When servicing and storing the compressor, keep the position it occupied in the vehicle. If the compressor seizes or if you find metal particles in the refrigerant piping, the system should be flushed and the battery/drier replaced by a professional.
17. Rotate the compressor clutch center piece six times prior to installation. so that the liquid collected in the head dissipates.
18. Install the compressor in the reverse order of removal. Replace any removed seals.
19. If a new compressor is to be installed, refer to the compressor manufacturer's instructions for instructions on topping up the system with refrigerant.
20. Removal, refilling and leakage control operations must be carried out by the same person who emptied the system.
Battery/dryer
21. The system must be emptied at the dealers.
22. Disconnect the negative battery cable (chapter 5 paragraph 1).
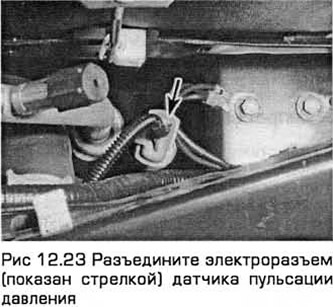
23. The battery/dryer acts as a container and filter for the coolant. It is installed in the corner of the engine compartment on the left front. Using tool Ford 34-003, disconnect the refrigerant line connecting this assembly to the compressor. Close the hole immediately. so that no dirt or moisture gets in. Then disconnect the electrical connector of the pressure pulsation sensor (see fig. 12.23).
24. Remove the lower radiator shield (Chapter 1).
25. Turn out bolts of fastening of knot from a subframe of a forward suspension bracket.
26. Using Ford Tool 34-003, disconnect the refrigerant line from the accumulator/drier assembly. It is possible that in order to use the device, you will have to unscrew the pressure sensor. Seal any openings immediately to prevent dirt or dampness from entering.
27. Remove battery/drier.
28. Install the assembly in the reverse order of removal. Replace any removed seals.
29. If you need to install a new unit, refer to the manufacturer's instructions for instructions on topping up the system with refrigerant.
29. Removal, refilling and leakage control operations must be carried out by the same specialist who emptied the system.
Pulsation sensor and pressure control sensor
31. The system must be emptied at the dealers.
32. Disconnect the negative battery cable (chapter 5 paragraph 1).
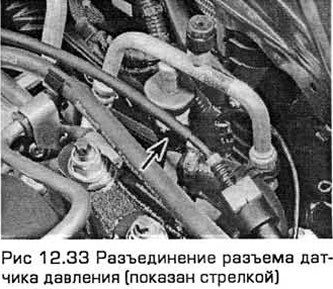
33. Disconnect the sensor electrical connector and unscrew it (see fig.12.33).
34. Installation - in the reverse order of removal. There is no need to recharge the system with refrigerant.
35. Removal, refilling and leak control operations should be carried out by the same specialist who emptied the system.
Visitor comments