Contents: Removal ↳ Rear cylinder head ↳ Front cylinder head ↳ Installation ↳ Front cylinder head ↳ Rear cylinder head ↳ Front and rear cylinder heads ↳
Removal
1. Disconnect the negative battery cable. Remove the battery and air cleaner for better access.
2. Drain the cooling system (chapter 1).
3. Remove the upper and lower sections of the intake manifold (Chapter 6).
4. Drain the engine oil (chapter 1).
5. Remove the MGR chains (paragraph 5). Note: If only one of the cylinder head covers needs to be removed, remove only the corresponding chain.
6. Temporarily install the right engine support and remove the lifting mechanism.
7. Remove the camshafts, hydraulic valve lifters and rocker arms (paragraph 12).
Rear cylinder head
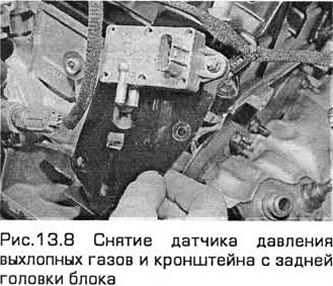
8. Remove the oxygen sensor from the exhaust manifold of the rear cylinder head (Chapter 4B). Unscrew the bolt of the rear engine lifting eye, as well as the exhaust gas pressure sensor and bracket (see Fig. 13.8).
9. Disconnect the EGR valve back pressure sensor hoses from the pipe connecting the EGR valve to the exhaust manifold.
10. Disconnect the wiring of the EGR valve back pressure sensor and the EGR unit.
11. Unscrew the fitting nut and disconnect the EGR valve pipe from the rear head exhaust manifold.
12. Loosen the clamps and disconnect the hoses from the cooling system connecting pipe located on the left edge of the cylinder heads. Remove the pipe from the front cylinder head and remove the O-ring.
14. Now you can remove the exhaust manifold of the rear cylinder head. It can also be removed together with the rear cylinder head, and then separated from it.
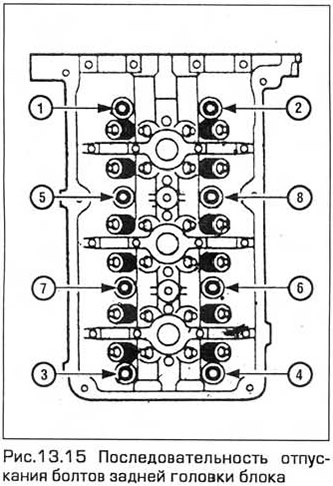
15. Loosen the cylinder head bolts one turn at a time in sequence (see Fig. 13.15). Remove them along with the gaskets. It is always recommended to replace the bolts after removal.
16. Remove the cylinder head with the help of an assistant (if possible), as it is heavy. Remove the gasket.
17. Unscrew the intake manifold bolts, remove it and remove the gasket.
Front cylinder head
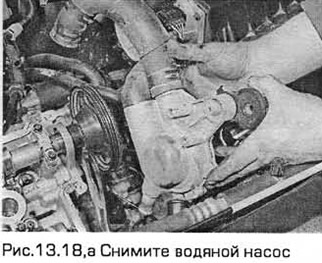
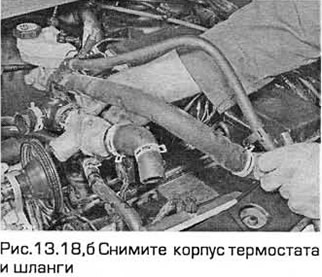
18. Remove the cooling system pump (Chapter 3). If necessary, remove the thermostat housing and hoses (see Fig. 13.18,a,b).
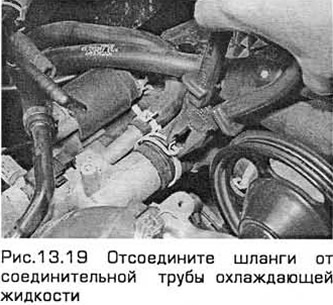
19. Loosen the clamps and disconnect the hoses from the coolant connecting pipe on the left side of the cylinder heads. Disconnect the wiring from the temperature sensors on this pipe (see Fig. 13.19).
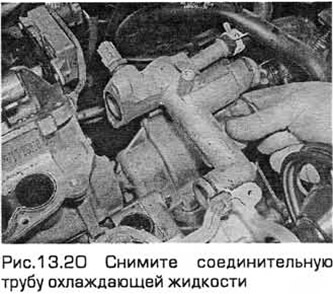
20. Remove the bolts and coolant connection pipe from the rear cylinder head. Remove the pipe from the front cylinder head and remove the O-rings. (See Fig. 13.20).
21. Loosen the clamp and disconnect the lower radiator hose from the elbow pipe of the front cylinder head. Then unscrew the pipe bolts.
22. Remove the engine oil dipstick.
23. Now you can remove the front cylinder head exhaust manifold. You can remove it together with the front cylinder head and then separate it from it. If you are removing the cylinder head together with the manifold, unscrew the air conditioning compressor bolts from the cylinder block and lean the compressor against the engine compartment bulkhead. Remove the oil filter as well. This will improve access when removing the exhaust inlet pipe from the engine compartment.
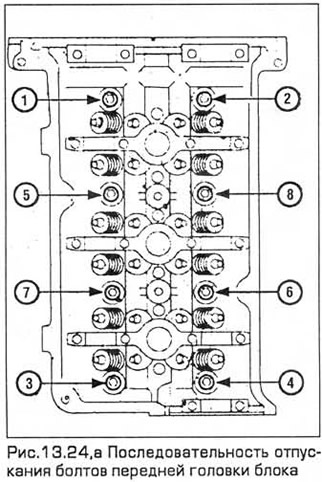
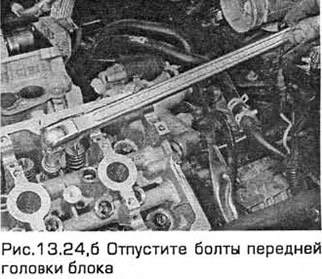
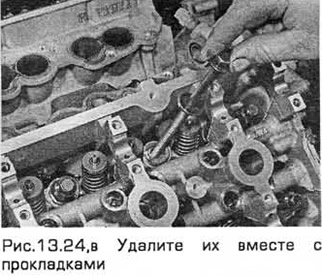
24. Loosen the cylinder head bolts one by one (see Fig. 13.24,a). Remove them together with the gaskets (see Fig. 13.24,6,c). It is always recommended to replace the bolts after removal.
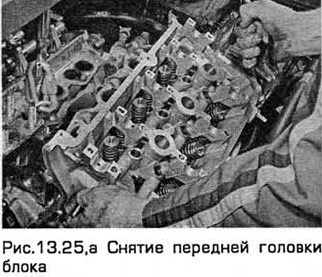
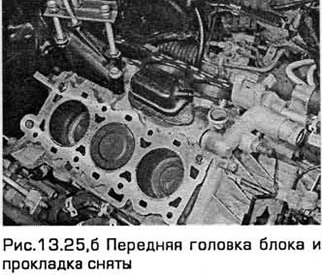
25. Remove the cylinder head with the help of an assistant (if possible), as it is heavy. Remove the gasket (see Fig. 13.25, a, b).
26. Unscrew the intake manifold bolts, remove it and remove the gasket.
Installation
27. Before installation, ensure that the mating surfaces of the cylinder head and block are perfectly clean. Use a hard wooden or plastic scraper to remove any remaining old gasket and traces of carbon deposits. Also clean the piston crowns. Avoid scratching the head, which is made of soft aluminum alloy. Make sure that carbon deposits do not get into the oil or coolant passages. Use paper and tape to plug the oil and coolant holes, as well as the bolt holes in the cylinder head. Clean all pistons.
28. Check the mating surfaces of the cylinder head and block for dents, deep scratches and other signs of damage. Minor defects can be removed with a file, but in case of significant damage, the damaged surface must be machined or the damaged component must be replaced.
29. If you suspect that the surface under the cylinder head gasket has warped, check it with the end of a metal ruler. If necessary, see Chapter 2B.
30. Clean the mating surfaces of the cylinder head and block. Make sure that the dowel pins are driven into the cylinder block and that the cylinder head bolt holes are free of grease.
Front cylinder head
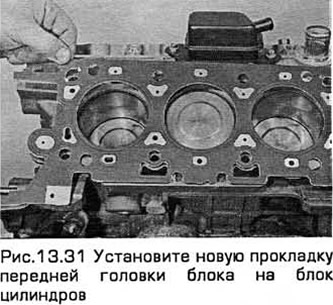
31. Install a new gasket on the cylinder block surface (see Fig. 13.31).
32. Clean the mating surfaces of the exhaust manifold and cylinder head. Then install the manifold together with a new gasket and tighten the bolts (paragraph 7). You can install the manifold after installing the cylinder head on the cylinder block.
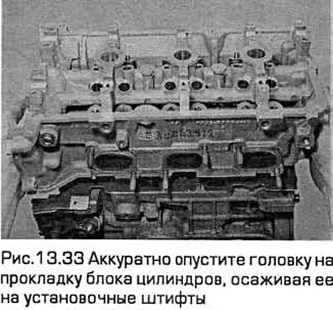
33. Carefully lower the head onto the cylinder block gasket, seating it on the mounting pins (see Fig. 13.33).
34. Insert the cylinder head bolts together with the washers and tighten them by hand.
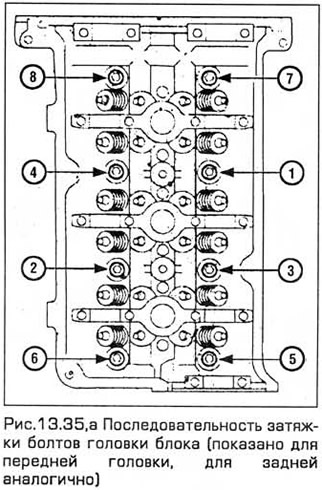
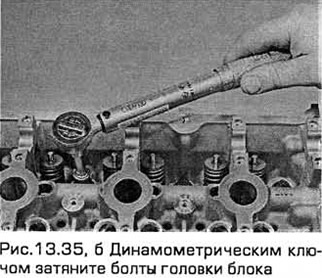
35. Using a torque wrench, tighten the cylinder head bolts in sequence (see Fig. 13.35, a, b) according to stage 1.
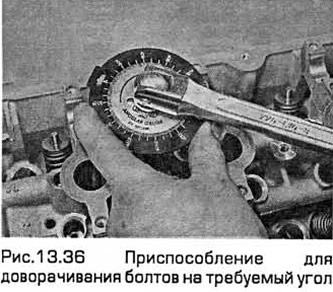
36. Tighten the bolts completely (see Technical requirements). Use the devices to tighten the bolts to the required angle (see Fig. 13.36).
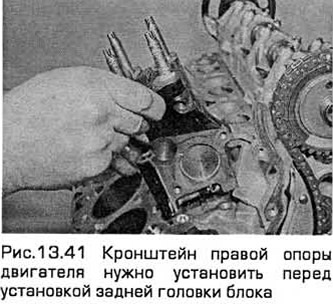
37. If necessary, install the exhaust manifold on a new gasket.
38. Insert the engine oil dipstick.
39. Install the elbow pipe with a new gasket onto the cylinder head and tighten the bolts. Disconnect the lower radiator hose and tighten the clamp.
40. Install the coolant connection pipe with new O-rings and a new gasket and tighten the bolts. Install the hoses and tighten the clamps. Connect the wiring to the temperature sensors, and then install the coolant pump (Chapter 3).
Rear cylinder head
41. Note: If you removed (during repair) the right engine support bracket, it must be installed before installing the rear cylinder head, since it will be impossible to do this afterwards (see Fig. 13.41).
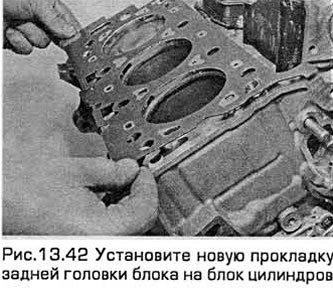
42. Install a new gasket on the cylinder block surface (see Fig. 13.42).
43. Clean the mating surfaces of the exhaust manifold and cylinder head. Then install the manifold together with a new gasket and tighten the bolts (paragraph 7). You can install the manifold after installing the cylinder head on the cylinder block.
44. Carefully lower the head onto the cylinder block gasket, seating it on the mounting pins (see Fig. 13.44).
45. Insert the cylinder head bolts together with the washers and tighten them by hand.
46. Using a torque wrench, tighten the cylinder head bolts in sequence (see Fig. 13.35,a) according to stage 1.
47. Tighten the bolts completely (see Technical requirements). Use the devices to tighten the bolts to the required angle.
48. If necessary, install the exhaust manifold on a new gasket.
49. Install the coolant connection pipe with new O-rings and a new gasket and tighten the bolts. Install the hoses and tighten the clamps. Connect the wiring to the temperature sensors.
50. Install the EGR valve pipe to the rear head exhaust manifold and tighten the connection nut.
51. Connect the wiring of the EGR system back pressure sensor.
52. Connect the EGR system back pressure sensor hoses to the pipe connecting the EGR system valve to the exhaust manifold.
53. Install the oxygen sensor on the exhaust manifold (Chapter 4B).
46. Using a torque wrench, tighten the cylinder head bolts in sequence (see Fig. 13.35,a) according to stage 1.
47. Tighten the bolts completely (see Technical requirements). Use the devices to tighten the bolts to the required angle.
48. If necessary, install the exhaust manifold on a new gasket.
49. Install the coolant connection pipe with new O-rings and a new gasket and tighten the bolts. Install the hoses and tighten the clamps. Connect the wiring to the temperature sensors.
Front and rear cylinder heads
54. Install the camshafts, hydraulic lifters and rocker arms (paragraph 12).
56. Raise the engine with a lift. Then remove its right support to install the timing chains and their covers.
57. Install the MGR chains and their covers (paragraph 10). Install the engine support and remove the hoist.
58. Install the upper and lower sections of the intake manifold (paragraph 6).
59. Install the battery and air cleaner if they were removed. Reconnect the negative battery cable (Chapter 5, paragraph 1). Note: To restore the engine management system settings due to the battery being disconnected, a mileage of approximately 16 km is required. In this case, the engine may not operate quite normally.
60. Top up the engine with oil (chapter 1).
61. Fill the cooling system with liquid (chapter 1).
62. Start the engine and warm it up to normal operating temperature. Check connections for oil or coolant leaks.
Note: Engine operation may not be completely normal after the battery is disconnected.