Contents: Removal ↳ Installation ↳
Note: See warning at beginning paragraph 15 on careful handling of brake fluid.
1. Raise the front and rear of the car and place supports underneath them.
2. Inspect the pipe connections for leaks. Inspect the hoses for cracks and abrasions.
3. Inspect the brake lines for corrosion, dents, or other damage. Corrosion can be removed by scraping the pipe, but if there is significant pitting, the pipe should be replaced. Such defects are especially likely on lines that run under the car.
4. Replace defective pipes and/or hoses.
Removal
5. If you need to remove a section of pipe or hose, you should first minimize leaks. Place a thin film under the tank lid and tighten the lid. Alternatively, you can pump out the liquid from the tank (paragraph 11).
6. To remove a section of the pipeline, unscrew the nut of the fitting on the pipeline side. At the same time, hold the nut of the fitting connected to the hose pipeline with a wrench to prevent it from turning. Pull out the pipeline. Unscrew the nut on the other end of the pipe in the same way. Then release the pipe from the clamps connecting it to the bottom and remove the pipe (see Fig. 14.6, a, b).
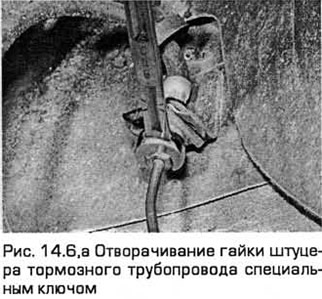
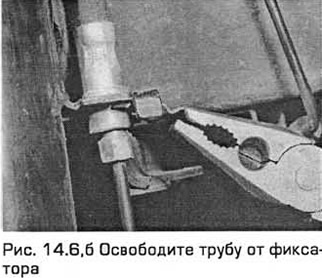
7. Some nuts are difficult to unscrew, especially in open areas exposed to moisture. Therefore, to unscrew them, it is better to use a special key for brake pipe nuts, which covers all surfaces of the nut. If you do not have such a key, you can use self-tightening pliers.
8. To minimize fluid leakage when disconnecting the flexible hose from the pipe, clamp the hose as close to the pipe as possible using a brake hose clamp.
9. To remove the flexible hose, first clean the ends of the hose and the adjacent surfaces. Then unscrew the nuts of the fittings at the ends of the hose. Remove the elastic retainer and pull the hose out of the support with teeth in the support bracket. Where necessary, separate the hose from the caliper.
10. Brake pipes have flared ends and nuts. Such pipes can be purchased separately or in a set. After that, the pipe must be bent, using the old pipe as a sample.
Installation
11. Installation - in the reverse order of removal. Make sure that all pipes are secured and that the hoses are not kinked. Check: the hoses should be routed away from all suspension components and underbody fastenings.
12. Finally, remove air from the hydraulic system (paragraph 15).
(For more information, please visit the website: FordBook)