Note: Before you begin, you must purchase the necessary spare parts (seal repair kit). Also note that if the pads are dirty due to leaks from the wheel cylinder, they must be replaced. The entire set of pads on both brakes must be replaced, even if only the brake on one side is dirty.
Removal
1. Remove the brake drum (paragraph 5).
2. To minimize fluid leaks, remove the reservoir cap, place a piece of plastic underneath it, and tighten it again to create an airtight seal. Another option is to clamp the brake hose (near the wheel cylinder) with a clamp.
3. Pull the brake shoes by their upper ends so that they do not interfere with the removal of the wheel cylinder. The automatic adjuster will hold the shoes in this position so that the cylinder can be removed.
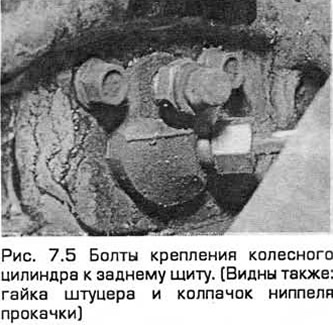
4. Wipe away any dirt around the nipple on the back of the wheel cylinder. Then remove the nipple nut.
5. Unscrew the two bolts securing the wheel cylinder to the rear shield (see Fig. 7.5).
6. Remove the wheel cylinder from the rear shield, freeing it from the pads. Plug the holes in the connections to prevent dirt from getting in and to minimize fluid leaks when disconnecting the cylinder.
Repair
7. Clean the outer surfaces of the cylinder. Unscrew the hydraulic system bleed nipple.
8. Carefully remove the dust cover from both ends of the cylinder.
9. Tap the cylinder against a wooden block to release the pistons and seals. Then remove the spring.
10. Clean the pistons and cylinder with methyl alcohol or clean brake fluid. Do not use gasoline, kerosene or other mineral-based fluids for cleaning. Remove and discard the old seals, taking into account which side they were installed on.
11. Inspect the piston and cylinder surfaces for rust or scoring. If such signs are found, the entire wheel cylinder assembly must be replaced.
12. Lubricate the first piston with brake fluid. Then install the new seal so that the working edge is directed away from the end of the piston that contacts the brake pad.
13. Insert the piston into the cylinder. When inserting the seal into the hole, rock the piston back and forth so that the edge of the seal does not stick.
14. Insert the spring. Then install the other piston and seals in the same way so that the edge does not stick when inserted into the hole.
15. Install new dust covers into the piston grooves and wheel cylinder housing.
16. Install the bleed nipple.
Installation
17. Wipe the backplate and remove the plug from the end of the pipe. Install the cylinder on the backplate and screw the nipple nut on by hand.
18. Tighten the mounting bolts. Then tighten the nipple nut completely.
19. Shorten the automatic adjuster so that the brake shoes engage with the wheel cylinder pistons. To do this, slightly spread the shoes by turning the adjuster, shorten it to the minimum and release the shoes.
20. Remove the brake hose clamp or remove the plastic film from the reserve tank.
21. Install the brake drum (paragraph 5).
22. Bleed the hydraulic system (paragraph 15). Provided that precautions have been taken to minimise leaks, only the relevant rear brake needs to be bled.
23. Before resuming driving, check the brakes thoroughly.