CVH Engine Timing System
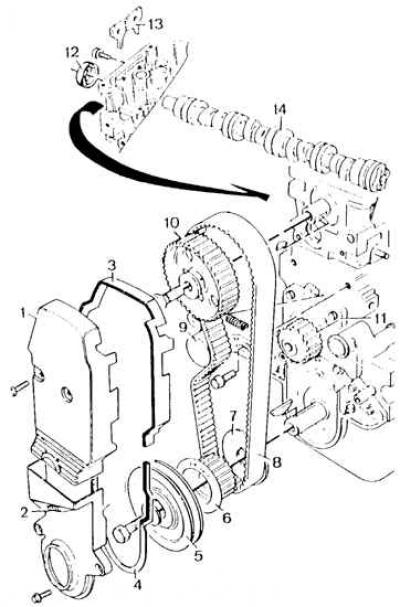
1 - Upper timing case, 2 - Lower timing case, 3, 4 - Gaskets, 5 - Crankshaft V-belt pulley, 6 - Crankshaft toothed pulley, 7 - Timing belt guide disk, 8 - Timing belt, 9 - Timing belt tensioner, 10 - Camshaft pulley, 11 - Coolant pump pulley, 12 - Camshaft sealing ring, 13 - Mounting plate, 14 - Camshaft
Installing the valve timing of the CVH engine
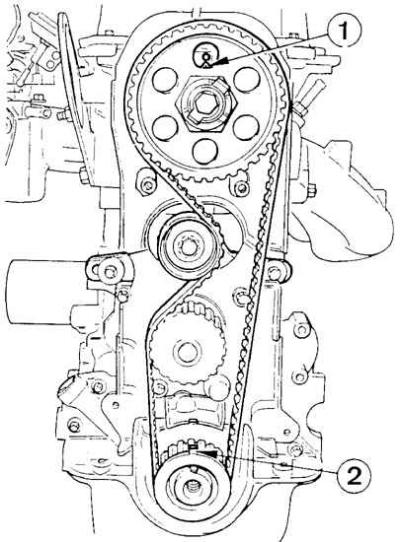
1 – camshaft timing marks,
2 – crankshaft timing marks
CVH engine cylinder head
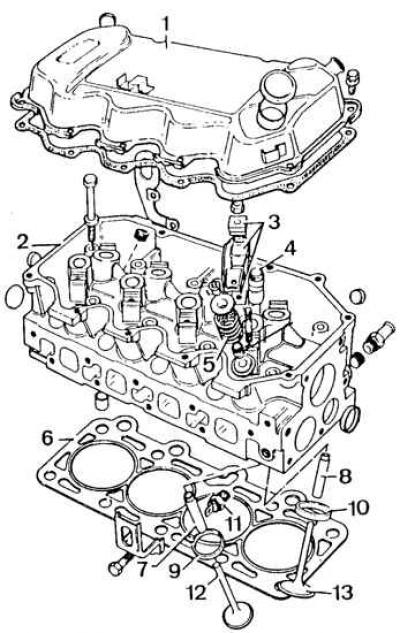
1 – cylinder head cover, 2 – cylinder head, 3 – valve lever, 4 – hydraulic tappet, 5 – valve spring, 6 – cylinder head gasket, 7, 8 – valve guides, 9, 10 – valve seats, 11 – coolant temperature sensor, 12, 13 – valves
CVH engine cylinder block
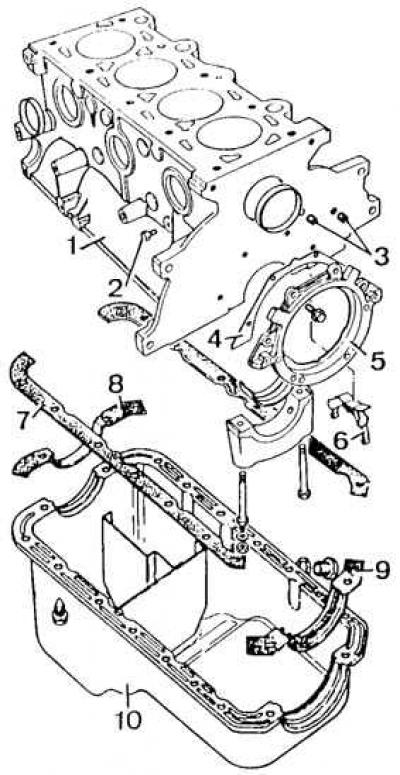
1 – cylinder block, 2 – coolant drain plug, 3 – oil channel plugs, 4 – gasket, 5 – rear cover of the cylinder block, 6 – oil separator in the crankcase ventilation system
Removal the timing belt
1. Disconnect the ground wire from the battery.
2. Remove the alternator drive V-belt.
3. Disconnect the ignition system electrical wiring harness, remove the high-voltage distributor, distributor rotor and distributor holder (see Fig. CVH engine timing system).
4. Remove the timing drive cover.
5. Turn the crankshaft until the mark on the camshaft pulley is aligned with the mark on the cylinder head (1) (see Fig. Setting the valve timing of the CVH engine).
6. Loosen the timing belt tensioner locking bolt. Move the roller to the left and tighten the locking bolt.
7. Remove the timing belt.
Adjusting the valve timing and installing the timing belt
1. Set the mark on the camshaft pulley opposite the mark on the cylinder head (1) (see Fig. Setting the valve timing of the CVH engine).
2. Turn the crankshaft until the mark on the crankshaft pulley (2) is aligned with the mark on the oil pump housing.
3. Insert the tensioner spring, tensioner and lock it in the position all the way to the left.
Attention! This spring is not installed at the factory, the toothed belt is tensioned using a special device. After loosening the tensioner, it is necessary to install the spring to ensure the correct tension of the toothed belt.
4. Install the timing belt starting from the crankshaft pulley in a counterclockwise direction.
5. Unlock the tensioner so that its roller tensions the toothed belt.
6. Perform two full turns of the crankshaft in a clockwise direction and align the mark on the camshaft pulley with the mark on the cylinder head.
7. Lock the crankshaft (engage the gear and tighten the handbrake lever) and rotate the camshaft counterclockwise using a torque wrench with a 41 mm head (through a 1/2"–3/4" reduction element).
Attention! A 41 mm head is required because the camshaft cannot be rotated by the bolt that secures its pulley.
8. Hold the camshaft with a torque of 23–30 Nm and tighten the timing belt tensioner with a torque of 23–30 Nm (first the bolt on the right side).
9. Check whether the installation signs have been modified.
10. Disengage the gear and handbrake.
11. Turn the crankshaft two revolutions in the direction of its working rotation, then recheck the position of the installation marks.
12. Install the timing case cover.
13. Install the ignition distributor and high voltage wires.
14. Install and tighten the alternator drive V-belt.
15. Connect the battery.